
Translated by Nick R
As the excellent potter you are or want to be, you would be keen to know and apply all the existing techniques to decorate your ceramic pieces. Nowadays, there are all kinds of decoration techniques for ceramics, from the most ancient to the ones done when the clay is raw, that is to say, not fired.
Today, we will show you 5 decoration techniques that you can apply to your pieces right after firing them in the kiln. We assure you that you will love them, so without further ado, it’s time to get started!
Table of Contents
Glazing
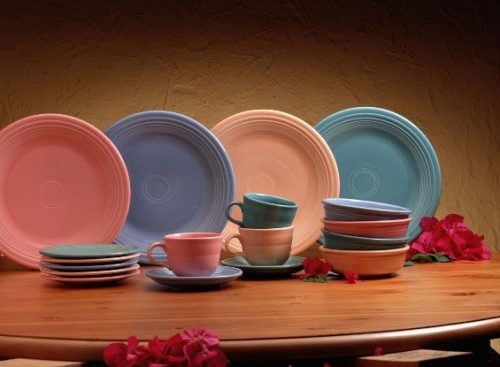
The first decoration technique we would like to show you is glazing. This is one of the most used and well-known techniques; nowadays, thanks to all the advances, you can find in the market different types of glazes for glazing your objects as you like.
However, know that it can be a bit difficult to do, although, with a lot of practice, you will master the different ways of glazing ceramics that exist. As we told you before, nowadays, there are several techniques to glaze your ceramics, and we will teach you the simplest one, which is with brushes.
Don’t forget that, for more information about other ways of applying glaze, we invite you to read our blog on ceramic glazing.
Materials you will need
- Ceramic glazes of the colors of your choice
- Brushes of different sizes and tips
- Two small containers (preferably plastic)
- Wooden or metal table or base to get dirty
- Apron
Step by step
Now that you know the materials you need to glaze your pottery, we will show you the most usual way to glaze pieces with a brush.
Step 1: Before you start, put on your apron to avoid getting dirty. Also, make sure to wear comfortable clothes so that you will not hesitate to get dirty.
Step 2: Put some water in one of the plastic containers to put the brushes in after using them.
Step 3: In the other plastic container, mix water with the glaze to be used on your piece.
Some glazes come already prepared for use; however, others need to be mixed with a certain amount of water. Remember to ask your glaze retailer for this information.
Step 4: Apply the glaze to the piece using your brush. Always paint in the same direction so that no lumps are left, and thus, the workpiece looks perfectly smooth.
You can make figures or drawings with fine-tipped brushes. But remember to wait until the base coat you applied is almost dry.
Step 5: Once you have finished your piece, put it on the table or a firm shelf to dry.
Inlay
The inlay technique consists of adding earth or materials, such as quartz, ground, or stone, for providing a different texture and appearance to the clay pieces.
This technique is very rarely practiced and known. It is also one of the most complicated if you do not know how it is done. But that is not a problem, because here, we will explain how to apply it.
Materials you will need
You will need the following materials to apply this technique to your pieces.
- Glazes or ceramic engobes
- Brushes
- Earth, quartz, feldspar, or ground or stone chamotte.
- Metal or wooden table or shelf
- Apron
- Two sponges
- Water
- Plastic container
- Tweezers
Step by step
Step 1: Before you start, put on your apron to avoid getting dirty.
Step 2: Right after you take the piece out of the kiln, with the help of a brush, apply glaze or ceramic engobe in any color of your choice. Make sure to do this evenly; that is, in the same direction.
Step 3: While the glaze is still fresh, apply the earth or material of your choice to the desired parts of the piece; like forming a pattern. You can do it with a brush or tweezers in case of using stones, making sure they are well embedded in the glaze.
Step 4: After the previous step, dip one of the sponges in water and wring it into the plastic container.
Step 5: Wipe the walls of your piece with the wet sponge, except where you applied the soil or stones. This will serve to clean your work and highlight the incrustations of the materials you added before.
Keep in mind that you should do this when the glaze is almost dry, or you could damage the glaze layer(s) you applied.
Step 6: Finally, rub the dry sponge left all over the piece, except for the parts where you inlaid the materials. You must rub the sponge until you recover its shine.
However, this step is optional: you can keep a natural and opaque finish on your piece if you wish.
Smoke-firing
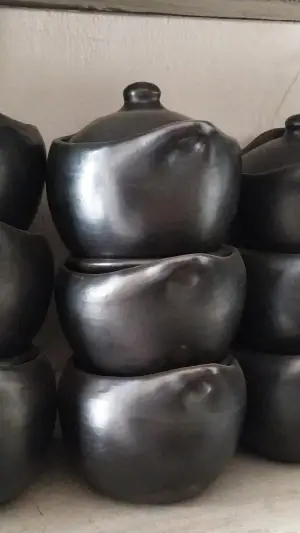
The smoking technique has been in use for many years, and its purpose in decoration is to change the reddish color of the piece after firing.
Smoking is done by using materials such as newspaper, rice husks, or other types of fuel during the firing of the clay pieces. Interestingly, this technique is used traditionally to make Colombian ¨chamba¨ pottery. This may seem a little difficult, but here we explain what you should do to make a perfect piece.
Materials you will need
- Ceramic kiln
- Sponge
- Newspaper, rice husks, sawdust, mango leaves, etc.
- Wooden shelf or table
- Water
- Wooden or metal table
Step by step
Follow in detail the instructions below to get a good smoking result on your pieces.
Step 1: Let the modeled piece dry before putting it in the kiln.
Step 2: Put the fuel you will use to change the color of your piece.
Regarding this, before we continue, let us clarify that if you want your object to turn brown, you need to put the leaves gradually, which is possible if you have a homemade kiln where you can place the paper underneath and light it on fire.
In case you have an electric kiln, what you should do is to put the amount of paper you consider necessary for getting the color you want to your piece. But, how do you know how much paper to put in? Keep reading.
If what you want is a brown or caramel color, add at least 3 to 4 layers of paper, mango leaves, sawdust, or whatever you want to add. Alternatively, if you want the piece to be totally black like Chamba, you need to add at least 5 to 6 layers of rice husks, sawdust, or whatever you prefer.
How big should they be? You may ask. It is actually not very complicated because, when we say “layers”, we mean piles of these materials which should be about the size of two soccer balls each.
Remember that you only do this if you have an electric or gas kiln. If you have a homemade kiln, you may put the same amount just under the piece as you see that the fuel burns and runs out.
Step 3: Then, put your piece in the kiln; the temperature to which you should expose it must be at least 900 °C.
However, do not forget to ask your supplier for the maximum temperature limit for your clay. If you overcome it, you can break or burn your piece and damage the whole process that you carry so far.
Step 4: Once the piece is ready, let it cool down in the oven.
Step 5: If it is cool, take it out of the kiln, and you will notice that it has the color you wanted from the beginning.
Step 6: By this point, your piece will be completely dry, so you need to wash it with a sponge and plenty of water next to remove the traces of soot.
And as we do not want to leave you with doubts here, we will briefly clarify what soot is. This is a greasy substance that sticks to the pieces after burning with fuels such as leaves and paper, which you will use in this technique.
Step 7: To finish, let your piece air dry on your table in your ceramic workshop.
Sanding
Sanding is a little-known decoration technique for ceramics, yet it produces a unique effect on the clay pieces.
It consists of sanding the piece after firing to cause a worn effect on its outer walls or, conversely, to make them thinner and smoother.
Yes, sure, we know, it may sound weird, and you may be thinking it will look, but we assure you it’s just a different artistic touch.
Materials you will need
The sanding technique is so simple that you only need the following 5 materials.
- Wood or metal table
- Sandpaper number 150 or higher (you can get it at any hardware store near you and for an affordable price)
- Soft tip paintbrush
- Water
- Sponge
Step by step
As we explained before, the sanding technique can produce two different effects, so we will explain the process for each one of them.
Let’s start with the simplest one to provide a smoother and thinner effect to the piece.
Step 1: Cut a piece of sandpaper of the size you feel comfortable working with.
Step 2: Having your piece dry, start rubbing the sandpaper all over your object. You need to apply a little force when doing it.
If there are parts that should stick out, such as the eyes or nose of an animal, we recommend sanding where the piece is to be smooth only and not over the details, or you could damage them.
Another key to knowing whether you are sanding your piece properly is to touch it with your fingertips to feel as it gets smoother and softer, and therefore identify the parts that need to be sanded.
Step 3: As you continue sanding, help yourself with a soft dry brush to remove the remaining dust.
Step 4: Continue sanding until the whole piece has the same texture.
Be careful not to sand excessively, or the walls of your piece may become very thin and light, and could break easily just by falling sideways on a pillow.

Step 5: Once you have finished sanding and dusting, dip the sponge in water and wring it out, and run it all over your piece.
Step 6: Let your piece dry, and that’s it. Leave it with its natural color or paint it as you like. Easy, isn’t it?
Now, we explain the step-by-step procedure for creating a worn effect on your piece with the sanding technique.
Before starting, you need to be aware that this technique requires your piece to have very thick walls and also that this type of object is used only as decoration.
Step 1: Cut a sandpaper piece of a size that is easy to handle.
Step 2: Start sanding only on certain areas of the piece. Make sure these bits get more sunken than the walls of the object. They also may be wide apart or not much apart from each other. So do them as you like.
Step 3: Using a soft-tipped dry brush, remove the dust resulting from sanding.
Step 4: Continue sanding the cavities until you see a big difference between the original walls to the sanded parts.
Remember that the sanded areas should be sunken and divided by a thin line, as thick as the original figure. So don’t be afraid to sand until the sinks are thick as a ceramic cup.
Step 5: Now, wet the sponge and wring it out to run it all over your piece and see how it looks.
Step 6: Let it dry on the table outdoors, but not in direct sunlight, and you can paint it if you want.
If you choose to paint it, we advise you to use colors like brown, black, white, and dark yellow to highlight the worn effect or make it look antique.
So, before showing you the result, we would like to share one of this technique’s advantages with you; you can do it after or before the firing. We suggest trying both ways and practicing whichever one is easier for you.
Of course, if you do it before the firing, make sure your piece is in leather hardness; that is to say, it is about to dry but still feels a little damp to the touch.
In the following image, we show you the result of this technique. As you can see, there are some cracks right in the middle, which can be achieved in two ways. The first one, by using a crackle glaze, and the second one, by leaving some dust from the sanding, which when painted, besides creating a similar effect, gives a different texture to the piece.
However, if you want to achieve this same effect, we recommend using crackle glazes. You just need to apply your glaze and, as soon as you are done, start blasting with a hot air gun the part where you want to achieve this effect. Almost immediately, you will see how the paint starts crackling until you get the desired effect.
Reserving
The reserving technique is one of the least known ways to decorate ceramic objects, and for this reason, very few ceramists practice it.
Reserving is very curious because its purpose is to change the color of the clay during or after firing, but at the same time, to leave certain parts of the clay’s natural color. And how is this done? We’ll show you how.
Materials you will need
To make this decoration technique you need the following materials:
- Kiln for ceramics
- Liquid Barbotine
- Newspaper, rice husks, sawdust, mango leaves, etc.
- Paintbrushes
- Glazes
- Adhesive tape of the thickness of your choice
- Sponge
- Water
Step by step
Now we will explain the two ways in which you can perform this technique on your ceramic pieces. We start with the one that takes the longest and can be done during the firing process.
Step 1: To begin with, once your piece is ready to be placed in the kiln and fired, apply liquid barbotine with a brush; you can use it to form patterns of figures or whatever your imagination leads to.
Keep in mind, that the drawings you make will be marked at the end of the whole process.
Step 2: Now, introduce the kiln fuel, that is, the husks or newspaper used to smoke your piece.
Follow the steps explained on the smoke-firing technique at the top of this blog.
Step 3: When finished cooking your piece, let it cool off inside the kiln; if you take it out hot, it may crack.
Step 4: Take the piece out of the oven once it is cold.
Step 5: Next, wash the piece with plenty of water and a sponge; the barbotine that you applied before firing will fall off. In addition, by doing so, you will also remove any grease that may have remained on the walls of the piece.
Step 6: Finally, lay it on your table to dry in the open air, but not in direct sunlight. As a result, you will have a smoky brown, caramel, or black piece with bits of the original clay color.
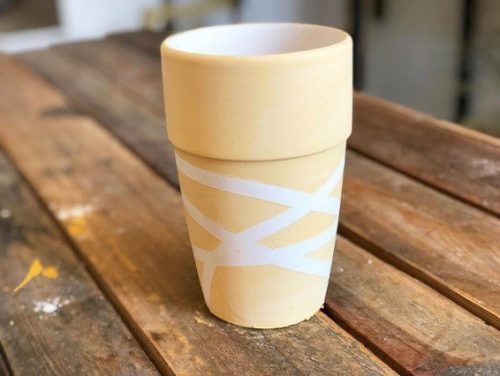
Finally, we will explain the step-by-step for you to do this technique easily, after firing the piece, using glazes and adhesive tape.
Step 1: Paste masking tape strips on its walls after firing the piece. Make sure to form the pattern you want so that, in the end, these lines will highlight the decorative design of your object.
One tip is to tape the last bit of tape underneath the piece so that peeling it off at the end would be much easier.
Step 2: Once you stick the tape in the shape you want, it’s time to paint the piece. For this, help yourself with a paintbrush, and remember to always paint in the same direction.
Choose any color of glaze you want for painting your piece. Here’s an idea: thanks to the tape stripes, you can paint each space with a different color or with two different colors in between. Don’t limit your imagination!
Step 3: Let the piece dry very well; it can take hours. You should dry it in the shade, in other words, in a cool place outdoors.
Step 4: As the piece is dry, start removing the tape from the one that you glued on the bottom of the piece.
If you want, apply a clear glaze all over the object to make it smooth and even. Do it with another brush.
Just then, you will see how the stripes kept the natural color of the clay. You will definitely love the end result.
So, with this tutorial, we end up today’s blog about decoration techniques for after-fired clay. We hope you liked it and that every procedure was as clear as possible.
Before leaving, if you are interested in knowing other decoration techniques for ceramics, here are some options you might like.
- 10 ceramic decoration techniques from ancient times
- Decoration techniques for raw clay
- Decoration techniques to modify ceramics
- Stamps to decorate ceramics
- 6 techniques to texturize your pottery
We invite you to practice the technique you liked the most today. Do not be discouraged if it does not come out perfectly the first time, because, like in any process, you need a lot of practice and patience.

