
Translated by Nick R
Are you an enterprising and creative person who loves crafts and making things with your own hands? Are you looking for an explanation of how you can make your own tools like the potter or ceramist that you are? We have great news for you. This blog is for you!
Today, we are going to show you, step by step, how you can build your own potter’s wheel, as well as what materials you need and where you can get them. It’s time to get started!
Table of Contents
How to build a potter’s wheel?
To begin with, we will show you how to build your own potter’s wheel. Remember that this is, par excellence, the tool of any potter around the world. How could it not be? Most of the pieces are made in it, after all.
The materials you need
Here is a list of the materials you need to make your own potter’s wheel. You should know that these can be obtained at any hardware store or online store specializing in this type of products.
- 2 cut pieces of wood measuring 2 ft. long X 6,6 in. high
- 2 wood pieces measuring 1 ft. long X 6,6 in. high
- 2 wood pieces measuring 2 ft. long X 1 ft. wide
- Drill or electric screwdriver
- 26 1/2-inch wood screws
- Plastic tub or bucket for lathe
- Wooden wheel of 2 in. diameter with a hole in the center of 1,1 in. in diameter
- All-purpose white silicone
- Motor of at least 12 volts
- A metal support
- 4 metal quarter screws with nut and washer
- Hammer
- 8 in. diameter wooden plate
- Scissors
- Metal rod
- 4 6×1 screws
- 2 wooden circles of 1,5 in. in diameter with a 0,16 in. hole in the middle
- 2 wooden circles of 8,6 in. diameter with a 0,19 in. hole in the middle
- 1 thin wooden circle of 1,1 in. in diameter with a hole in the center of 0.19 in. diameter
- 1 thin wooden circle of 8,25 in. diameter with a hole in the center of 0,19 in.
- 2 wooden circles of 2,3 in. diameter
- Small switch (to your liking)
- Coaxial cable
- A strap from a washing machine
Step by step
Here is a step-by-step explanation of what happens in the video to guide you through the process.
The box
Step 1: the first thing you have to do is take the 2 pieces of wood (2 ft. long X 6,6 in. high) and the other 2 pieces of wood (1 ft. long X 6,6 in. high).
Step 2: place the 2 pieces of wood (2 ft.) facing each other, the same as the other 2 pieces of wood (1 ft.). By doing this you will form a sort of rectangular box or crate.
Step 3: attach the pieces with screws using a drill or electric screwdriver. We advise you to put 1 screw in each corner to join the sides properly and avoid an unstable box.
Step 4: now, also join one of the other two pieces of wood 2 ft. long X 1 ft. wide. They will serve as the base and lid of your box. For now, only glue the one on top.

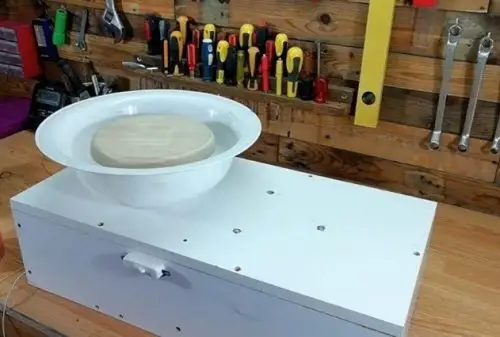
The basin
Step 1: now that the box is ready, measure the plastic basin on top of it; it needs to be on one side of the box, not in the center.
Remember that the basin is the plate or plastic bowl below the lathing wheel that collects the clay that falls from the wheel.
Step 2: open up a hole on top of the box into which the lathe axle will fit. As a guide, keep in mind that the basin should have a hole in the middle, so mark it with a pencil.
Step 3: put the basin back on top of the box and screw it to the drawer with three screws placed in an equilateral triangle, as you can see in the image.

Step 4: take the small wooden wheel and glue it with silicone just around the hole where the lathe axle will go through. This will prevent the water and clay that falls into the basin from getting into the motor.
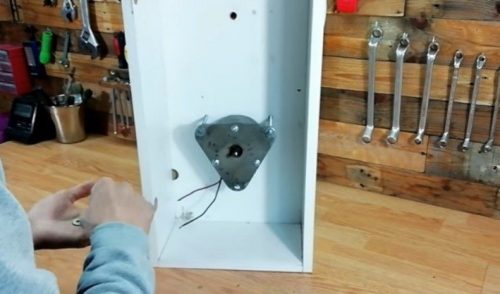
The motor, wheel, and lathe axle
Step 1: use the metal bracket to mark where the motor will be mounted. It must not go below to where you glued the basin, but next to it, glued under the lid of your box.
Step 2: for the motor, draw three holes with a pencil, or however many the metal bracket has. Next, open the holes with a drill.
Step 3: next, hammer in the 1/4″ metal screws from the outside of the box lid towards the bottom.
Step 4: place the motor with the metal bracket underneath and secure this joint with the nuts and washers.
Step 5: draw the circumference of the 7,8″ diameter wooden plate on a piece of newspaper and cut it out.
Step 6: put the paper circle over the wooden plate and find its center.
Step 7: when located, mark it with a gouge and remove the piece of newspaper.
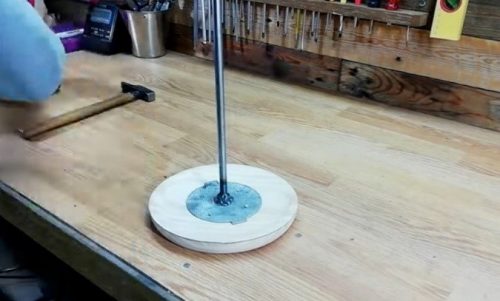
Step 8: now you make the lathe axle: take the metal rod and weld it to the round metal base. Use a welder to fix them together.
In case you don’t have this device, you may either go to a carpentry shop or ask for help from someone you know who does this job.
Step 9: drill four holes in this base and screw it to the wooden circle using the four 6×1 sheet metal screws. It must be centered.
Step 10: take the 2 wooden circles (2,3 in.) and open 2 holes facing each other. Then, open a slightly larger hole in the center of the two circles, about 1 cm thick.
Step 11: insert the lathe axis, or in other words, the wooden circle with the metal rod through the hole in the middle of the basin. You must insert it from top to bottom so that the wooden plate rests at the top, right in the middle.
Step 12: pass one of the two wooden circles through the rod; inside the box, and screw it to the box lid.
Step 13: cut a wooden board to the size of the inside width of the box.
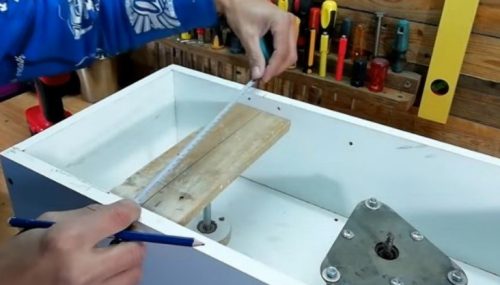
Step 14: find the board’s center and screw the other 1,5 in. wood circle to it.
The pulleys
Step 1: glue the 1,1 in. wooden circle in between the two 1,5 in. thin wooden circles; like a sandwich. Use the multipurpose white silicone to help you. This will be one of your pulleys.
Step 2: insert through the circles’ hole the 1/4″ screw and secure it at the end with the nut and washer.
Step 3: repeat steps 1 and 2, but this time with the 8,6 in. and 8,25 in. diameter circles. That will be the other pulley.
Step 4: open two small holes for the switch. They have to be spaced apart, that is, the same size as the switch you plan to put in.o
We advise placing the switch at the front of the box, below the wheel.
Step 5: on the side, open another hole, cross the cable through it, and then through the two holes you opened before.
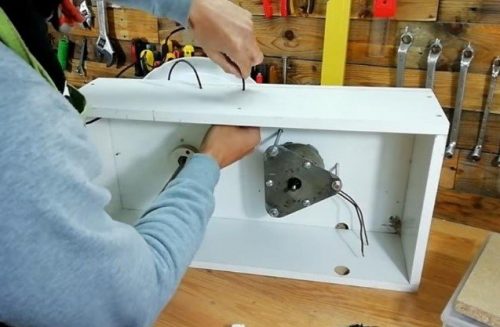
Step 6: plug the cable into the motor. If you don’t know how to, we suggest you ask for help from an electrician, and while you’re at it, ask him to leave the switch on.
Step 7: now, inside the box, just above the motor, place the smallest pulley and push it with the hammer. Do not forget to apply multipurpose silicone to adhere it to the metal base.
Step 8: make a hole in the middle of the large pulley, that is, through the thick circle, and insert a screw that protrudes.

Step 9: then, through the inside of the box, insert the pulley through the metal rod of the lathe shaft. Make sure it is tight and does not slip.
If it slides, sand the metal rod a little to place the screw that will help to keep the pulley steady.
Step 10: put a piece of washing machine string around the large pulley and glue the ends together. It must not be glued to the pulley as it also has to go around the smaller pulley.
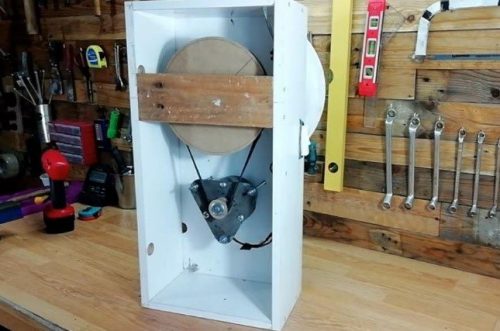
Step 11: remember the board you made in step 13? It’s time to glue it in such a way that the wooden circle glued on the board stays against the big pulley.
Step 12: to make it stable, screw it on both ends using 4 1/2-inch wood screws, to be more specific, 2 on each side.
Step 13: to finish, seal the box. Screw the base of the box as you did at the beginning with the top.
Step 14: at this point, your potter’s wheel should spin and turn perfectly when you press the switch. Congratulations, you’ve built your very own potter’s wheel!
So that’s the end of this blog. Did you like it? Are you ready to start building your own potter’s wheel? We are ready. Go ahead and set up your own potter’s wheel to keep practicing all the techniques for making pottery and discovering all the pieces that can be made on it.

