There are several techniques for modeling ceramics:
- Handmade
- With potter’s wheel
- Casting technique
Each has its difficulties, advantages, and disadvantages.
Table of Contents
Types of hand modeling techniques
There are 3 types of hand modeling, namely:
- Pinching
- Coiling
- Slab
If you want to produce a large number of identical pieces, none of these methods are suitable.
However, containers, particularly open vessels, e.g. B. Make cups or plates. No tools are required and the process is simple, making these methods ideal for beginners in the world of ceramics.
Pinching technique
With the squeezing technique, the clay is shaped by direct pressure with the hands and fingers, usually the thumb, index, and middle finger. The technique is very intuitive, easy, and quick to learn.
This technique can be used to create open forms such as mugs, plates or pots of various shapes.
How to make a mug using the pinching technique
- First, you should knead the clay well with a little water so that no air bubbles remain that can cause damage.
- Form the clay into a ball with your palms.
- With your free hand, poke a hole in the center of the ball. It’s important not to press too hard as you should only get a shallow hole. By no means should the clay be pierced unless you want to make a doughnut and not a cup.
- Once the hole is about 1/2″ deep, push the clay outwards from the center to enlarge the hole.
- Squeeze the clay from the bottom to the mouth of the piece and slowly turn it over in your hand so that all the walls are the same height and thickness. Use your fingertips to give the shape you want while holding the piece with your other hand.
- To ensure that the piece has no flaws, that no parts are machined more heavily than others, and that the opening of the cup is straight, you can place your piece on a table. This way you can see if the cup is standing upright and if one side is higher than the other. You determine how thick or how high the walls should be.
- Once the shaping is complete, bake at 800°C to 1,200°C for about 2-3 hours.
- Once cool, you can decorate your work with Rosetta or Produart acrylics or any other painting technique you like.
You can use the same steps to make any ceramic shape, not just mugs. All you need is all your energy and creativity!
Advantages
- Since it is a manual process, you can choose whatever shape you want.
- The only thing that affects the end result is the handling of the pottery between your hands and not the speed of the potter’s wheel.
- Imperfections are easier to touch up because you can fix them instantly with your fingers and adjust the ceramic as desired.
Disadvantages
- As a beginner, if you hold the clay in your hands for too long, it will heat up and lose its moisture and plasticity. However, you can dampen your hands with a little water so they are the right temperature for ceramics and you’re good to go.
- If the clay cracks, it’s because it dries out, making it more difficult to work with.
- Sometimes it’s a bit difficult to implement your ideas.
Is this technique recommended?
If you’re just starting out in the big world of ceramics, this is the perfect place to start! You don’t need any tools and you don’t need a kiln either, just some clay, water, your hands and a lot of patience.
Coiling technique
You might be wondering why the technique is called like that. This is because we need to give the clay the shape of a cylinder or, to make it easier to understand, that of a sweet roll that we eat in Spain and Latin America.
All kinds of objects or figurines can be made with this technique, from plates for the kitchen to vases of various shapes.
It is based on assembling the rolls of clay to then give the piece the desired shape.
How to make a vase using the rolling technique
- First, you need to create a base. Since we want to make a vase, for example, we have to form a circle out of clay rolls on which we will later place the other rolls. The rollers that form the bottom of the vase should be a little thicker than the next ones that we will gradually attach to the growing wall because that way the bottom will be stable from the start.
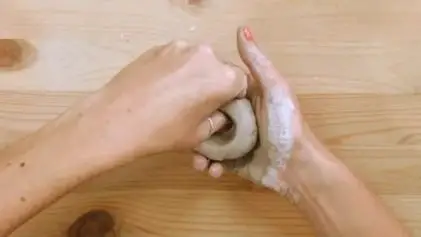
2. To form the rolls, take a piece of clay and start moving it back and forth on a table with your palms.
This step is crucial, so here are some recommendations:
- Remember to always work with your palm and not your fingers so that the rolls have the same shapes.
- The movement should not only be forward and backward but also outward from the center to stretch the tone.
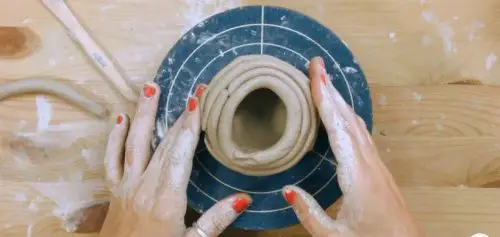
3. If you have made several coils, you can place them on the floor one after the other. The bottom rolls should be thicker than the top ones. Placing the rolls on top of each other creates the walls of the piece.
4. Each time you place a new roll on top of another, you can snap them together with one finger so that the visible connection disappears. This should be done bottom-up first, then top-down, as if you were dragging the clay. Depending on the shape you want, you can make all the rolls the same size. However, if you want to make a vase that is wider in the middle, you can put slightly longer rolls on the rim of the previous roll to create an outer shape.
5. Now you need to perfect the walls of the pottery by fitting the rollers together so that the walls are smooth inside and out.
6. To bake your piece you will need to place or place it in an oven between 800ºC and 1,200ºC for approximately 2-3 hours.
7. After baking, you can decorate your piece however you like to make it a perfect decoration for your home.
Advantages
- It’s a very easy and fun technique.
- You can use this method to create any imaginable shape.
- You don’t need complex tools.
Disadvantage
- It is difficult to make the roll of the same thickness and length so that the figure is symmetrical.
- Corrections are complicated to impossible. If an error creeps in somewhere, it is quite possible that you have to start from the beginning.
- For some people, this is a bit too complex a method.
Is this technique recommended?
It is recommended for beginners, but it requires a little more patience than the previous one, as assembling small ceramic pieces can be more tedious and a little more difficult.
Slab technique
This is perhaps one of the easiest hand modeling techniques in the world of ceramics. It can mainly be used for mugs, plates or cups.
How to make a vase using the slab technique
- First, you need to knead the clay very well to start the process. Place the clay on a cloth so it doesn’t stick to the table.
- Make a circular base because as with the roller technique, we will be making the whole piece on this base. You can make the base with a slightly smaller diameter than the ceramic plate that will form the wall of the vase. This will make it easier later when assembling to close the plate with the overhanging clay residue, since it is slightly larger than the base.
- Now, with a rolling pin, you need to gradually stretch the clay to form a slab. This should be done on both sides, the top and bottom, to create the same thickness.
- When you have reached the thickness you want and want to add a personal touch to the pottery, you can place a fabric or mold with a pattern on it and roll the roller over it, imprinting it on the pottery.
- Now that the clay slab has a unique design, you can pick it up and place it on the rim of the base you made earlier, making it look like a cylinder. (see point 2.)
- Now that the clay slab is no longer edge-to-edge but one piece on top of the other as you can see in the image below you can gently join the two edges together with your fingertips just like the rolling method.
- When you have finished the shape of your vase, you should put it in the oven at 800°C to 1,200°C for about 2 to 3 hours. Don’t worry, if you don’t have a dedicated oven, you can use your oven too.
- As the last and most important step, if you want something unique, you can decorate your vase according to your taste.
Advantages
- Only two pieces of ceramic are needed to make it.
- To make the process symmetrical easy, use a ruler and a scalpel.
Disadvantage
- You have to be very careful with the air bubbles that can form when rolling.
- It is a little complicated to connect the ceramic plate with your fingertips and make it even and needs some practice.
Is this technique recommended?
This technique is also highly recommended for beginners because it doesn’t require any extraneous tools that you don’t know, just your hands and your desire to create a work. The process is simple and easy to follow, perfect for a lazy afternoon of clay.
Modeling on a potter’s wheel
This is the best-known technique in the world of ceramics as it is used by skilled potters.
It is perfect for making all kinds of ceramic work, from the smallest things like tableware to unique and innovative objects.
It takes a lot of practice to master this technique as you are working with a machine. The result depends on several factors, in particular the speed of the potter’s wheel.
How to make a vase on a potter’s wheel
- With this technique, the clay must first be kneaded very well so that it can be better processed when shaped on the potter’s wheel.
- With no piece of clay on the turntable, gently step on the pedal to determine how much force you need to apply to the pedal without your piece deforming in the process.
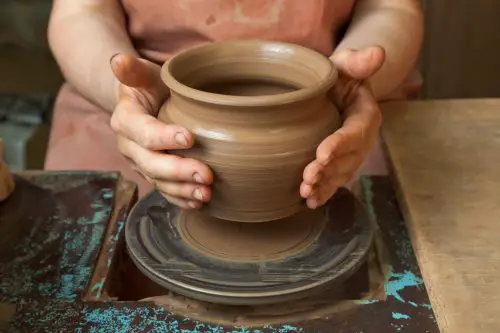
- Once you are familiar with how fast the platter or turntable is spinning, you can place your clay ball on the platter and slowly and very gently shape it to create the shape of the vase. You can wet your hands with some water so that you have a better grip on the putty and it can slide more easily in your fingers.
- Now you can make the general shape of the vase by pressing the clay upwards as if you are sculpting a cylinder while placing your hand in the center to sculpt the inner part. You must use both hands at the same time, inside and outside. Because if you exert force on the inside and do not simultaneously position the other hand as a support on the outside, you can cause a deformation of the workpiece that you can no longer rectify.
- If you have already achieved the perfect shape of your vase and it is smooth with no air bubbles or bumps, you can stop. Deposit the piece in a place where it can dry a bit.
- Finally, the vase is placed in an oven at a temperature of 800°C to 1200°C for about 6 hours. After baking, you can decorate your pottery however you like or leave it as is to keep it looking natural.
Advantages
- The pieces are of high quality and have a beautiful finish.
- If you have some experience with this technique, the pieces are quickly made.
- For a person looking to relieve stress, the combination of stepping on the pedal, feeling the sound slide between your hands, and being able to sculpt is one of the best ways to do it.
Disadvantage
- It is a technique that is not easily accessible to everyone.
- It takes a lot of practice to master the technique.
- It is difficult to get the desired result when you are just starting out with this technique.
Is this technique recommended?
It is a technique for experts or for people who already have some experience. Actually, the idea is to learn little by little, scaling the levels of difficulty that ceramics can present.
But the results are great in the end and the process is very interesting. So if you want to try something new, the potter’s wheel is your thing!
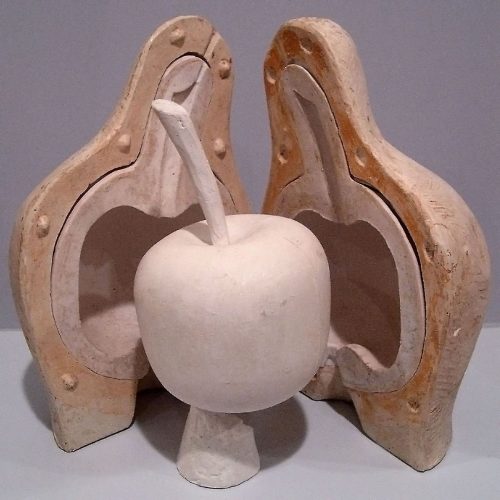
Casting technique
This technique is widely used to mass-produce ceramic pieces. The technique consists of pouring slip into a mold. Slurry is a mixture of water and clay that forms a viscous mass.
Basically, it’s a matter of letting the clay dry in the mold and then removing the mold to get our piece.
How it is done
- To check that the slip is at the right time to pour into the mold, the mixture must be neither too liquid nor too solid.
- Now that the two parts of the mold are glued together, you can start pouring the clay mixture into the mold. But be careful, not too fast or too slow, so that the slip gets into every pore of the mold. The mold should be made of plaster of Paris so the water from the mix will be absorbed by the plaster of Paris and help the piece harden and dry faster.
- You need to leave the mold with the mixture for a minute so that the pores can absorb the clay well.
- After waiting that minute, you can pour the mixture into a jar at medium speed so that the necessary clay sticks to the mold and the piece can be formed well.
- When the piece is dry and ready to be demolded, the clay should no longer be shiny. And don’t worry, you don’t need an oven for this step, it will air dry.
- Now you can remove the mold and admire your work!
- In order for your piece to be perfect, you need to polish it to remove any imperfections, e.g. B. the joint between the two parts of the mold or the entry point of the mixture. These small details can be removed with a scalpel.
- Finally, your piece goes into a special ceramic kiln at 1,050°C for 4.5 hours and the work of art you have worked so hard to create is complete.
Advantages
- This is a very simple procedure and is only a matter of form.
- It’s a fun and different technique.
Disadvantage
- It requires plaster molds in the desired shape.
- You need a special oven to harden the mixture.
Is this technique recommended?
This is definitely an expert technique, not because of the procedure, but because of the quantity and quality of elements it requires. We hope that you have found this blog very useful and that you have been able to find the perfect technique for you, whether you are just starting out or are already experienced. These are all very interesting, fun, and unique techniques, so you’re sure to enjoy one of them.