
Translated by Nick R
Hey! Did you know there are some easy and satisfying techniques for painting your ceramic pieces? Yes, there are! And best of all, they make this step of the creation process, the decoration, much more fun and relaxing.
We will share with you 5 techniques, what you need for their application to your pieces, how they can be done, and some examples of what they look like on different ceramic items. The techniques you will learn are:
- Lathe painting
- Fineline applicators – Rubber bulbs
- Ceramic glazes
- Freehand designs
- Damifude
Well, your artist soul must be anxious to get started, so let’s not put this off any longer. Let’s start learning how to paint your pieces!
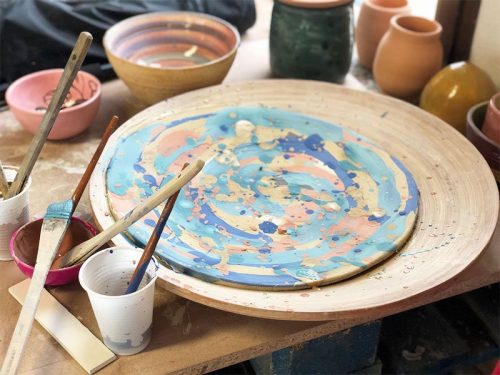
Table of Contents
Lathe painting
This technique is one of the most used by potters because it is among the easiest to carry out, and thus, anyone can paint in this way, from beginners to experts.
Painting on the wheel means that, while the piece is turning, you hold a brush over it to paint the surface wherever you want to. It is really simple precisely because it does not depend 100% on your pulse, as it would be with freehand designs.
The brush will glide smoothly over the piece anywhere you put it. Great, don’t you think?
What do you need?
In this case, you won’t need many materials to perform this technique. Basically, they are:
- Brush or brushes of different sizes
- Acrylic or oil paints
- Piece of leather
- Potter’s wheel or rotating plate
Step by step
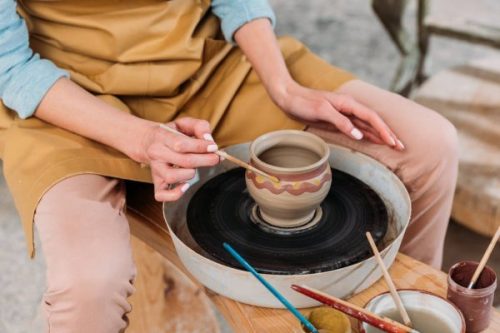
Step 1: in the middle of the potter’s wheel, place your ceramic leather-hard piece, that is, when it has lost some of its moisture. Remember it must be well centered so that painting it will be easier.
You can use a rotating plate if you do not have a lathe; however, it would always be easier with a lathe because the plate requires you to rotate it with one of your hands.
Step 2: keep all the brushes and paint colors in different containers handy. You can use brushes of various sizes and tips; it all depends on the design you want to make.
Step 3: turn on the lathe and when it gets to a comfortable speed, smear the brush on paint and stick it over the piece. The work will be done automatically, you’ll notice.
If your design has several lines, you would have to raise the brush and start again with a lower line. And if they are of different colors, you have to switch brushes or clean the one you were using.
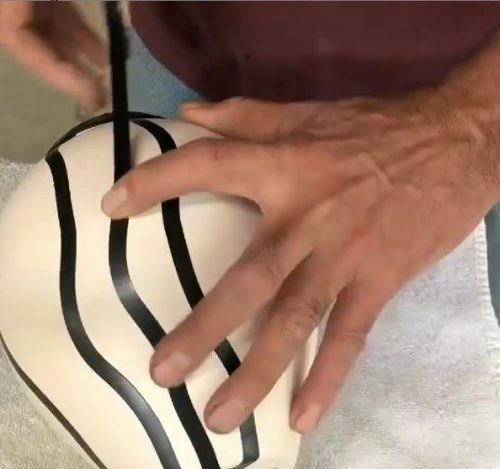
Step 4: now, for making a wavy design like the one in the picture below, you have to take a brush and do certain movements with your hand: Smoothly up and down as if you were following the movement of small waves of the sea.
In this case, your pulse plays an essential role as you are sketching a form, not a straight line where you just have to keep your hand still.
Step 5: when done making your design, you have to let the paint dry for a while.
Step 6: then, you bake it in the kiln at a temperature between 800°C and 1,200°C for approximately 2 to 3 hours. *The temperature and firing time varies according to the type of clay you use. And that’s it, you will have your hand-painted piece, but in a very simple and satisfactory way.
Although it is an easy process, with practice, you will be able to carry it out even with your eyes closed.
Fineline applicators – Rubber bulbs
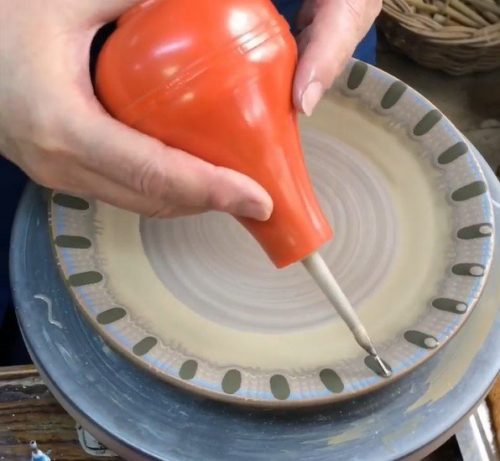
This is one of the most exciting and unique techniques in the world of ceramics. It requires a lot of precision to use the tool and an incredible artistic eye to make designs as amusing as the ones you see here.
There are pieces completely decorated using this technique but others, use it only to create little details such as dots all around the artwork.
The idea of painting with Fineline applicators or rubber pears, which are larger and therefore store more paint, is to decorate the pieces delicately and beautifully.
These tools store paint that comes out through small plastic tips or syringe-like needles. These tips can be of different sizes because, as we told you, they can be used for large designs or very minimal details.
What do you need?
For this technique, you will need few materials, but one that is extremely essential: the applicator or rubber pear (of course!).
- Fineline applicator or rubber bulb
- Acrylic or oil paint
- Piece of ceramic in leather state
- Potter’s wheel or turntable (Optional)
Step by step
Step 1: the first thing is to place your leather-hard piece in the center of the lathe or turntable. Although only if you want to decorate it all as if you were using the lathe painting technique.
If you are only making drawings or dotting, you can rest it on a table; it doesn’t need to be on the lathe.
Step 2: now, in order to fill the paint containers, you have to remove the lid of the applicators or pears and then fill them with any color you want.
You may have several applicators, each one with different colors. We are sure you will find them very handy.
Step 3: to start decorating your piece, you must cover the container tightly and apply the paint carefully. If you are using Fineline applicators, you need to put pressure on the pot, while if you use the rubber bulb, you would need to put pressure with your thumbs on the base of the jar.
You have to be very careful as you apply the paint: if you press too hard, too much paint will come out and ruin your piece. Likewise, if you push too softly, layers will start overlapping, which would look bad.
But don’t worry, time will give you lots of experience, so it will be very easy; you will learn to measure your strength.
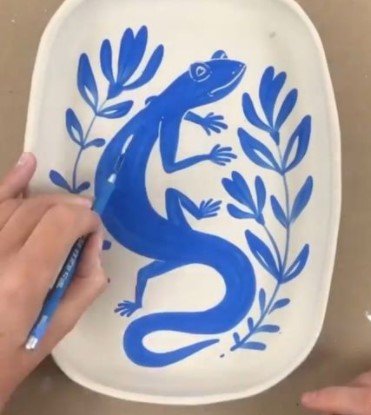
Step 4: make any designs you want on your piece. The plate in the picture below is made entirely with the bulb, using different tip sizes for the base: the blue lines and the little gray dots, for example.
Step 5: after the design or the small decorations are fully done, like the one in the picture below, let the piece dry for a while.

Step 6: Bake the piece in the kiln for 2 to 3 hours at a temperature of 800°C (1400 °F) to 1,200°C (2,200°F) in order to finish your work of art.
Step 7: to ensure the durability of your applicators or rubber bulbs, we recommend cleaning the tips with a wire to remove the excess paint that may remain inside.
Taken from: Valeri Aleksandrov
Ceramic glazes
A well-known painting technique in the ceramic world is the ceramic glaze technique. A technique that gives fantastic results is the Raku, which makes each piece unique and extremely attractive to the eye for its metallic and pearlescent effects, together with its surprising surface color changes.
That is the reason for showing you how to paint your pieces with Raku glaze, which is made to be used exclusively in the decorative technique bearing its name. But don’t worry, even though this glaze has a bizarre name, it is not very difficult to carry out.
This technique aims to give the piece a beautiful finish with effects that only Raku glaze can do while painting it in a simple way by dipping it all in the glaze or painting it with a brush.
What do you need?
You will paint the piece in the first way we mentioned; by dipping it in the glaze, so you will need the following:
- Piece in bisque
- Raku glaze
- Big bucket
- Large tweezers
- Insulating tape
- Large container with wood shavings or dried tree leaves
Step by step
Step 1: no matter what type of glaze you will apply, the piece must be in bisque, that is, burnt for the first time. Also, it should be washed very well with water and powdered soap and then left to dry in the sun.
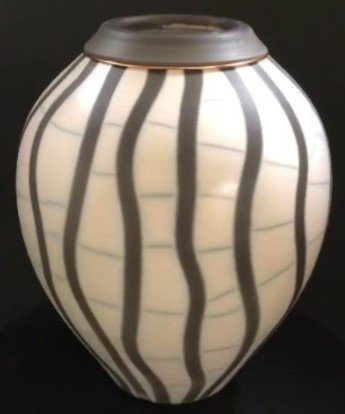
Step 2: now, to make the piece less plain, use the insulating tape to sketch any figure so that the glaze does not get to the covered portions.
For a similar result to the finished piece below, you should place the tape as shown in the picture; parallel wavy strips.
Step 3: next you need to pour the glaze into a bucket that is bigger than the piece because the next thing you will do is submerge the piece completely in it.
The easiest way to hold the piece is with a pair of tweezers, so you do not disturb the glazing nor damage the result.
Step 4: allow the glaze to drip off and remove the insulating tape you placed before.
Step 5: take your piece to the kiln for its second firing at 900°C (1650°F) or according to the type of glaze you have chosen, as some are suitable for low or high temperatures.
Step 6: take it out of the kiln and let it cool down for about 5 minutes as it must be in an incandescent state for its third firing.
Step 7: now, carefully and with the help of the tweezers, lay it in the large container of wood shavings. This material, when in contact with the intensely hot ceramic, will ignite and generate a huge cloud of smoke that will penetrate into the piece and become a further part of it.
It is this third burning with the dry shavings or leaves that creates such a cool effect on the piece, as you see in the picture below. The deep black tone on the parts covered with tape is a good example of what a burn of these materials does, as it changes the color of the clay from white to black.
Freehand Designs
Freehand design is another popular technique; however, it is better for those who are very good at drawing or painting because it requires an understanding of proportions above all things.
They can be large drawings covering the entire piece or small ones just for decoration.
You can do whatever you imagine to further personalize your pieces. If you are afraid of damaging it, you may first sketch the design with a pencil and then paint it over.
What do you need?
You will only need 4 things:
- Brushes
- Leather hard piece
- Acrylic or oil paints
- Pencil (optional)
Step by step
Step 1: lay your piece on a table and sketch your design, but make it first with a pencil. This way, you won’t make room for mistakes, and you will feel more confident.
Here is a perfect time to bring out all your creativity. Look for the best inspiration to make amusing decorations for your piece.
Step 2: have all your acrylic paints in a container from where you can easily pick them up; have your brushes handy as well.
Step 3: paint and fill in every single gap of your design with paint! Enjoy this time of connection with your hand, the brush, the painting, and the clay. We assure you it feels great to hit a point where the brush just flows over the ceramic.
Step 4: if you need to place one color over the other, wait a few minutes for it to dry, and then you can paint.
Step 5: take your special piece to the kiln for 2 or 3 hours between 800°C to 1,200°C (1470°F to 2,200°F). Keep in mind that this depends on the type of clay you use, as there are some for high firing temperatures and others for low.
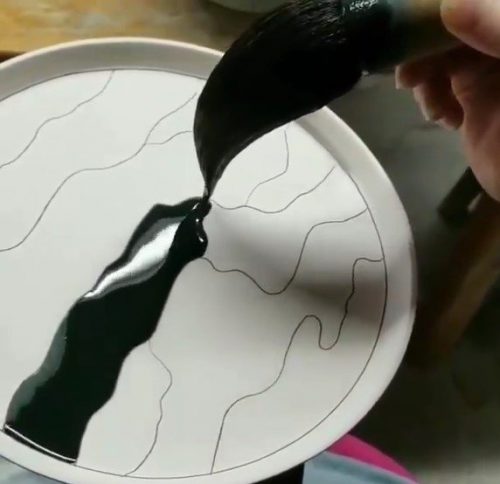
Damifude painting
It was born in the early days of Arita city in Japan; in other words, it is a really old technique present in most of the pieces of this place. Its main feature is to take advantage of the capacity for water absorption of clay pieces.
It outstands for being one of the oldest and most difficult painting techniques around the world. It takes a great deal of practice to achieve perfection. Not all potters take the risk of using it on their pieces.
For this technique, you need dami brushes, which are fairly easy to obtain. These are very thick brushes that need to be loaded with plenty of paint, so much that it must drip from the brush tip. The point of the damifude is that, out of all that thick and large brush, only the tip touches the piece superficially.
What do you need?
If you want to try this technique that looks so flashy, you will need few materials.
- Dami brush
- Acrylic or oil paint
- Leather hard piece
- Pencil
Step by step
Step 1: your piece can be patterned to make the painting more interesting, so use a pencil to make some lines and divisions on the clay to know where the colors will go.
Step 2: now, virtually, give your brush a bath in paint, and we say it like this because, no matter the art piece, we almost always drip the paintbrush, and in this case, that’s the only thing you should not do.
Remember the most important part of this technique, the paint must drip.
Step 3: here comes the most stressful moment if this is the first time you do it: painting the piece. Don’t worry though, here’s a picture that can help you understand much easier how to handle the brush.
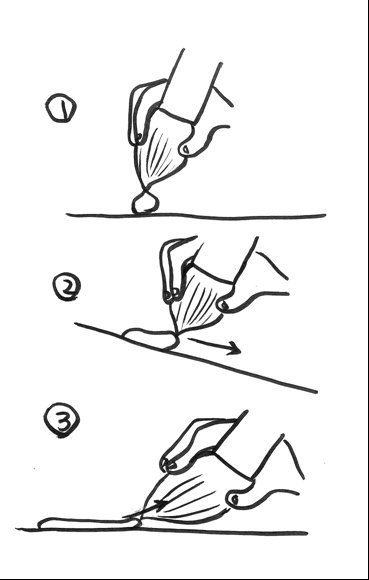
You have to gently put the brush tip vertically on the workpiece and move it until it is slightly reclined. This does not apply to all cases; however, if you want and feel more comfortable, you can keep the brush straight all the time. What matters is that the tip of the brush spreads the paint delicately over the piece.
Step 4: use another brush with another color or clean it and repeat the same process on another of the splits you made with the pencil.
Don’t be worried if you see that the clay is too wet because it will absorb the paint very quickly; indeed, it will be absorbed while you paint the rest of the piece sections.
Step 5: when done, you can leave your piece to dry in the air for a few minutes so that the paint gets fully absorbed. Then, fire it at a temperature between 800°C and 1,200°C (1470 °F to 2200 °F) for about 2 to 3 hours when you are sure that the paint is not dripping off.
We know it looks tricky, but we are sure that practice makes perfect, and once you master this technique, you won’t want to stop doing it on all your pieces.
We have reached the end of this blog, and we hope you have had as much fun as we did when writing this blog for you. There are many techniques for painting and decorating pottery, but if you want to have fun and relax in doing it, we recommend any of the ones we show you today.

