
Have you ever wondered how to create unique and detailed designs on ceramic plates, mugs, or vases?
There are numerous ways to decorate pieces. You can work with colors, glazes, and textures, as well as with different materials such as sponges, patterns, or figures by drawing directly on the ceramic.
Despite all these options, there is an easier way to decorate ceramics. In this blog, we are going to share with you the 4 best ways you can use stencils to decorate and add a special touch to your pieces.
Table of Contents
1. Tissue transfer
This is one of the most common methods used by professional potters and ceramic enthusiasts for stencil decoration. There are many reasons for that.
This type of transfer is very easy to use, so it can be done by anyone, regardless of experience. The result is a spectacular finish because it is very natural and almost looks like a completely hand-made drawing.
There are many designs out there, all of which are one or two colors at most, and still produce patterns that look perfect on the pottery. This technique can be applied to any type of workpiece, whether it is flat or round.
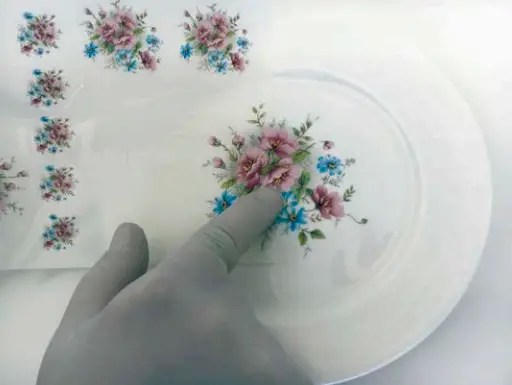
Tissue Transfer consists of a thin 42×31 cm tissue paper, which is very thin and fragile and has something like a decal formed on it that can be very easily transferred to the workpiece.
What pieces can it be applied to?
It can be applied to raw pieces when the clay has just been modeled or to those that have already been fired. In addition, this paper can be used for high and low-temperature pieces.
We advise you never to use it on already glazed ceramics as it will not stick to the glaze.
The surface must be unglazed because it must be porous to work successfully, as the motif is transferred to the clay by applying water.
Now comes the most interesting part, which is to understand how this method works so that you can put it into practice.
Applying tissue transfer
- The first thing you need to do is take the sheet and cut out the shape you want for your ceramic piece. You can use the tissue transfer sheets as if they were the usual white sheets we use daily because they can be easily cut with scissors or a scalpel like normal sheets.
- Take a sponge and dampen it where you want to put the paper because it needs to be wet to stick properly. If you want to use a raw clay object, all you have to do is moisten it a little. However, if it is a burned piece, you should moisten the area much more to avoid problems when attaching the sheet.
- Now you can put the sheet on very carefully. Remember that the side of the sheet that should be directly on the clay is the one with the strongest color since the light side is the paper, which we will remove later. If you want to make several cuts on the piece, do it, it’s all up to your imagination and creativity!
- Wipe the paper with the same damp sponge you used previously to transfer the design to the clay. The key to dampening the paper so it doesn’t get too wet (and damaged) is to make small strokes with the sponge to gradually release the design from the paper.
- When you have finished wetting the area of the paper, you need to let it seal for a few minutes.
- Once you know the design has been transferred to the piece, use a knife or something sharp to gently lift a corner of the paper so you can peel off the rest of the paper by hand.
You can then see the design on the piece and realize that tissue transfer is perfect for making your pottery one of a kind. It has the advantage of combining the cut of the figure, the position and the area in which it is placed, the design, and the colors.
If the design doesn’t fully adhere the first time, don’t worry. With practice, you’ll learn how wet the sponge should be and how long you should let it seal on the piece.
2. Ceramic decals
Ceramic decals are another easy way to bring your pieces to life with cool drawings or designs. The great thing about ceramic decals is that there are millions of designs in every imaginable color and shape.
These decals come on paper sheets in 3 different sizes: 20x20cm, 10x20cm, and 10x5cm to offer more practicality to the buyers.
What pieces can they be applied to?
They are made from precious elements such as gold and platinum and can be placed on any type of object, be it a plate, vase or cup.
It is important to note that these decals can only be applied to glass-ceramic surfaces, meaning the surface must be glazed or the piece must be porcelain, tile, or earthenware.
Decals come in millions of designs, colors, shapes, and sizes that can best accompany your pieces and give them a unique look. That’s why we’re going to explain step by step how to apply them so that you too can enjoy admiring them later on your pieces.
Applying a ceramic decal
- The first thing you need to do is have your piece completely ready to apply the decal. That’s why you have to clean it with a cloth and some alcohol to remove any kind of substance.
- Now you should soak the decal in lukewarm water with an average temperature between 20 and 22°C for one minute so that it easily peels off the paper. If you only want to use a decal of the entire sheet, be careful to only get the portion to be used wet. After all, if you try to use the previously wet area again after a while, you will certainly notice small imperfections such as cracks.
Also, be careful how long you leave the film in the water because if it gets too wet it can lose its adhesive properties. - Apply the decal to your ceramic piece and very carefully remove the paper. If you see that the decal doesn’t stick to the piece but stays on the paper, you need to let the paper get a little wetter.
- Using a dry sponge or cotton cloth, gently press outwards from the center of the decal (which should already be adhered to the workpiece with no paper residue) to remove any water and air bubbles.
- After this process, you should let the ceramic decal sit for 24 hours to allow any water still on the piece to evaporate.
If you don’t have much time or don’t want to wait 24 hours, you can dry it with a blower or a hair dryer, keeping a certain distance from the piece to avoid damaging it. - After 24 hours you can bake the piece in a kiln between 790°C and 860°C for about 4 hours. You can also start the kiln at 450°C and increase the temperature by 200°C every hour until you reach 790°C to allow the piece to adjust to the heat.
3. Mayco screen printing
In contrast to the previous two options, Silkscreen Mayco serves to create individual designs of animals, symbols, flowers, objects, and much more, not samples of the same figure. And that’s exactly why this type of stencil is so eye-catching.
The number of figures inside the 29x46cm sheet depends on the design, and the good thing about them is that, with good care, they can be used several times for different figures.
In order to be able to use this template, the ceramic piece must have been fired, i.e. it must have been fired once. This is necessary so that the mixture of dyes and ceramic glaze adheres well and the design gets the desired color.
This technique requires a bit more work than the others as you will need to buy paints and glazes and mix these materials, but trust us, it’s a technique that will get you some amazing results!
You can apply the same pattern several times but in different colors or in different places and it will look beautiful.
You need the following materials:
- Bisque piece
- Dyes, can be coloring oxides
- Powdered glaze
- A sheet or design from Silkscreen Mayco
Applying Mayco Silkscreen
- First, you need to mix the materials to color your figure. So put a scoop of your choice of color in a bowl, sprinkle some ceramic icing over the color, and mix.
The perfect consistency of the mixture should be thick, like the peanut butter you can buy in stores. If it gets too runny, you can add more glaze. - Now take the design and place it on the piece. The shiny, smoother side should be on top. The blunt side is the side where you need to apply the mixture.
If you place the plate upside down, the motif will not stick to the workpiece. So make sure you put the shiny side on the ceramic. (the smoother side should be on top? What applies now?) - Press the sheet down a little so it sticks to the piece.
- Now it’s time to color it! When you have finished the sheet, take some of the mixture with your index finger and start applying it from the center outwards, following the shape of the pattern.
Be careful when you run your finger over the sheet because you can move it and ruin your drawing. Hold it with your other hand so it doesn’t move. - After spreading the mixture over the entire design, you should carefully remove the sheet.
Remember that the mixture must still be wet before you can remove it. If you let the mixture dry, you will not only lift the leaf, but also the colored layer of the pattern. - Let your amazing design dry for a while and you’ll have a piece of creativity and talent to admire.
Maintenance of the stencils
As we have already told you, these templates can be used multiple times. To keep them usable for a long time, you should follow these simple steps:
- Wash the stencil with a sponge and water. Don’t worry, you don’t need to use any other cleaning products.
- When there are no traces of dye left, you can dry it with absorbent paper.
You can place a sheet of absorbent paper on the table, the Mayco Silkscreen sheet on top, and another sheet of absorbent paper to allow both sides to dry quickly.
It’s that easy to use this technique and wash the stencils so you can use them again and again to decorate your pieces. So don’t hesitate to choose these stencils.

4. Templates designed with editing software
This is perhaps the most complicated method of all, as it requires knowledge of editing programs such as Illustrator, which is the most commonly used by potters who use this technique.
To create these templates in software, all you have to do is place the real-size model of the piece so that the cutting plotter; the machine in charge of drawing the design, prints the cut on the contact paper. Remember that this paper is our most important material.
Almost always, the figures that are made are patterns of geometric figures that are repeated throughout the piece, which must be raw.
This template is used in two ways:
- By gluing them to the piece and marking each hole, then taking the template off and cutting out with a scalpel so the pottery has gaps with no clay.
- Place it on the piece and paint in the holes in the center of each pattern.
It sounds complicated, but don’t worry, over time you will gain more experience and this technique will work very well. To help you, below we explain how to do it.
Applying Templates
- In Illustrator, create the shape of your ceramic piece using the exact dimensions of the real piece.
- Once you’ve created the shape, you can divide it into sections to make pattern placement easier.
- To create the design, you can create a square or other geometric shape and arrange it in different ways, that is, cut it out and duplicate it several times in different positions.
We have no doubt that it takes a designer’s eye to understand the relationship between space and form. So if you know someone who is a designer, ask them to help you. We assure you that this method is worth trying. - When the whole piece or part you want is filled with the pattern you made, you can print it out with any printer that can print on contact paper.
It has to be on contact paper because you want it to stick to the putty for as long as it takes, and it’s very easy to remove. - Since the stencil is to be used for painting or removing clay, the planned holes must be made in the contact paper.
You can use a scalpel to remove the contact paper in the place where the paint will go or where it will be blank. - Carefully place the contact paper on top of the piece so it stays where you thought it would be and placed it in the editing program.
- Start painting your workpiece with acrylic paints or dyes! Take your time to paint because since everything is covered in paper, except where you need to paint, there is no chance of making a mistake.
- Carefully remove the contact paper so that no parts remain on the object.
- Wait at least 3 to 4 hours for the paint to dry and then place it in the oven for a full finish.


