Table of Contents
Pierced decoration
Piercing is one of the coolest but also most difficult techniques out there. This technique involves making cuts or holes in the shape of figures on a clay object.
Because it is a cutting technique, to decorate his pottery the potter must be very careful, precise, and have an excellent hand to avoid damage.
Materials needed
Here’s a full list of materials and suggestions for some of them you’ll need if you want to do the cutting technique:
- Engobes
- Sponges
- Templates with ready-made motifs
- Damp cloth to clean bumps
- Gouges and blades
How to apply this technique?
Now that you have the materials, we are going to explain step by step how to apply this great technique to your ceramic pieces.
- First, you must design the drawing you will put on the figure. To do this, you can make the drawing on a piece of paper, and then transfer it to the object.
If you are already an expert, you can work directly on the workpiece. - Trace the drawing where you want to attach it to the piece.
- Carefully cut out the figure using the knife. Remember that this step is the most important and crucial of all. That’s why you have to be careful when cutting.
It is important to complete this step while the object is in a leather-like condition, i.e. almost dry but still slightly damp. - While cutting, you can buff the edges with a damp sponge so the cut is free of lumps or bumps.
- Finally, paint the piece with paint or engobes in the color of your choice and let it dry. You will love the results of this technique, they are very original.

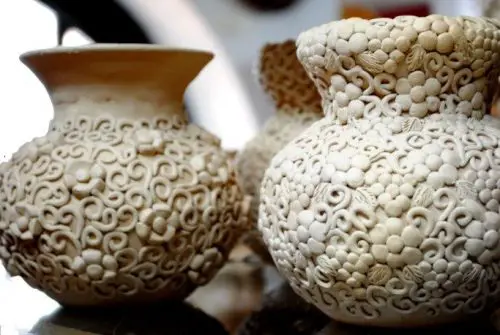
Pastillage
In the pastillage technique, sculptural pieces of clay of the potter’s preferred size are inserted into the piece in question.
With this technique, you can give relief to the parts you add and it also gives a different and special touch to the pieces of clay.
Materials required
- Engobes
- Clay
- Barbotine
- Plaster molds
- Sponges
- Gouges and blades
- Damp cloth to clean bumps
How to apply this technique?
- First, you need to create shapes, structures, or drawings in the plaster mold. If you want to know what these are and how they work, please read our blog about molds for pottery making. Keep in mind that these designs need to fit your piece perfectly, so we recommend taking some measurements to get the best result.
- Once the molds are made, you need to engrave the design into the stoneware clay. It is best to fill the mold and then carefully remove the piece of clay without damaging the mold or design.
- With the help of a chisel or knife, you can cut off the excess pieces and give the desired shape to the piece of clay you want to add to the piece.
- Next, find the spot where the dough is to be glued and apply barbotine; then glue the piece of clay and apply barbotine. Thanks to the barbotine, the piece sticks.
- Remember that before the previous step, you need to make sure your workpiece is still a little damp but ready to dry.
- Finally, you can paint the piece with the engobes in the color of your choice.
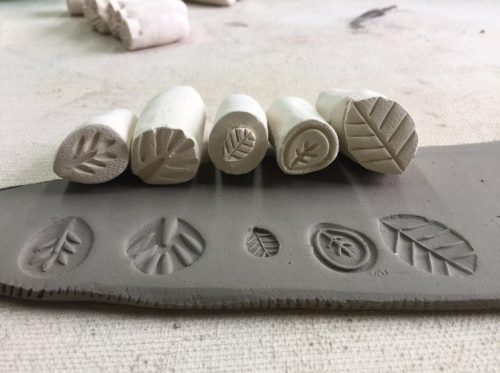
Stamps
Surely you have heard of this popular decorative technique in ceramics. It has evolved so much that today you can find stamps with an infinite number of designs on the market.
This technique is based on pressing stamps with designed figures so that they are printed on the workpiece – a beautiful technique!
Materials needed
- Engobes
- Barbotine
- Plaster stamp
- Sponges
- Blades and gouges
- Damp cloth to clean bumps
How to apply this technique?
This technique is super easy and even if you’re just learning it, you can trust it blindly. Now you will find here the instructions on how to use the stamping technique on your ceramics.
- Production of stamps. To do this, you can use small plaster bases on which to draw the motifs or designs that will later be engraved and used as stamps.
If you can’t make a stamp yourself, you can also buy one and choose the design you like the most. - Make sure the piece is in a leather-like condition, which means, as mentioned, just about to dry but still slightly damp.
- Once you have the stamp and have chosen the appropriate spot on the piece, you need to press it firmly onto the surface there. Be careful not to overdo it with force as this may affect the result.
- The next step is to decorate the piece with engobes or colors as you wish, the only limit being the imagination.
- Finally, the workpiece should dry.
Flammable Materials
The technique of combustible materials owes its name to the materials used for decoration.
The materials commonly used for decoration are paper, fruit seeds, corn, beans, grass, or straw. These materials are combustible, meaning they can burn easily at high temperatures, but once extinguished their appearance and properties change, and when mixed with clay they give the pieces a different look and texture.
Materials required
- Clay
- Flammable materials (paper, fruit seeds, corn, beans, grass, or straw)
- Sponges
- Plastic container
- Blades and gouges
- Damp cloth to clean bumps
How to apply this technique?
Once you have all the materials for this technique, follow the following steps:
- Choose the combustible materials you want to use.
- Make the dough in a plastic container. Remember that you can also buy the ready-to-knead clay and add a little water.
- Now you need to mix very well. This mixture is not used for modeling but applied to the workpiece.
- Once the mixture is ready you will need to apply the slip to the piece and then add the mixture with your chosen materials to ensure it is well distributed and does not form lumps.
- If you need to remove the excess mass, you can use the chisels and blades to do so.
- Let the piece dry and then fire it in a kiln if necessary.

Non-combustible materials
Unlike the previous technique, this technique uses non-combustible materials, that is, those that do not dissolve or completely mix with the dough when exposed to heat.
However, these materials also add a different texture and look to the pieces that wear them. Some non-combustible materials used for decoration are metals, glass, sand, or stones.
Materials needed
- Clay
- Non-combustible materials (metals, glass, sand, or stones)
- Paintbrush
- Roller made of wood or steel
- Sponge
- Gouges and blades
- Damp cloth to clean bumps
How to apply this technique?
To use this technique, you just have to follow the 6 steps below.
- The non-combustible material you choose must be placed on a metal or wooden base.
- With the clay, you model a piece in the shape you want to add to the piece. It is important that the thickness is neither too thick nor too thin.
- This piece of clay is placed on top of the non-combustible material that was placed on the base in the first step.
- Using the rolling pin, press for about 20-30 seconds to allow the material to stick to the clay.
- When you have finished the piece with the material glued on, sculpt a figure or add the piece of dough to the piece you made.
- Finally, the object is subjected to the necessary burning process.

Before proceeding to the last decoration technique, it is very important to note that all items made using the technique of non-combustible materials are not suitable for domestic use. They are usually made as decorative objects.
Impressing
The printing technique is one of the simplest and fastest to use.
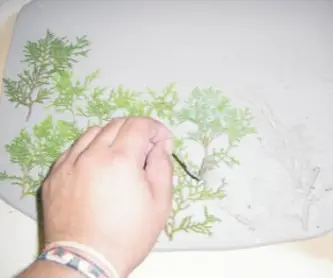
In this technique, a drawing is made from organic or inorganic materials, which is transferred to the clay so that the drawing adheres to it.
Organic materials are those that come directly from nature, e.g. B. Bread leftovers, sheep’s wool, flax, straw, cotton, eggshells, flowers or leaves, and much more.
Inorganic materials, on the other hand, are those that are created through a non-natural process. Some examples of these materials are glass, batteries, cans, needles, plastic, batteries, and more.
Materials needed
- Engobes
- Organic materials (wool, flax, straw, cotton, eggshell, flowers, or leaves)
- Inorganic materials (glass, batteries, cans, needles, plastic, batteries)
- Gouges and blades
- Sponges
- Roller made of wood or steel
- Damp cloth to clean bumps
How to apply this technique?
Here we explain step by step how to perform this amazing technique.
- First you need to create a design using organic or inorganic materials. Choose the ones that best suit your design.
- Next, roll out the dough so you have room for the pattern you created in the previous step. With the gouges and blades you can give the dough any shape you want.
- Once you’ve stretched the clay, you need to transfer the design to the piece of clay in such a way that it should leave a relief in the dough.
This step should be performed when the clay is in a leathery state, i.e. still slightly damp but about to dry. - To achieve the ideal relief, you can help yourself with the rolling pin, which you roll over the clay with light pressure.
- Next, carefully remove the materials used to create the design. At this point you will see that the figure is marked in the clay.
- If you decide to work or model the dough after the design, be careful not to damage the figure as it is still fresh.
- Finally you can paint the clay and the motif with the engobes as you like and let it dry very well.