Translated by Nick R
Have you ever seen a ceramic piece with a particular texture and thought you wanted yours to look and feel the same but don’t know how to do it? Don’t worry, in this blog we will explain how you can get those same textures.
You can apply many decoration techniques to your ceramics, such as painting and decorative stencils, which are very interesting and give very nice results. However, if you are looking to texture your pieces to make them feel different, we have the perfect techniques.
These are the two main aspects you think of when creating decorations that create textures on the clay surface. First, it looks different from any piece you can find in a workshop or store, and second, your hands experience a whole new sensation, unlike when touching a usual smooth ceramic.
Throughout this blog, you are about to learn what each texturing technique is about and how you can perform them to get the same results you saw in other pieces.
Let’s start texturing!
Table of Contents
Techniques
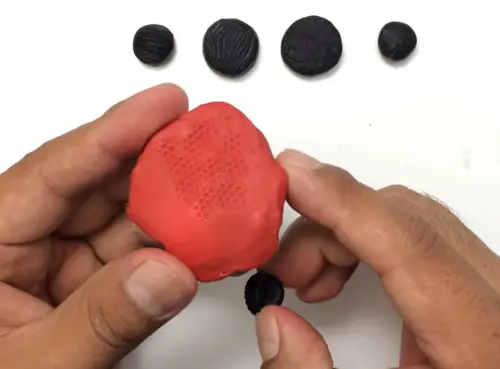
Sponging technique
Sponging is a decorative texturing technique to create very subtle effects on ceramic pieces. It is really simple to make, so easy that it can be done from beginners and children to professional potters.
To carry out this technique you only need to gently dip a sponge in acrylic, oil or enamel paints and then smoothly apply it on the clay, leading to a stippled effect on the piece.
What do you need for this technique?
You need a few materials to use this technique in your pieces, all you need is:
- Piece of bisque
- 180 or 220 grit sandpaper
- Damp cloth
- Round foam sponge
- Small plastic bowl
- Acrylic paints, oil paints or ceramic glazes
Step by step
Step 1: As the piece must be in bisque; meaning that it has already been fired in the kiln for the first time, its whole surface must be sanded very well with sandpaper of grain 180 or 220 to remove all the imperfections and get it totally smooth.
Step 2: After sanding the piece, wipe it with a clean, damp cloth to remove all the sanding residues, like dust, which can damage the expected result without even having started.
Step 3: Having the piece ready to be decorated, put some acrylic paint in the plastic recipient to smear the sponge on it.
Do not forget that you can use several paint colors on the piece. If you don’t think it would look good, you have nothing to worry about, on the contrary, the piece looks much nicer with several layers of different colors.
Step 4: Now, you take the sponge and dampen it with some paint to gently wipe the sponge on the piece. Every time you take it out of the clay, you will notice that the acrylic paint will have 3D dots that will be the final texture your piece will have once it dries.
Keep in mind that it is better to first apply a layer of one color and then another one. While you are covering the whole piece, the first parts where you passed the sponge should have already dried a little, so you can start applying the other color of paint.
What’s best about this technique is that you don’t have to be so precise; you can put the sponge wherever you want and fill the piece as you wish.
Step 5: Let your piece dry for a few hours so that the acrylic paint or enamel adheres very well.
Step 6: After this time, you have to put your piece in the kiln at a temperature between 950°C and 1000°C for 3 to 4 hours, depending on the type of clay you have used.
Step 7: As the last step, let it cool down, and that’s it. You will see how beautiful your piece is and feel those little dots that are a plus in the decoration of your ceramic.
Printing technique
Printing on ceramics is one of the most well-known techniques within the ceramics world. There are 3 main ways of achieving effective clay printing, namely:
- Stamps
- Rollers
- Vegetable prints
What is sought through these elements is creating marks on the clay; the clay is not smooth but rather has certain shapes that modify the surface and also provide a different image to the piece.
Stamps
The stamps are widely used for clay, as they are a pretty quick and easy way to decorate ceramics, and best of all, you can buy them in art or virtual stores or make the clay stamps at home by hand.
What we always seek in this Ceramics Club is to show you the best options, the easiest, most beautiful, and most economical for you to decorate and make your pieces a work of art. Never forget that.
Stamps feature embossed designs of anything you can think of: leaves, animals, stars, and moons, thus they will be a great help in making your ceramic pieces unique.
What do you need for this technique?
In this technique, you will use far less materials than in the previous one. Basically, you will only need:
- Leather hard piece
- Clay stamps in wood or plaster
- A thick piece of cardboard
- Acrylic paints (optional)
Step by step
Step 1: Since you have a leather-hard piece, i. e. the clay has partially lost its moisture, there is no need to go through sanding as in the previous technique. Thus you can start texturing right away!
If your piece is not flat, you will have to put your hand on the inside to hold the clay or place a piece of firm cardboard to prevent the clay from bending or damaging when applying force to stamp the figure.
Step 2: Gently and with a bit of pressure, push the stamp against the clay for a few seconds and then remove it to verify you got a clear design.
Step 3: Repeat this process on the parts you want.
To get an idea of how your piece would look like based on where you place the stamps, you can sketch it on paper to see whether it would look nice or if you could better adjust the spacing or position of the stamps.
Step 4: Once the piece is finished, you can take it to the kiln for a first firing at a temperature of 950°C to 1000°C (950°F to 1000°F) for 3 to 4 hours.
Step 5: This step is optional, but if you want to do it, besides its characteristic texture, you will give your piece an extra touch of beauty.
The stamps also serve to paint the designs on the clay, so you can smear them with some acrylic paint and place them again over the spot where you placed the stamp to texturize or where it is smooth. It looks beautiful either way.
Remember, if you do this or apply color to your piece in any way, the work will need a second firing at the same temperature as the first firing.
Decorating with stamps
Taken from: Clay Footprint
Ceramic roller
The rollers are also a pretty helpful technique for texturing the clay, but in this case, you have to place the designs on a table with the flat clay since the roller is very long.
But if you want to do it on the already assembled piece, there are also smaller rollers than the normal ones that you can use much more easily. They are practical and recommended.
What do you need for this technique?
In this case, you will not need many materials either, as it is a little simpler than with the stamps.
Leather hard piece
Small roller with designs
A thick piece of cardboard
Step by step
As the easiest way to texture with rollers is with the small ones, we are going to show you how to do it with the smallest and most maneuverable ones.
Step 1: As with the stamps, if you have a high relief piece, it is best to place your hand or a thick piece of cardboard inside that fits the shape to hold the clay so that it does not deform.
In this case, as you are making a vase with an ironing technique, there is no problem if you lay a sheet of clay on the table and then roll over it.
Step 2: Once you have reinforced the clay, you can start rolling over the clay. The best thing about these rollers is that you can apply the design much faster because you only need to move the roller in one direction to get the mark all over the piece. In contrast to the stamps which you have to apply one by one.
It is up to you whether you create rows or columns with the roller, it depends on your creativity and what you think looks best according to the type of piece you are creating.
Step 3: Now that the clay is textured, leave it in the kiln for 3 to 4 hours at 950°C and 1000°C.
Step 4: You can paint it if you want to, but we don’t recommend doing it, as with stamps, because it is much more difficult to match the first design and the paint roller, so you had better do it with a paintbrush one by one.
Decoration with roller in clay
Taken from: Pinterest
Vegetal prints (leaves, bark, roots).
Vegetable footprint printing is more common than you might imagine, it is very easy and quick to do and makes the piece look quite pretty and subtly decorated.
For this technique, you can use different items such as leaves, seeds, tree bark, seashells, roots… any organic material you can think of.
What do you need for this technique?
Leather hard piece
Leaves, roots, shells, anything you want.
Acrylic paints
Step by step
Step 1: The first thing to check is for the piece to be leather hard to be able to print the leaf or the material you will use. For if the clay is at this stage, it will still allow you to modify it.
As with the previous two printing techniques, it is best to place your hand inside or behind the piece or some thick cardboard so that you can apply some pressure to the material with no problem.
Step 2: Now, take the shells, leaves, and roots in your hands and press them firmly against the clay until the ribs of the leaves and every part of the shells are well marked.
Step 3: As soon as you are sure that you have finished texturing your piece, you can send it to the kiln at a temperature between 950°C and 1000°C for 3 to 4 hours.
Step 4: You may leave the piece like this if it looks nice; otherwise, color it using acrylic paints or enamels.
Remember to send the piece back to the kiln at the same temperature if you applied color.
Clay texture with shells
Taken from: Pinterest
Glaze texturing
Maybe you’re wondering, “Glazes? Those are for painting” Not exactly. Some glazes work to texture clay, which is great because as well as texturizing the piece, you are giving it the color and strength and making it waterproof at the same time.
There are several types of ceramic glazes but the texturizing ones are the crackle glazes that create a cracking effect on the surface, while the crystallization glazes simulate crystals on the clay surface.
First of all, you should know glazes are divided by high and low temperatures, just as there are types of clay that vary firing temperatures. Both glazes are available in low and high temperatures depending on the clay you are using.
What do you need for this technique?
There are 6 techniques for glazing, but in this occasion, you will use the pouring technique, which is one of the easiest.
- Piece in bisque
- 180 or 220 grit sandpaper
- Damp cloth
- Crackle glaze powder
- Water
- Large plastic container
- Jug for pouring glaze
- Glazing tongs
Step by step
Step 1: The first thing is to clean the piece thoroughly, so you should follow the same procedure we taught you at the beginning. Sand the clay to remove any blemishes and then wipe it with a damp cloth to remove the residue.
Step 2: As the glaze comes in powder, you need to mix it with water to make it liquid and decorate the piece.
So in a plastic container slightly larger than the piece, as this is where the enamel will fall when pouring it, put 60% of enamel powder and 40% of water. These are usually the proportions of the mixture, but check the instructions on the package.
Step 3: Now, put some of the preparation into the jar, take the piece with the glaze tongs, and put it on top or inside the large container, so the remaining glaze falls in there and does not get wasted.
To get the piece evenly coated, you have to pour rapidly while turning the piece as the glaze will start to soak in and there will be different layer thicknesses. You will notice it later when the piece is baked.
Step 4: When the piece is totally covered with the glaze, you should let it dry for a few hours.
Step 5: Finally, as with the other techniques, you need to put the piece into the kiln for 3 or 4 hours at 900 to 1300°C, depending on the clay and the type of glaze temperature you chose. Once baked and cooled it would be ready, so you can take it out of the kiln.
Crackle ceramic glaze
Taken from: Apuntes Cerámicos
Incising technique
This technique can look very similar to the crackle glaze at first glance. However, the big difference is that, in this technique, the cracking effect is done on the clay, and not on the glaze covering it. This is why the walls of the piece cannot be too thin.
This technique can be done by forming small lines or cuts in the clay with the help of a taut wire, a metal bow, or a long knife. The aim is to facet the piece, which is to basically remove portions of clay, thus the clay must be leather-hard.
What do you need for this technique?
It is one of the easiest techniques and requires less materials, you need only two things, one is the element to modify, which is the clay, and the other is the knife to facet the piece.
- Clay in leather hardness
- Long knife
Step by step
Step 1: Your piece must be modeled and have no burns, but remember that the walls must be thick and firm so that the knife does not go straight through when you pass it, nor will it burst when baking the piece.
Step 2: Make short or long vertical incisions with the knife to create the texture you are looking for. If you want, you can follow the design in the photo below; it can be a great example of how to facet the piece. For a finish like in the picture, you should remove some of the clay from where you make the lines.
Remember, though, that the incisions will probably open up a bit on their own when the piece is in the kiln.
Step 3: To have your ceramic piece completely ready, you only need to do one more step: fire it between 950°C and 1000°C for 3 to 4 hours.
Scratching with serrated tools
This is a technique for creating a nice texture on your ceramic pieces. It consists of using scrapers or serrated objects such as combs, knives, forks, or small saws that can help you to texture.
The best modeling technique that you can use in this case is lathing, by it, you can texturize the piece very simply while it is rotating.
What do you need for this technique?
- Leather hard piece
- Scrapers or serrated tools
- Potter’s lathe or turntable
Step by step
Step 1: Put up the piece in the center of the potter’s wheel and start turning the chuck gently until you get a good rhythm.
Step 2: Take the scraper, place it near the piece and move it closer and closer until you are comfortable with the depth of each line you are doing on your work.
Step 3: Verify if you like the result, and if not, you can model your piece again as it is in leather hardness, and try one more time.
Step 4: Once you are happy with your piece, bake it in the kiln at a temperature of 950°C and 1000°C for 3 to 4 hours.
Clay decoration with scrapers
Taken from: AliExpress
Mishima Technique
The Mishima technique involves making incisions with a sharp object on a leather-hard piece, which is then filled with engobe or colored barbotine. It is basically an inlay decoration.
This technique has oriental origins, originated in Korea in the 13th century, and is a technique with one of the most beautiful results.
What do you need for this technique?
- Leather hard piece
- Engobes of various colors
- Brushes
- Pencil
- Sharp object, e.g. a scalpel
- Acrylic paints
Step by step
Step 1: First, draw the design on your piece with the pencil, so based on it, you will make the cuts confidently, making sure of the path to follow with the scalpel or the object you will use for removing the clay parts.
Step 2: With the scalpel, you will go over the lines of the sketch and slowly peel off a thin strip of dough in each part of the design where you passed the scalpel.
Step 3: Once you have removed the clay lines from the drawing, you can fill in those gaps with your favorite colored engobes.
Step 4: As the idea is that the engobe colors remain in the grooves only, you need to remove the excess from the surface, so the engobe is aligned with the piece.
You should clean the surface of the piece well so that the engobe stays only within the grooves; this technique’s objective is to achieve a very classy and pleasing result.
Step 5: Let the piece dry for a few hours.
Step 6: If your figure is like the one in the image below, you should use a brush to apply acrylic paints inside the drawing, the same way as with the middle butterfly, which is pink and grayish colored.
Don’t worry because the engobe color is too clear, as it has already dried and is on another layer or surface of the piece, so the paint will not interfere in any way.
Step 6: Bake your piece for 3 to 4 hours at 980°C or 1200°C.
Step 7: Let the piece cool a little.
Step 8: Apply clear gloss glaze to cover your piece and make the colors look more vivid.
Step 9: Once again, take the piece to the kiln at the same time and at the same temperature to allow the glaze to adhere very well and fulfill its purpose of making the work more resistant and shiny.
Taken from: Marphil Ceramics
Instagram accounts featuring these texturing techniques.
As these techniques are very recognized and used by potters, there are many potters’ accounts and ceramic workshops that use them in many of their pieces and we are going to show you some of those accounts.
Becca Sands – @simplysands_ceramics
This incredible potter with 16.5 thousand followers makes mugs and bowls with unique beautiful designs that she crafts herself, as she shows in several videos. All her pieces are decorated using the Mishima technique, and it is fantastic to see the artistry achievable through this technique.
Ceramics with Mishima decoration
Taken from: @simplysands_ceramics
Taller del vivero – @tallerdelvivero
This workshop, with 1,813 followers, is located in Buenos Aires and decorates most of its pieces using the plant print technique. Their mugs, plates, flowerpots, and essence burners show how cool plant printing your ceramics can be.
Leaf print in clay
Taken from: @Tallerdelvivero
Áter Cerâmica – @aterceramica
In this account, with 1,840 followers, they make cute mugs and small vessels, and besides that, also they use the glaze decoration technique, especially with a crackle glaze that can be seen clearly in most of their pieces.
If you want to fully understand the final result of this technique, we recommend you to follow this account and zoom into each and every publication. You will be amazed at how detailed the glaze looks.
crackle ceramic glaze
Taken from: @aterceramica
With these magnificent accounts that show us how good the techniques look well carried out in ceramic pieces, we come to the end of this blog. We hope you have learned a lot, but now it’s time for you to decorate your own ceramic works and give them eye-catching and cool textures.