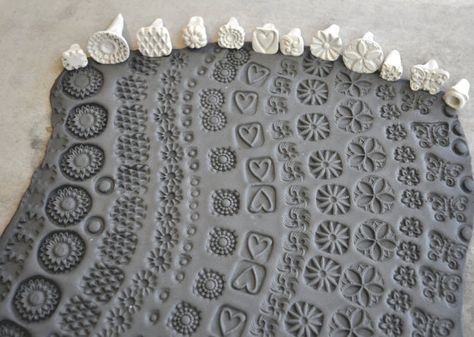
There are many ways to decorate ceramics, e.g. B. with stencils and paints, but one of the most interesting and least common is stamping with clay. This gives the pieces a very special and interesting touch.
Stamps can be used for two things:
- To add texture to the clay
- By inserting them in acrylic paint or glazes and then decorating the clay with the stamped motif.
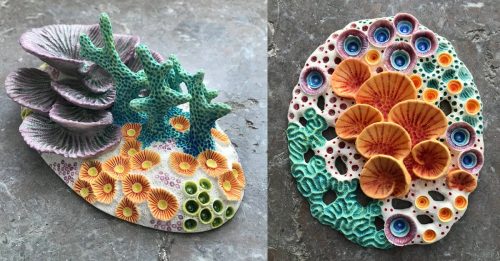
Table of Contents
How to make stamps for decorating ceramics?
There are two techniques to make these stamps. One is easier and less time consuming, the other requires a little more work, but both are very simple and effective.
Polymer clay stamps
This is the easiest technique you can use to make your stamps as you only need a few materials and the steps are very easy to follow.
Materials
- Polymer clay
- Objects with some texture
- Kilns
- Toothpick
- Lance-tipped scalpel
Step by step
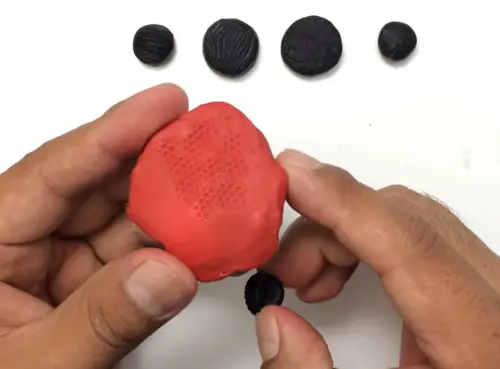
- Since the material from which the stamps are to be made in polymer clay, you must first knead the clay well so that you can work it easily. You can buy this play dough in stores or online stores, but you can also make it at home.
- When the polymer clay is kneaded well, you should make the shape of the stamp in the form of a circle, square, moon or any other shape depending on what kind of stamp you want to make. The size is arbitrary. We recommend a slightly thicker stamp so that you can hold it comfortably in your hand.
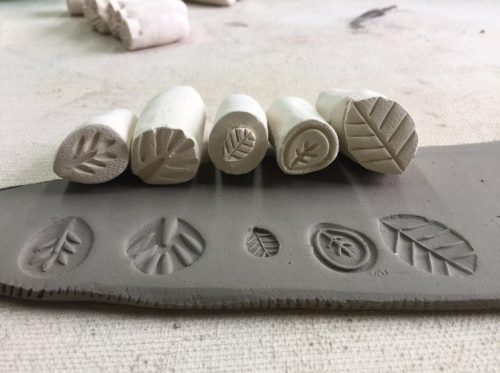
- With the shape complete, it’s time to texture the stamp area. You can use a toy or other object as a template. The goal is that we then see this object on the ceramic as soon as we press the stamp on it. You can also stamp words instead of objects.
- Now that you have your stamps ready, there is only one very important part left to use so that you can use them and get amazing results. If you don’t have a ceramic oven, you will need to bake your polymer clay stamps in an oven at 110ºC for 25 minutes.
- After 25 minutes you can take the stamps out of the oven and let them cool down a bit so you don’t hurt your hands – done! Your stamps are ready, now you can decorate your ceramic pieces.
Plaster stamp
Making plaster stamps is a bit more involved. However, these are perfect for use in a workshop.
Materials
- Plaster
- Water
- Plastic container
- Clay
- A cup or glass (shape 1)
- Wooden chopsticks
- Vaseline
- Silicone molds with molds for making chocolates (Form 2)
- Round-tipped modeling stick
- Knife or scalpel
Step by step with a cup
- For the stamps that are made in cups, you have to coat the inside of the cup with petroleum jelly or it will all stick.
- In the cup with petroleum jelly put some clay that will be the bed of plaster on which you will make the pattern that will stick to it when poured onto the clay.
- While you let the clay dry for a few minutes, in the plastic container, mix the plaster of Paris with water until it has a slightly thick consistency with no bubbles to avoid damaging your stamp.
- When the mixture is made, the putty should be sufficiently dry so that you can now draw the pattern on the putty with a toothpick. The plaster penetrates into the indentations you made when creating your design and takes on the same shape but in relief.
- As soon as the stamp motif has been worked into the clay, the plaster mixture is poured over it and after about 3 minutes you put a small wooden stick in the middle so that you can use the stamp better. The wooden sticks will also help you get the cast out of the cup more easily.
Proceed to step 3 of the silicone mold procedure.
Step by step with silicone molds
- Great stamps can also be made in the silicone molds used to make chocolates. Just like with the mug, you’ll need to coat each element with a little Vaseline so you can easily remove the stamp later.
- Now pour some plaster onto each of the stamps in the mold. If you want, you can attach the wooden stick to make it easier to use.
- It will not be necessary to remove the stamp from the mold as you did with the mug. Because this mold is made of silicone, bend them to remove the stamp.
- Once the plaster has hardened, you can release the stamps from the mold.
- As a final step and so that you can easily use your stamps and create works of art on your ceramics, you must wait a few days for the plaster to dry completely.
What shapes can you make with stamps?
With this decoration technique, you can let your thoughts and creativity run free.
You can write words, and make figures like fish, leaves, trees, flowers, landscapes, squares, circles, stars, and houses to decorate your objects individually.