
Translated by Nick R
You can think making pottery is costly, especially for firing since you don’t have your own kiln, and renting or buying one may be very expensive. Anyway, we have news that will make you happy.
Today, we will give you the perfect solution to all your problems. In this blog, we will show you two ways in which you can make your own ceramic kiln. Plus, we will tell you what materials you’ll need and where to get them so everything becomes easy for you. Without further ado, let’s get started!
Table of Contents
Build your ecological ceramic kiln
Building an eco-friendly kiln is one of the simplest and coolest things to do, because it mostly consists of recyclable materials, just what we need to help the environment, don’t you think?
The materials you need
Most of the materials listed below can be found in construction stores or on the internet.
- 2 empty car oil barrels of 200 L
- Pliers
- Refractory fiber
- Permanent marker
- Large tub or bucket
- Protective gloves
- Straw
- Recycled earthenware clay (2 kg)
- Already baked ash (4 kg)
- Water
- Stoneware clay
- Black wire
- Polishing machine
- Hammer
- Refractory plate
Step by step
Now, we leave you the step-by-step video to guide you in building your ecological kiln.
The fireplace
Step 1: cut the barrel horizontally in half with the polisher.
Step 2: cut the edges of the base or bottom half of the barrel into small blades. Don’t forget to wear protective gloves to avoid any accidents.
Step 3: once you have finished cutting them, use a pair of pliers to bend all the blades inwards into the barrel. Make sure they are straight and not downwards.

Step 4: draw three holes on one side of the barrel: two rectangles and a circle, which should go in between the two rectangles.
The circle should have a diameter of about 9 to 10 cm (3 to 4 in.), and the rectangles measure 30 cm long X 12 or 13 cm high (11 x 4,4 in.).

Step 5: cut the holes you drew in the previous step. If you can’t remove the pieces, don’t worry, and simply fold them inwards as you did with the blades.
Step 6: next, cover the inside walls of the barrel with refractory fiber. The refractory fiber is very easy to put on as it is like plastic.
Step 7: in the large bucket, mix 1000 g of earthenware clay with 1.5 liters of water. Before mixing, let it stand for 5 minutes so that it breaks down much faster later.
Step 8: add the ash and continue mixing.
Step 9: now you add about two ball-sized handfuls of straw and mix.
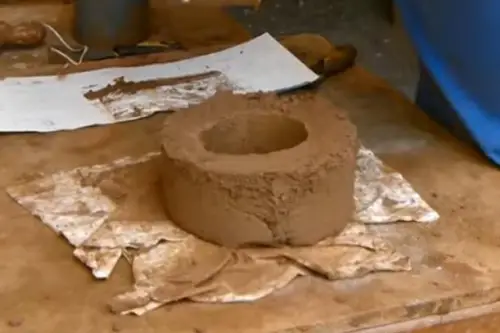
Step 10: use stoneware clay to form an elongated bowl. To do so, you can use the slab technique, which you can learn on our blog.
Step 11: on one side of the bowl, open a hole 4 cm high x 7 cm long (1,5 x 2 in.), and in the base, make several holes. The ash will fall through these holes into the ashtray.
Keep in mind that the holes should protrude at the top of the bowl’s base. To achieve this effect, insert your ring finger through the bottom of the bowl to make them protrude.

Step 12: fire this piece at 1300°C (2400 °F) and leave it in the kiln for 5 hours. In the meantime, continue with the next steps.
Step 13: spread the mixture you made in step 9 all along the inside of your barrel.
Step 14: place a large straw-filled bag inside the barrel and cover it with more of the initial mixture.
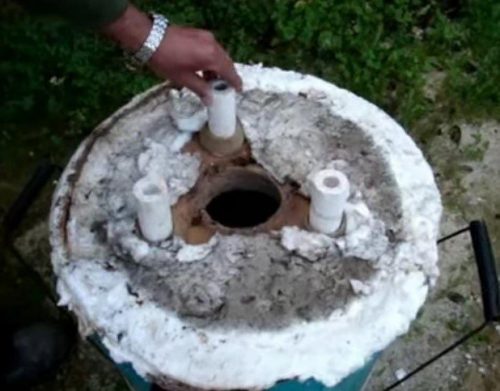
Step 15: once it is well covered, make a 12 to 14 cm (4 – 5 in.) diameter hole in the top. For this, you can insert a plastic element of that size.
Step 16: wait for the dough to harden completely.
Step 17: once it has hardened completely, through the upper rectangle, take out the straw and the plastic bag you put in. If you also put in a circular object to make the hole at the top, take it out as well.

The laboratory
Step 1: now cut the other barrel in half and cut the edge of the bottom half into blades. These should be slightly larger than the ones you made on the first barrel.
Step 2: bend the blades inward with pliers as you did on the first barrel.
Step 3: then, cut a circle on top of the barrel, making sure it is 5 to 6 cm (2 or 3 in.) away from the barrel’s edge.
Step 4: here, cover the inside walls of the barrel with refractory fiber and then with the initial mixture.
Step 5: design some sort of handles out of black wire to make carrying the barrel easier.
Here, our advice is to wrap the wire around the barrel and make a knot on each side using the pliers. Then, you can insert two small pieces of metal that will serve as handles.

The chimney
Step 1: for the chimney, you must use the leftover piece of the first barrel, that is to say, the top half.
Step 2: cut the base of the barrel into a circle, making sure that it is 5 or 6 cm (2 or 3 in.) away from the edge of the barrel.
Step 3: at the barrel’s bottom, draw a line 5 cm away from the bottom edge.
Step 4: now, measure spaces of 20 cm (7,8 in.). Each 20 cm indicates the start and end of a triangle that will go all the way up.
Step 5: start cutting the edge of these triangles, and once you finish, you will see a wreath formed.

Step 6: very carefully but with force, push the triangles into the center of the barrel.
Step 7: then bend the ends upwards so that the triangles mount on top of the other in the same direction, leaving a gap in the center. Tie them together with a piece of black wire to make them stay together.

Step 8: turn this part over so it can stand on top of the triangles and cover what is left facing up with the mixture from the beginning. Don’t forget to keep the hole in the center uncovered.
Step 9: allow it to dry thoroughly, and then, flip the piece over again.
Step 10: cut off the ends of the triangles and fold what is left inwards. Then coat it with the mixture you know so well.
The funnel
Step 1: on another of the remaining barrel halves, cut a rectangle with the same measurements as the rectangle that you drew on the fireplace.
Step 2: then, pick another piece of the unutilized barrel and hammer it flat with the hammer.
Step 3: shape it into a rectangular box.
Step 4: do you remember the rectangular bowl you made at the beginning with stoneware? Put it inside this rectangular box, completing a single figure.

The hole in the stoneware should go in the lower part. At this point, you will have to make a new hole in the barrel opposite the hole in the bowl.
Step 5: make a sort of tube to be bent and enter through the rectangle with another barrel piece. You should also join this one to the one you made in the previous step.
Step 6: in another piece, make another rectangle joining the rectangular figure, but this time from the top. It has to be much wider on top, just like a funnel.

Steps to use your ecological kiln
Step 1: light the kiln by putting straw and newspaper on fire through the final hole of the barrel. While the fire burns the straw inside, place the recycled refractory fiber on top of the fireplace.
Keep in mind that you cannot put the pieces in yet.
Step 2: next, place three supports so that the fire does not directly touch the pieces.
Step 3: next, place the laboratory on top.
Step 4: inside the laboratory, place a refractory plate, which should be placed on the top, and on top of it, the pieces to be fired. The platter will take the fire impact, and the smoke will come out from the sides.
Step 5: place recycled fiber around the edges of the laboratory, and finally, set the chimney.
Step 6: pour straw through the funnel, and insert newspaper with the tip in flames in the rectangle below to start to heat it up.
Step 7: if you want to know the kiln’s temperature, you can get a pyrometer. Open a small hole in the top of the lab and insert the tip of this tool through it. On the screen, you will see the temperature of the kiln.
And that’s it, you have your own eco-friendly kiln for ceramics.

Build your own home ceramic kiln
If you’re looking for a larger kiln option that you don’t have to move or disassemble, here’s how to make your own homemade ceramic kiln.
The materials you need
All the materials below can be found in construction stores or on websites of construction companies and e-commerce sites such as Amazon and Mercado Libre.
- 27 cement blocks N14
- 3 sheets of SUPERBOARD of 1.22 cm high x 2.44 cm long (48 x 96 in.)
- 8 wooden planks of 80 cm long X 8 cm wide (31 x 3,1 in.)
- 27 refractory bricks or mixture
- Jig saw
- 18 screws 6×1 cm (2×0,5 in.)
- Mortar
- 72 stone slabs
- Hammer
- Cement sheet 100 cm long x 100 cm wide (40 x 40 in.)
- 1 bag of cement
- 2 carts of pebble sand
- Water
- Metal spatula N° 6
- 1.50 meters (4,9 ft) of galvanized chain
- Pencil
- Ground refractory clay
- Ground temper (whatever you want to use)
- A bag of sawdust
- 3-inch metal pipe, 3 m long (9,8 ft.)
- Refractory fiber
- Round metal door with mesh openings measuring 60 cm x 60 cm (24 in. x 24 in.)
- Black wire
- Empty 5-liter paint bucket
Step by step
To make this great homemade kiln, follow the instructions below in detail.
Here is the step-by-step video that you should follow in detail so you can better understand how to make your own homemade kiln.
The base
Step 1: the first part you have to do is the base. For this, you must carefully think about where to place the kiln as it cannot be moved. We advise you to choose an outdoor space with enough ventilation.
Step 2: use the cement blocks to build the base. You should lay 3 rows: each consisting of 3 long bricks laid horizontally and 2 high bricks laid in the same way. Leave 32 cm of space between the spaces of the rows.
Step 3: place the 100 x 100 cm cement or concrete sheet on top of this base.
Step 4: on top of this sheet, place three more rows of 3 cement blocks. One row of 3 blocks on the left side and two rows of 3 blocks on the right edge each.
Step 5: here, mix the 2 wheelbarrows of sand with 1 bag of cement and water in a bucket that you no longer use.
Be sure to stir well until the mixture is liquid yet a little thick, as you will use it to glue the stone slabs together.
Step 6: start placing the stone slabs in two rows horizontally on the base of the concrete sheet. To do so, spread the mixture you made with your spatula on top and place rows of two stone slabs in the center.

Step 7: you will notice that there is some space on the sides, so here you will also spread some mixture and put the bricks, but this time, standing vertically.
Remember to apply some mixture in the middle of each brick to keep them firm.
Step 8: now, keep doing the same, but this time, place the stone slabs horizontally on top of the last three rows of cement that you laid in step 4. You would have the base by now, and it should look like in the following image.

The mold
Step 1: draw a 60 x 60 cm ( 2 x 2 ft.) square on two SUPERBOARD sheets.
Step 2: cut the squares with the jigsaw and place them one on top of the other.
Step 3: in the top corners of the squares, drive a screw and attach the ends of the chain to them in such a way that it curves over the bottom edge of the squares.
We recommend that you stand the squares up so that the chain drops naturally.

Step 4: once the chain is even, trace its edge with a pencil.
Step 5: take off the chain and lay down the planks. Then cut the figure you drew with the jigsaw.
Step 6: by this step, you will have your two curved figures cut and separated, so next start forming the curve of the chimney using the 8 boards.
Step 7: erect one of the curved figures and start joining each board with two screws. You must put one board down, leave some space, and then continue with the other one, and so on.
Calculate how much space there must be so that the 8 boards are attached to the curved figure proportionally.

Step 8: then glue the other curved part to the boards using the remaining screws.
Step 9: measure the curve left in the center, and use the other SUPERBOARD sheet to cut it to size.
Step 10: then adhere to it and you will see how you already have a mold of what will be your chimney roof.

Step 11: place the mold on top of the brick and cement base.
Elaboration of the bricks
Step 1: make a mixture of ground fireclay, ground temper, sawdust, and water.
We recommend making it about the size of a 2.5-gallon paint bucket.
Step 2: once the mixture is ready, start making bricks 60 cm long x 13 cm high (2 ft. x 5,11 in.).
Make as many bricks as you need to cover the chimney mold you made previously. As a recommendation, glue the bricks on the mold so that they overlay on top of the other and interleaved, as shown below.

Important: one of the bricks should have a curved hole in the middle, and this is what you should put on the right side first on the bottom of the mold.
Step 3: let the bricks dry completely on top of the mold. Then remove them.
Step 4: once they have dried, put them in the kiln at a temperature of 900 °C. (1400 °F).
Step 5: cut a 5-liter paint bucket in half. This cut should be vertical.
Step 6: join the edges of the can by tying them together with a twist tie.
Step 7: fill slightly less than half of this bucket with the mixture you made.
Step 8: dip the 3-meter metal tube into the mixture in the center of the bucket and then take it out. Then empty it, because it will have a little bit of clay inside, or you can wet it to make it easier and faster to repeat this procedure. You will see how round it will be.
Step 9: untie the bucket and separate the edges to remove the figure from there.
Step 10: repeat steps 6, 7, 8, and 9 at least until you have 15 of these figures. These figures should be cut in half, vertically, as they will be used to surround the metal pipe next to the chimney.
Step 11: let them dry, and once they are leathery hard, that is, nearly dry yet a little damp put them in the kiln at a temperature of 900 °C (1200 °F) for about 4 to 7 hours.
The mounting
Step 1: place the bricks on top of the mold, that is, one on top of the other until the mold sides, top, and back are covered.
Remember to apply, with your spatula, the mixture you used before to glue the stone slabs in the middle of each brick. And that the first brick to place is the one with a hole in the middle.
Step 2: when you are done, carefully remove the mold.
Step 3: apply more of the mixture underneath to keep the bricks steady.
Step 4: now, to the right side, just in front of the brick with the hole in it, place the metal pipe.

Step 5: start adding the circled pieces around the tube until you run out of fragments. Don’t worry if they don’t cover the whole tub, as the idea is to coat the lower part at least.
Don’t forget to apply the glue mixture to these pieces as well.
Step 6: let them dry thoroughly.
Step 7: leave a space of 20 cm (8 in.) from the back wall inside the chimney.
Step 8: with 9 stone slabs, make a small wall from bottom to top, in other words, from the base of the chimney upwards after the 20 cm (8 in.) you left in the previous step. Always use the mixture to glue the slabs together well.
Something to keep in mind is that this wall should not go up to the ceiling; it is common to leave a little more than 20 cm of space.

Step 9: install refractory fiber on top and behind the ceiling. Make sure to cover it tightly.
Step 10: then spread the cement mixture on top of the fiber. You need to put a thick layer and let it dry completely.
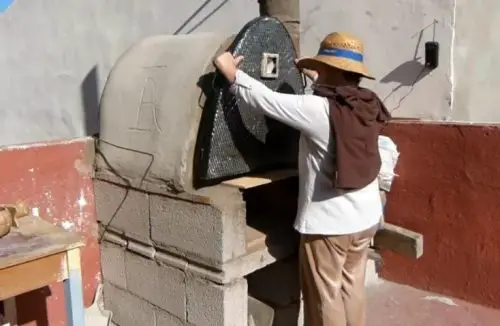
The door
Step 1: place refractory fiber along the inside of your door, leaving a hole at the top. Our advice is to have your door made as you see it in the image so that you don’t need to do it yourself and the process becomes easier for you.

Step 2: pass the black wire from one side to the other behind your kiln; it must be tightly stretched.
Step 3: at the end of each tip, assemble some kind of hooks that will hold the door.
Step 4: place the door by holding it with the wire and close it.

Step 5: to test your kiln, light a fire in the middle space between the chimney and the floor by using paper or any other fuel.
Just as with the eco-friendly kiln, you can use a pyrometer to check the temperature of your kiln.
Congratulations, you are now done building your homemade kiln. Well done!

And this is how we close today’s blog. What do you think? We hope you liked it and, most importantly, you got encouraged to make your own tools for making your own pottery and creating art. Don’t forget to keep innovating and put your work in motion.

