
Translated by Nick R
Have you seen those ceramic pieces with several veins or lines of colors? Well, those types of works are made with a simple technique called marbling. Today we will explain it in detail so you can create objects that are just as beautiful.
This technique involves more work than a regular one-color piece, but the steps are very easy to follow, so don’t worry.
Throughout the blog, we will explain what marbling means, what materials you need, and the steps to follow to achieve such a fantastic marbling effect.
Table of Contents
What is marbling?
Marbling is a decoration technique that causes the object to look like marble. It is used in many different fields, not only in handmade ceramics, for example, in food (such as cakes) and various textiles for clothing.
This time, as we are using marbling to make the clay pieces, we will achieve a marble look by using various mixed colors of clay, creating this incredible finish. It can also be achieved by applying ceramic glazes on the clay of a single color or with silicate oxides.
One great thing about this technique is that your pieces will never be identical. Even with the same figure and colors, the art pieces will never be the same because of the clay kneading, the veins, their thickness, and the order of the colors. They will always be in different spots.
Materials
The materials you need are very easy to obtain, and you probably already have them at home or in your workshop and that you use frequently.
- Clay
- Cutter
- Ceramic pigments of one or two colors
- Water sprayer
- Roller
- Lance-tipped scalpel
- Barbotine
- Ceramic kiln
- Clear ceramic glaze
Step by step to make a marbled pitcher
Step 1: first of all, place your clay block on the work table and cut a piece with the cutter. Then you knead the clay very well to make it easier to join the colors together later.
You have to knead it thoroughly to explode the air bubbles that the clay may have because, when taking the piece to the kiln, bubbles will explode because of the heat and, therefore, your art piece and all the pieces you are firing will be damaged.
Step 2: divide the clay you have just kneaded into several pieces. This is for applying the pigments to each layer that later will be the veins we talked about before.
Step 3: make a hole in the middle of every piece that you will apply pigments. This way, you will be able to put the pigments there, and when you knead the clay again, it will be well distributed.
Step 4: as you place the ceramic pigment in the center, sprinkle a little water with the sprayer included in the materials. This is to help dilute the powder a little and avoid lumps or anything like it in the mass.
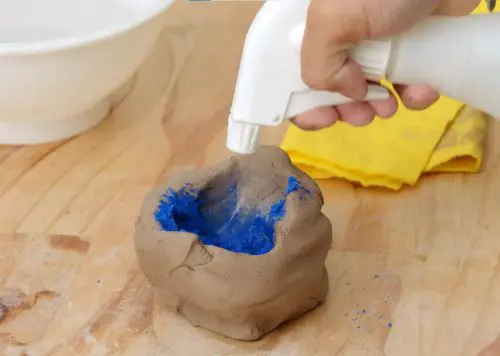
Step 5: now you start to knead the clay with your fingers, pinching, making holes, and moving it so that the pigment gets well distributed. You will stain your hands, so if you like to smear and feel each texture, we don’t recommend you use gloves; anyway, use them if you prefer not to get dirty.
You have to do this process with each of the pieces of clay you divided before. If you want your piece in two colors, you can paint some pieces in one color and the others in the other, or you can paint only some of them so that the others stay in the natural color of the clay.
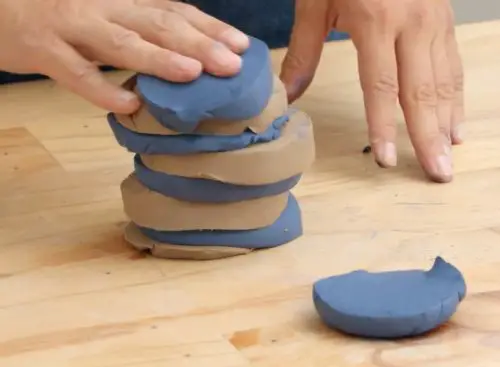
Step 6: when you have all your pieces or layers of colors ready, shape them into a disk and place them in a tower by alternating colors.
If you want one color more noticeable than the others, for example, the grain to be thicker, simply make the clay layer of the color you want bigger and wider. As you can see in the image, the layers in natural brown color are larger than the blue ones.
Step 7: knead the clay as if you were in the first step where you took it out of the block. Apply lots of force, turn it over and knead again. All this is to really divide the colors and create the veins we are looking for.
This step will take a lot of time, effort, and energy, but we are confident that it will be worth it.
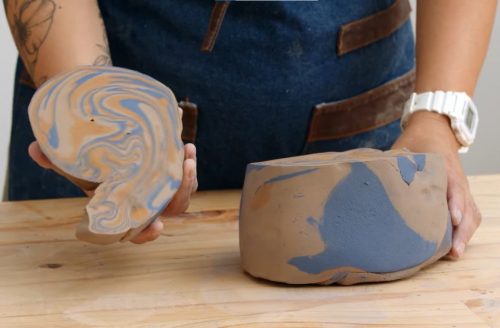
Step 8: after kneading for a long time, you have to cut a piece with the cutter, just like you did when cutting from the block, and check if the clay has the marbling effect. It should display several well-distributed veins of several colors like the one in the image below, in which three colors were used: orange, blue, and the brown of the clay.
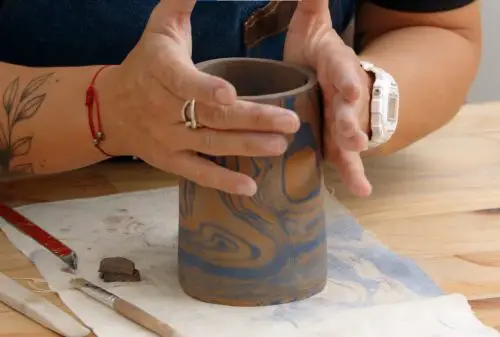
Step 9: now that you have the marbled clay ready, you will start making your jar. Are you ready? You will make it using one of the easiest modeling techniques in the world of ceramics, the slab technique.
You have to place the clay on the table and flatten it very well with a roller until the slab is about half a centimeter thick.
Step 10: you will make the whole piece from this plate, so using the lance tip scalpel, you have to cut a circle which will be the base of the jar, as well as a rectangle as long as the circle’s circumference or perimeter. That is, the rectangle must be able to surround the base circle completely and reach to join its ends to form a cylinder.
Besides, you will have to cut a tiny rectangle to make the spout or mouth of the jar and a long strip of clay to make the handle.
Step 11: use barbotine, a liquid mixture of water and clay, to join all these parts together, but first, you must make short incisions with the scalpel on each of the pieces that will be joined to the others. This is done so that the barbotine gets into the clay effortlessly and, therefore, all the parts can adhere much easier.
For example, you have to make the cuts on the top edge of the circle, that is, the base of the jar, and on the rectangle base (the part that measures half a cm wide), which are the walls of the jar that will store the liquids.
Once you have made the cuts, apply barbotine on both pieces and join them together. Remember that the rectangle goes on top of the circle, and you must join its ends to form a cylinder.
Before gluing the small rectangle, remember to make a U shape to form the pitcher spout. Make the cuts on the base of one of the long sides (the one glued to the jar) and on the rectangle where it will go. Then stick it so that the U opening gets facing upwards and at the same level as the jar’s top edge.
As for the handle, make the cuts on both ends of the strip and, like for the spout, cut on the jar where you think the handle will go.
Each time you join the parts together, you should press them together with force and leave your hands there for some seconds. This will make it stick much better.
Step 12: in order to blend the joints of the base with the jar walls and of the spout and handle with the walls, you have to moisten your fingers and run them gently along with them. By doing this, you will pull the clay to make it look like a single piece.
This step is used a lot in the coiling modeling technique, as the piece is formed by placing clay coils one on top of the other. For that, you can also use a toothpick or a wet sponge so that the clay drags smoothly.
Step 13: something’s wrong with the piece, isn’t it? There is no place for the liquid to come out! Don’t worry, we haven’t forgotten. To complete the jar’s spout or mouth, cut the wall with the scalpel, and flush with the spout you placed before.
You must make the same exact U-shape. If the cut is not polished enough, don’t worry, you can moisten your fingers or use a sponge to refine it.
Although there is another option for the liquid to run out. This option will make your piece even more unique. You will need to use a small tipped hole punch on the wall section with the spout to drill the holes through which you can pour the water.
Step 14: now you must take your piece to the kiln for 2 to 3 hours between 800°C and 1,200°C. Check your clay manufacturer’s instructions for the exact time and temperature.
Step 15: after those hours, remove your jar from the kiln and let it cool. You can leave your piece without glaze, matte, as you see it right now, but if you want to make it shiny, waterproof and more resistant, we recommend you apply a transparent glaze.
Keep in mind that the glaze temperature must match that of the clay, as some types of clay require high or low temperature, as well as ceramic glazes.
Step 16: if you decide to glaze your piece, you can use one of the glazing techniques, like pouring or dipping, which are the most used by professional potters.
For this piece, you could use the dipping technique, consisting of a container full of glaze, and take your piece with a pair of glazing tongs to dip it into the container to completely cover the piece.
Tweezers are a great tool to avoid staining your hands and cover the piece all over; surely if you use your hands, the piece will have no glaze where you have held it.
Step 17: as the glaze requires a second firing to adhere well, you will put your piece in the kiln for the second round at the same temperature and the same time as the first time.
Step 18: take your piece out of the kiln, let it cool down for a long time and that’s it, you now have a completely finished marbled jar made with your own hands! We promise that you will impress at family gatherings or friends when you take out your pitcher to serve a drink.

We have reached the end of this blog and we hope you have learned a lot and applied all your knowledge about ceramics.
It looks like you have a painted piece, but no, it is much better, it is decorated purely in clay. Take advantage of that no single piece will be the same as another to sell or give them as a gift.
Remember that you can make any type of piece using this technique since it is like having natural clay, only now it has beautiful colors and veins.
If you wish to continue learning about the world of ceramics, including decoration techniques, tools like the potter’s wheel, the history of this art, and much more in a simple, easy-to-understand, and fun way, join our Ceramics Club and read our content.

