Translated by Nick R
Would you like to make ceramic pieces other than plates, cups, flower pots, or any regular item? You’ve come to the right place; we will show you in a really easy way how to create clay characters just by putting your creativity to work.
Household pieces are the most typical ceramic objects you see; don’t you agree? But clay is so versatile and easy to use that it lends itself to make literally anything we want. From a small piece such as a chain pendant to enormous sculptures like the ones, you see in a museum.
Making ceramic figures is a fantastic activity for children and adults to put their creativity to the test. So we will show you which types of clay you can use for 3D character creation, which is the ideal technique for this plan, and the detailed steps for achieving it.
Table of Contents
Clays for making the characters
There are 4 types of clay that can be used to make this kind of figure, which are:
- Stoneware clay
- Terracotta clay
- Polymer clay
- Cold porcelain
The first thing you need to know in order to choose among the four types of clay is to decide how big and heavy your character will be, if you have a high-temperature kiln, and whether or not it fits in your ceramic kiln given its size.
Stoneware clay needs firing at 1,300°C (2,372°F) and terracotta between 900 and 1,100°C (1,600 and 2000°F). Don’t worry if you don’t have a kiln, polymer clay, and cold porcelain dry in the open air; a great plus if you cannot borrow a kiln or you don’t want to spend money buying one.
Besides, the latter two you can buy in art stores or virtual stores, or you can even make them at home with a few domestic materials.
However, if you want to make big characters, over 15 cm (6 in.), we don’t recommend using polymer clay or cold porcelain as these materials are too fragile and not commonly used for figures of this size.
For the character we are about to make, we will use stoneware clay, so if you have no way to get a ceramic kiln, don’t worry because you can use one of the two clays that dry in the open air. This time we advise you to make it smaller than ours so it will look nicer for the type of material you have chosen.
Techniques for character modeling
Broadly speaking, there are 5 techniques for modeling ceramics: the pinching technique, the slab technique, the coiling technique, the potter’s wheel technique, and the slip casting technique. On this occasion, for characters, only the first 3 techniques can be used, as they are purely manual.
As this type of work depends solely on the movement of your hands following the mental picture you have of it, a technique such as casting, which requires molds, does not work at all. Overall, what we seek with this type of work is to get out of the molds and try new things.
If in the process, you see no need to use a technique, you can build each part of your character with a piece of clay and then join it with the rest. It is also a big plus of creating 3D characters that work is not that restricted to techniques.
What should you do before you start modeling?
1. Choose the clay with which you will create your character well based on whether it will be big or small and whether you have a ceramic kiln in your home or workshop.
If you don’t have one, but can borrow one from an acquaintance or a pottery workshop, don’t hesitate to go for that option; it would be much better.
2. Let creativity soar to get a good idea of what your character will look like. Find inspiration in your life, your daily life, or take inspiration from existing characters and adapt them to your own ideas.
3. Be sure of why you are making this work, either to decorate your room or home, for a gift, or for a school or university project that you want to develop in this way. That will help you decide the size of your artwork.
4. From the idea you have in mind, sketch the exact character design on a paper sheet; down to the smallest detail. That will enable you to visualize your character concerning volume and dimension.
5. Prepare your workspace and set up all of the modeling tools, a few or many depending on the textures and decorations you want to create.
These are some of the tools you will use, including sticks and ribbon tools with different tips.
The ceramic character creation process
We will show you the process of making a character by the artist Martin Ferreyra. However, it’s valid if you feel like making changes in the middle of the process, like adding more arms, leaving only one leg, or giving it a different face. The figure will be about 60cm (23 in.) tall.
With this blog, we’d love to help you bring out all that creativity and that you learn the fundamentals of character creation so that you can start making your own designs little by little.
Materials
- Stoneware clay
- Barbotine
- Water
- Roller
- Sponge
- Scraper
- Drill
- Cutter
- Ribbon tool
- Chopsticks
- Deep-toothed knife
- Fork
- Lance tip scalpel
- Enamels
- Pottery kiln
We know these may look like a lot of materials, but don’t worry, most are just tools for texturing the clay.
Step by step
Step 1: The first thing to do is cut a large piece of clay from the clay block in your workshop or home. The best way to cut large pieces is by using the ceramic cutter, such a helpful tool.
Step 2: Then you have to knead that clay very well. For you to be able to handle it much easier and model your character, it has to be smooth and free of lumps.
Besides, kneading the clay makes all the air and water bubbles disappear, thereby avoiding the possibility of the piece bursting in the kiln.
Step 3: You have to separate it into several chunks; the character will be composed of 7 parts in total, including the base on which it will stand.
Step 4: Using the coiling technique, make the head of the character; the first part.
You can also make it with the slab technique or with a whole block of clay. If you choose the latter option, you must consider that it will be really heavy and possibly the legs will not resist all the weight.
Step 5: To achieve the coiling technique, you must have a 12cm (4″) diameter circular clay base, which is the starting point to form the whole head. And for the coils, you must take a piece of clay and start to roll it back and forth with your palms.
That movement, apart from going back and forth, must be done from the center outwards so as to stretch the clay and make a final cylinder that looks like the actual ¨churros¨ that you eat.
Step 6: Then you must join both ends of the coil as doing a ring and then put one on top of the other until reaching the desired height. The head will not be circular but cylindrical; keep this in mind when placing the coils.
To join them, you can squeeze them together with your finger each time you place one so that the union is not noticeable. A tip for making it easier is to moisten your hands with water and join the coils, first from the bottom up and then from the top-down as if you were pulling the clay.
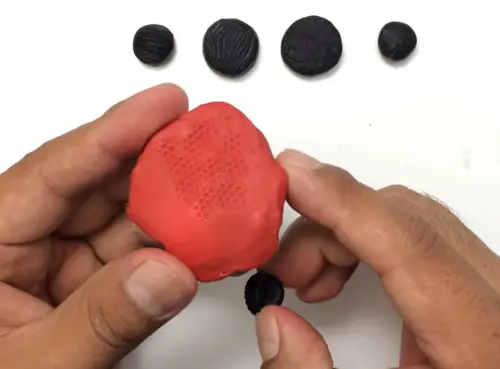
Step 7: Now that the head is done, it’s time to make the ears. These you can do using the pinching technique since they are the smallest parts of the character.
First, make a ball of clay for each ear and make a 2 cm deep hole in the center with your thumb, and gradually, make it deeper according to the size you think is best.
Step 8: Once the hole is complete, you have to pinch the clay from the center out until it gets as wide as you want, and with your thumb inside the hole, start forming a triangle with the help of the hand, that is, holding the clay ball.
The head details, such as the ear, eyes, mouth, and nose, we will do them later; you don’t have to worry about them yet.
Step 9: Let’s move on to the character’s trunk. For this one, you will use the slab technique because if you place a big clay block, same as with the head, it will be too heavy, and the legs won’t support the weight.
Many do it with blocks of clay but keeping in mind that the lower part of the character must be firm enough to bear all the weight of the upper part.
Step 10: To make the plate, use a rolling pin to flatten the clay and make it of equal thickness all over. Then you will cut out a rectangle with the lance tip scalpel. It doesn’t matter if it ends up too long; it’s better to chop a portion later than having to cut the piece again because it is too small.
Step 11: Then, stand the clay slab over the long side and join the ends together as if forming a cylinder to check if it is proportional to the head. Note that the slab will flatten a bit, and thus the trunk will get a little wider.
Step 12: If it looks good, apply barbotine on both slab edges and join them together.
Step 13: There must be a hollow inside, right? Well, to make the base and the shoulders, you will squish inwards in both the top and the bottom openings and join them in the center.
So that you don’t see any joints or wrinkles resulting from the previous step, pour some water on your fingers and run them gently over the imperfections until they no longer exist. This way, the clay becomes one.
Step 14: We are almost done with the character’s body parts. Now, do the arms and legs, which you can model with the slab technique for easier work.
In this case, you only have to make the slabs taller than long, and afterward, join them with barbotine and polish the joints.
Be sure to assemble your character on a table to see if the body parts are proportional to the rest, so you can redo them if they are not working well.
Step 15: To make the character’s base, you only have to take a block of clay and form a sort of rock where it will stand.
Step 16: Now, join all the parts to the trunk and the body to the base by applying some barbotine to each area of the trunk where the limbs are to be placed. Apply some barbotine to the limbs also, so it gets more steady and with no risk of falling off.
Always run your wet finger along the joints to make them look like an entire piece, rather than a portioned work.
Step 17: We come to the decoration phase! But before being able to scrape and create texture, the piece must dry out for a few hours until it becomes leather hard, meaning it has lost some moisture but is not totally dry.
Step 18: Use all your tools to scrape and drill into the clay: ribbons, drills, chopsticks, deep-toothed knives, forks, or anything you can use to scratch your clay to create interesting textures on your character.
Although tools like the ribbons are helpful not only for that, they can also help you perfect the character’s surface, making the clay smoother, just like the scraper does.
Step 19: The face is still to be detailed, isn’t it? For making the facial features, you will use the lance-tip scalpel. You have to shape the eyes and nose and cut that piece out. For the mouth, draw a thin line and remove some of the clay with a ribbon tool.
As for the tusks, you can make them with a small piece of clay and glue them with barbotine. Then, you can scrape the inside of the ears with a chopstick to give them a different texture, as if they were hair.
Step 20: Now, you only need to enamel the figure to make it more resistant and waterproof, which would be perfect if you want it as a garden decoration. But before that, you must put it in the oven at 1,300°C [2,300°F] for 3 to 4 hours.
Step 21: Let the piece cool for a few hours, and then start enameling your character to bring it to life. Keep in mind there are 6 glazing techniques, although in this case, using a brush would be the best so you can apply several colors easily.
Step 22: As the last step, put the piece in the kiln for a second firing round at the same temperature, and enjoy your new sculpture built with your own hands!
We have reached the end of this blog, and we hope you enjoyed it as much as we did while writing it. We saw a unique use of ceramics, and, in particular, one that allows us to let our creativity fly and express all our ideas and feelings.
Also, we hope you learned lots of extra stuff while modeling your character, such as types of clays, modeling techniques, glazing, and texturing.
Put your creativity to the test and create as many characters as you wish!