
Table of Contents
Recommendation of materials
Below we explain different materials to apply these techniques to your pieces.
Engobes
Ceramic engobes are both a material and a decorative technique. This material is made by mixing clay with dye oxide and water. In the end, its texture resembles that of a paint, which makes it ideal for decorating ceramics.
Engobes (high temperature)

- Price: between $7 and $9
- Brand: Marphil
- 250cc pots or 1000ml containers
- Ideal for firing temperatures between 980ºC and 1280ºC.
These Marphil engobes are liquid and ready to use on clay. This engobe can be applied to the fired or hardened clay. However, we advise you to add a glaze after application to bring out the color and not leave a pastel shade, unless you like the result.
Remember that this type of engobe can withstand high temperatures, but we recommend that you do not exceed 1280ºC. If you want more recommendations for this product, you can find them on our blog about ceramic engobes.
Extenders or thinners
The extender is a liquid used to dilute the paint or engobe. This material is used for the marbling technique, which you will learn more about later.
American Extender

- Price: $25
- Brand: Americana
- 60cc container
The content of the product seems very small. However, you only use a few drops at a time, so the product should last for some time.
Polyester (liquid)
Liquid polyester is used for sublimation. In the case of ceramics, it is used to highlight and seal the applied engobe so that the design will not mar or bleed and best of all it will last for many years.
Polyester Polirigid

- Price: $22
- Brand: POLIRIGID
- 500ml and 32ml containers
Polirigid polyester is ideal for all types of ceramic pieces. It is transparent, easy to apply and serves to enhance the colors of the engobes applied. It can also be used on materials such as wood, glass, and metal.
Remember that this material should only be applied once the piece has been fired and the engobe has been correctly applied, which of course must be almost dry.
Squeegee
The squeegee is a tool used to spread paint, glazes, or in this case, ceramic engobes. The squeegee allows the materials to be spread very well on any flat surface and no lumps are left behind.
Ink spatula

- Price: $22
- Brand: Caydo
- 3 different sizes
We recommend this product because the kit includes 3 sizes of 5.9″, 9.4″, and 13.7″.
Paint roller
The roller is the ultimate tool for flat surface painting. In this case, you will use it in the monoprint technique on glass.
AYC role

- Price: $2
- Brand: IMPORTACIONES AYC
- Plush roller number 7
We recommend this product for its size, perfect for painting on any surface.
Turntable
The potter’s wheel, also known as the potter’s wheel or potter’s wheel, is the most common tool used by potters around the world. Typically this is used for modeling your characters.
S SMAUTOR 350W ceramic wheel
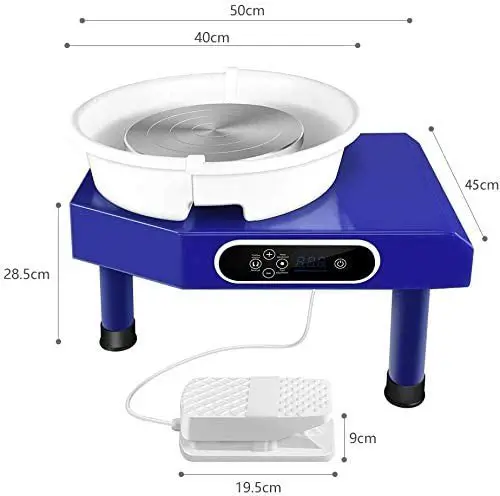
- Price: 38 (USD)
- Brand S SMAUTOP
- Digital display for speed control
- Electric lathe with foot pedal
We recommend this product as it is the perfect size to place and decorate the piece. It also has a support surface that will help you place the brushes and engobes.
Spatula
Spatulas are used to apply the engobe or paints. You can also use them to cut or remove the clay from your pieces.
MG spatula

- Price: $2
- Brand: MG
- 5-inch spatula
Screen printing frame
This tool is a must for the screen-printing technique. The frame is a kind of board with a mesh used to draw designs on the pottery.
Kit for screen printing

- Price: $38
- Brand: Caydo
- 19 Piece Screen Printing Set
As a final recommendation we have this screen printing starter kit, the kit is ideal as it contains 19 pieces including the wooden frame, squeegee, tape, special sheets or sheets to trace through and more.
Marbling
Marbling is a decorative technique that, as the name suggests, aims to give a marble or wood effect to the piece of clay.
This decoration technique is widespread because it is very easy to apply to ceramics. The great thing about this technique is that once applied to the figure, it appears as if several colors are together, but not mixed, i.e. they are easily recognizable.
In addition, the marbling creates a movement effect, since the applied colors are distributed in such a way that they simulate the rippling of the water. This gives the ceramic a touch of sophistication, elegance, and a differentiating effect.
Materials required
Here is a list of the materials you will need to apply this technique to your ceramic objects:
- Engobes or paints
- To brush
- Plastic container
- Container with water
- Sponge
- Pipette
- Paint sprayer
- Liquid polyester for sublimation (optional)
- Damp cloth to wipe off bumps
How to apply this technique?
Before we start explaining this technique, we would like to point out that marbling is ideal for flat pieces such as tiles, trays, dinner plates and soup plates.
However, this technique is also used for figures of different sizes and shapes.
We are now going to explain step by step how to apply this great decoration technique to your flat ceramic pieces:
- Make sure the piece has completed its modeling process and is in its leather condition, i.e. its mass is almost hard and dry but still contains some moisture.
- Add a layer of engobe in the color of your choice. We recommend that this first engobe be the darkest of any that you will be applying.
- We remind you that engobe differs from paint or glaze for ceramics. Glaze and color can be used to paint your pieces without changing the texture, thickness, or durability of the clay, while engobe can be used not only to paint and color your pieces, but also to change the texture, thickness, color, and durability your tone.
- Once the first layer of the dark engobe is evenly distributed, add small drops of the lighter engobe that should be spread all over the dark engobe.
- When the drops are randomly arranged, start tipping them gently from side to side. At this point you can see the drops of the lighter engobe moving, creating the illusion of water.
- You should follow step 4 until you decide to stop and feel the drops have spread sufficiently.
- The final step is to air dry the work piece and then kiln dry it if necessary for the type of clay you are working with.

Now that you’ve learned step-by-step this technique for flat objects, it’s time you see how marbling can be applied to more complex figures:
- Separate the colors you want to use and pour each color separately. We recommend 2 colors, e.g. B. a dark brown and white.
- Using an eyedropper, apply about 5 to 8 drops of any extender or material to each color that will be used to keep the color from drying as quickly.
- After applying the drops, mix very well or dilute so that the entire paint is impregnated with the product.
- When they’re done, use the brushes to apply the darker color to the piece. This should not be painted in the normal way, instead you should apply small, random streaks of this color.
- After applying the darker color, continue with the lighter color. This should be applied in strips next to the strips already laid out.
- After the stripes are done, use a damp sponge to blend the two colors. It is very important at this step that you apply the mixture onto the paint in small, quick dabs, covering up the missing areas.
- It is important that the scratches and their distribution on the piece are not done all at once, but piecemeal.
- Once you have completed these steps on the entire piece, you should apply polyester to add shine to your piece and accentuate the marble effect. This step is optional, but you can add an opaque effect to your piece if you wish.
Marbling with feather
This technique also stimulates the marble effect but differs from the first in the way it is applied and the style of the result.
Before we tell you how to do it, you should know that if you want to do it, you should have a steady hand and a good hand. And if not, don’t worry, you can practice until you get it perfect.
Materials required
Here is a list of the materials you will need for this decoration technique:
- Engobe or light color
- Engobe or dark color
- Plastic container
- Pipette
- A feather
- Damp cloth to wipe off bumps
How to apply this technique?
This technique is suitable for all types of objects. However, it’s much easier on flat items, so you can use it on those items too if you’re just starting out.
It’s time to tell you step by step how to apply this curious decoration technique to your ceramic pieces.
- Make sure the piece is almost dry, don’t worry if it still feels a little damp.
- Apply the darker glaze evenly, being careful not to form lumps.
- Use the eyedropper to draw short but continuous straight lines in the same direction with the lighter icing. Usually, this is done vertically as it is easier that way. Precision is very important here because these lines must not shift or merge into one another.
- Draw these lines in the same direction with the pen to simulate the lines running down.
- Do the same as in the previous step, but this time in the opposite direction, i.e. towards the other side.
- When you have completed these steps, the piece is complete. It is now time to let it dry. We advise you not to move it because the engobes may still be fresh and if you move it abruptly you may damage all the steps previously done.

Monoprinting with glass
This method works very similarly to stamping. For this method, you need a smooth, non-absorbent surface such as e.g. glass.
Remember that mono-printing is used to create unique designs by hand as they are drawn onto the surface.
Materials required
- Slip
- Paint roller
- Wooden or stainless steel roller
- Glass
- Q – tips or a tool to draw on the paint
- Damp cloth to wipe imperfections
How to apply this technique?
Mono-printing with glass is perfect for completely flat pieces because the process requires it.
- Using the roller as support, apply the engobe to the glass so it is even with no lumps.
- Using the swabs or any other tool of your choice, draw the desired motif onto the engobe.
- Once the design is complete, you should spread out the piece of dough that you are going to place on the jar.
- Press the dough down, making sure it doesn’t stick to the jar so you can easily lift it off later. You can help yourself with this step with a rolling pin made of steel or wood.
- Gently lift the paste. Now you can see the subject sticking to this piece of clay.
- Finally, let it dry. If you want, you can paint them to enhance the figure.

Monoprinting with mold
This technique owes its name to the fact that an impression is simulated during the process, which can only be done once.
Materials needed
- Engobes (two different colors)
- Plaster molds
- Brushes
- Plastic container
- Sound
How to apply this technique?
To apply the monoprint with a mold you must follow the following steps:
- Paint the plaster mold. First, coat it with one color before it dries, you can also do two coats.
- Before the first engobe has dried completely, you need to paint the mold with two more coats of the other engobe.
- Then you need to close the parts of the mold and fill them with liquid dough.
- Remove the parts from the mold. At this point, you can see how the colors that were applied to the shape have been transferred to the figure.
- The piece is dried until it has reached its leather-like state, i.e. almost dry but still a little damp.
- When the piece is in leather condition, it can be worked and scraped with the help of the blade until the colors applied at the beginning can be seen.
- If you scrape, you can customize the figure as you like, and even put eye-catching patterns on it.

Monoprinting with paper
The monoprinting technique with paper consists of placing pieces of paper, preferably newsprint, and using them to give the piece the desired texture and thickness of the decoration.
Materials required
- Engobes
- Strips of paper (preferably newspaper)
- Brush
- Glass
- Damp cloth to wipe imperfections
How to apply this technique?
Paper mono printing is ideal for all types of items, but it is much easier to apply to flat items such as plates or bowls. But you can also do it with cups.
Now we explain step by step this curious technique of decorating your ceramic pieces:
- Paint the strips of paper onto the glass in the colors of the engobes.
- Before the strips dry, place them on the pieces to leave their texture and color in the form of a strip.
- Press the strips of paper so that the paint adheres to the piece and slowly remove them one at a time. If you see that the engobe isn’t drawn very well, you can put another stripe of paint over it to emphasize the color and shape.
- Do step 3 multiple times until you think it’s done. Remember that this decoration is free, which means you can put the strips in any direction you want.
- As a last step, you need to let the paint dry well because since there are several layers of pigment, it may take some time for the design to dry completely.

Screen printing
Screen printing is a technique that leaves a very fine finish on ceramics and any other material to which it is applied. The process consists in printing an image through a synthetic mesh.
You should know that there is not much difference between screen printing on ceramics and screen printing on textiles. It is obvious that both are very similar since the objective of this technique in the different areas is to draw a pattern on a surface.
Both techniques are very similar as they both use screen printing frames, except that in the case of ceramics you use the engobe, and in the case of textiles you use a special ink to trace the figure.
Screen printing requires a lot of practice, so while it’s not easy, it’s not impossible either.
Materials needed
- Engobes
- Spoon
- Screen printing frame with premade design
- Squeegee
- Damp cloth to wipe off bumps
How to apply this technique?
To apply this technique, you should follow the following steps:
- Place the dough, i.e. the stretched piece of dough, under the frame.
- Place the motif under the frame and on top of the dough. Remember that this motif must be made of nylon or polyester fabric that is specially made for screen printing frames.
- On the frame with the figure, with the help of the spoon, put the engobe, only on the top, and then what we will indicate in the next step. It is important that the engobe is neither too runny nor too thick so that the work can be done well.
- With the squeegee, start running the engobe over the figure. This must be done very carefully so that it adheres properly to the figure.
- Then carefully lift the frame so that the underlying paste with the freshly drawn figure is not damaged.
- Finally, let it dry because the figurine is fresh and easily damaged.
- You can shape the clay without touching the drawing. In this way, the desired piece remains in the drawing.

Template
With the stencil technique, motifs are created using materials such as fabric and paper. With this technique, too, a frame stretched with silk is used, with which the figure can be transferred to the clay.
Materials needed
- Engobes
- Strips of paper (preferably newspaper)
- Completely clean screen printing frame
- Scraper
- Damp cloth to wipe off bumps
How to apply this technique?
Now that you know what materials you need to make a ceramic stencil, we can proceed with the step-by-step guide.
- Prepare a piece of dough and start designing the motif with a newspaper. In this case, you can roll or fold the paper and use it to form figures.
- Place the frame over the piece and motif.
- Carefully apply the engobe to the frame and spread it downwards using the squeegee. It is very important that you cover the entire image and that no space is left empty.
- You can apply a double coat if you wish, but if you don’t find it necessary you can skip this step and move on to step five.
- Then remove the frame, being careful not to soil the dough underneath.
- Lift up the pieces of paper, even if they mostly stick to the frame.
- Let the dough dry and model it if you like. This step is the most difficult of all, however, as the engobe is still fresh and mishandling can damage the design and ruin the work already done.

Cast engobe
Sandblasted engobe, also called bath engobe, is one of the most traditional techniques in the world of ceramic decoration.
This technique is accomplished with the help of a bag or similar object that can control the flow of the slip. There are people who use the typical plastic sleeve to decorate cakes, which makes the task easier.
Materials required
- Engobes (at least two colors)
- Liquid dispenser for the glaze
- Damp cloth to wipe off bumps
How to apply this technique?
Now see the step-by-step guide so you can perform the wonderful sandblasting engobe technique:
- Check that the piece is in the condition of the leather, i.e. almost dry but a little damp.
- Using the pouch or sleeve, apply the first coat of engobe to the piece. At this point you should keep in mind that the technique does not require painting the piece in its entirety, but leaving gaps without engobe in the first layer.
- Let the first coat of engobe dry.
- Apply the second layer of engobe, but in a different color, making sure that it does not cover the first layer but contrasts with it, i.e. this second layer must be applied in the areas that are not covered by the first layer are covered.
- Remember that with this technique you can leave gaps with the color of the clay, it is not necessary to decorate the piece in its entirety.
- The last step is to let the second coat dry.

Engobe by immersion
With the immersion engobe technique, as the name suggests, the ceramic workpiece is immersed or introduced into a liquid, the engobe.
This technique is very well known and traditional because its application is very simple.
Materials required
- Engobes
- Large plastic containers
- Brush
- Damp cloth to clean bumps
How to apply this technique?
Before we start explaining this technique, it is important to know that the scuba engobe is suitable for all types of objects, from decoration to households. However, we advise you to be careful not to apply the layers of engobe too thickly on objects for domestic use.
- Empty the engobes completely in the large plastic containers. Remember that the amount of each slip should be enough to dip the piece in clay.
- When the object is almost dry but the clay still feels a little damp, dip it in the engobe of the color of your choice. In this step it is important that the piece is not too soaked, otherwise, it will be oversaturated and the drying process will take longer and be more difficult.
- It’s time to let this first layer dry a bit.
- Once the first layer has dried you can dip the piece into the next engobe on the desired side. Usually, this technique results in circles of different colors that blend into each other.
- We let this layer dry just like the first one.
- In the next step repeat the previous steps, you can use as many engobes as you like.
- Finally, let everything dry well. We advise you not to move the pieces too much as the engobe may be fresh and damaged. We don’t want that, do we?

Wax
Wax is a material that has long been used as a decorative technique in ceramics.
The advantage of this material is that thanks to its nature and properties, it is possible to create patterns that remain in the natural color of the clay. Because when the wax dries and you try to put the engobe on it, the wax protects the compound and doesn’t allow the paint to stick. Great is not it?
Materials needed
- Engobes
- To brush
- Liquid beeswax
- Damp cloth to wipe off bumps
How to apply this technique?
Now we are going to tell you step by step how to use this technique and make your creations the most fascinating ever.
- Make sure the piece is in a leather-like condition, i.e. almost dry but still a little damp.
- Use a thin brush to apply the wax to the parts that you do not want to paint with engobes. In this step, you can paint in a creative way. Remember that the shape stays as you designed it.
- Using another brush, coat the parts of the work piece that are not covered with wax with engobe. You can apply as many coats as you deem necessary, but remember to let them dry one at a time before applying the next coat.
- Remember that you can apply engobes of different colors. It all depends on your personal taste.
- Once you have completed these steps, you need to let them dry very well. At this point, you can see your wax design with the natural color of the clay and the remaining color or colors of the engobes.

Mocca
The mocha technique has its origins in Europe, and that’s a good thing because the result brings a touch of elegance and sophistication to each piece.
It consists of a mixture of water, tobacco brew, and rust. If you can’t get hold of the tobacco brew, you can replace it with vinegar, wine, lemon juice, or potato juice.
This mixture achieves the effect of roots or shrub-like plants when placed on a fresh engobe.
Materials required
This technique sounds great, doesn’t it? If you want to do that, here is a list of the materials you will need for your creations:
- Engobes
- Brush
- Large plastic containers
- Eye drop
- Mud flaps
- Infusion of tobacco or vinegar, wine, lemon juice or potato juice
- Coloring oxides
- Damp cloth to clean impurities
How to apply this technique?
Before we explain how to apply the mocha style to your pieces, we will first give you a guide on how to make the mix that will make this possible.
To make this mixture you will need the following:
- 25 g strong tobacco
- 30 g metal oxides in the color of your choice
- ¼ liter of water
- Boil the 25 grams of tobacco for about 45 minutes.
- Allow the infusion to cool and strain through a sieve to extract the essence.
- Add the metal oxide to the tobacco essence.
- Mix very well.
- the obtained liquid in a dropper.
Let’s continue with the guide on how to apply this curious technique to your pieces.
- Pour all of the engobes into a large plastic container.
- Immerse the piece of clay in this container. Remember that the piece must be in leather-like condition in order for you to dive it.
- After dipping, use the pipette to apply a drop of the prepared mixture to the object. Remember that to apply the drop you must tilt your figure as shown in the image so that the figure is shaped.
- You can repeat this operation on the surface of the piece as many times as necessary, but only with one drop per figure for a better result.
- Finally, let it dry completely.

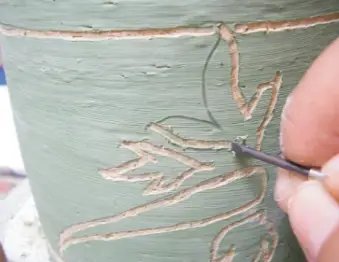
Sgraffito
Sgraffito is a technique aimed at revealing the natural color of the clay in certain areas of the object to be made.
This technique scrapes off a piece that has already been painted with ceramic glazes, paints or engobes. By scraping, it is also possible to create simple designs.
Materials required
- Engobes
- Brush
- Turntable
- Plastic container
- Pencils
- Blades, gouges, or other tools can be used to scrape surfaces.
How to apply this technique?
Now let’s look at what to do to apply the sgraffito.
- When the workpiece is almost dry and still contains a little moisture, you need to apply the engobe with a brush. Make sure there are no lumps.
- Once this process is complete, you need to let the piece dry very well.
- Use the pencil to draw the motif that you will later scratch or sgraffito.
- With the strokes or scraping tool selected, start scraping along the edges of the pattern created in the previous step.
- When you finish all these steps, you will see a fabulous result. This technique is one of the simplest there is.
Low relief
As the name suggests, this technique involves thicker and deeper strokes than the sgraffito technique.
The technique of bas-relief dates back to the early days of ceramics when ancestors used it to decorate their pieces, but over time the process has improved.
Materials required
- Engobes
- Brush
- Pencils
- Sponge
- Turntable
- Plastic container
- Gouges and blades
- Stencils with a ready-made design
- Damp cloth to clean bumps
How to apply this technique?
To make the bas-relief you must follow the following 7 steps:
- On a white piece of paper, draw the design you want to put on your piece.
- When the piece is in leather hardness, you need to start drawing the design. To do this, the sheet is placed on the piece and drawn over it with a pencil. Be careful not to apply too much pressure to avoid damaging the object.
- Once this is done, use circular and thin tools to make these strokes thicker.
- Then moisten the sponge and use it to remove the remains of dough that come out when you scrape the figure.
- Then, using a brush, apply the paint to the entire figure scraped off the piece.
- Use the blade to scrape off any paint that has come off the figurine, being careful not to damage the figurine.
- Finally, let it dry and the result will fascinate you. Remember that you can use any colors you want to customize your design.

Lathed Agate
Twisted agate is also known as millefiori or agate veining.
The purpose of this technique is to color a white mass, which is then rotated with another color of your choice, in this way obtaining a mixture of both colors. The result of this decoration is abstract but impressive.
Materials needed
- Sponge
- Potter’s wheel
- Scraper
- Gouges and blades
- Plastic container
- Colored paste or paste
- Damp cloth to clean bumps
- Different sizes of slats
How to apply this technique?
It’s time to explain step by step how to attach the twisted agate.
- You need to make blocks with two pastes, one in a color of your choice and the other white. For these blocks you have to put the pieces of dough on top of each other, being careful that they are pushed into each other, i.e. one white, one colored, one white and one colored.
- You then have to turn these blocks with the help of the potter’s wheel. This allows the colors to mix. Remember to twist and form a cone.
- Once the dough is ready you can shape the piece of your choice, a vase, cup, mug, etc. The possibilities are endless.
- If you find that there is excess water, you can remove some of it with a linen cloth.
- After removing the excess water you can see the colored grain forming.
- To remove the excess dough, you can scrape it off with the scraper from top to bottom to keep the shape of the piece.
- The last step is to let the piece dry very well.

Modeled Agate
The technique of modeled agate, also called millefiore , consists in combining many different colored types of clay in one piece without mixing them.
Anyone who carries out this technique needs a good hand because the clay is usually cut into strips of different thicknesses and lengths.
Materials needed
- Plaster molds
- Sponges
- Plastic container
- Blades and gouges
- Colored paste or paste
- Damp cloth to wipe imperfections
How to apply this technique?
Let’s look at the steps to follow to apply this decoration technique to ceramic pieces.
- Cut the colored plasticine into strips or whatever shape you prefer for decorating the plasticine figure.
- These molds are moistened with water. This step can be done with the help of a sponge.
- Once this is done, you should wet the mold with an atomizer or spray. As a result, the colored pieces of dough stick very well.
- Once the mold is wet, place the colored pieces of dough as you wish, as this is how they will be placed on the piece.
- If you need to press to fix a piece of colored dough in the mold, you can use the gouge to help.
- Once you have completed this step, the next thing you need to do is connect the sides of the mold and fill it with the liquid clay.
- After the time is up, take out the finished figure and let it dry completely. You will love the result.

And that’s all the decorating techniques used on the surface of your pottery. We hope you enjoyed them and, more importantly, learned how to do them.

