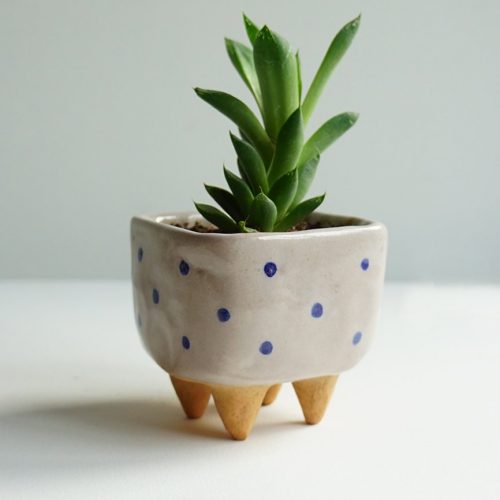
There is no better introduction to pottery than making a pot. It is one of the most common objects made in pottery with many different shapes.
Table of Contents
How to make a simple planter
To make a flower pot, you can use any available modeling techniques, that is, pinching, coiling, slab, lathing, and casting.
If you are just starting out in the world of ceramics, you can try the first three methods. If you just got interested in the other two techniques, don’t worry. With time and a lot of practice, you will master all the techniques.
In this case, we will use the build-up technique, which is one of the simplest. And here we explain step by step how to do it and what materials you need for it.
Materials
- Pottery clay is easy to shape and suitable for kiln firing.
- A wire or nylon cutter, which is two sticks of wood connected with wire or nylon down the middle, is used to cut a piece of clay from a block.
- A rolling pin, but you should only use it for this activity. Do not use it for cooking as well.
- A knife or scalpel.
- Barbotine is the name given to the mixture of water and clay that is often used to join parts of a single piece of pottery together.
- A kiln to fire the workpiece when modeling is complete.
Step by step
- First cut off part of the clay block with the wire cutters and knead the clay very well. You can put the dough on a cloth so that it doesn’t stick to the table and break.
- Since it is a very simple pot, you only need 3 parts to assemble it. First, you make the bottom, which is in the shape of a circle, on top of which you can then shape the rest of the pot. You can make the bottom with a slightly smaller diameter than the ceramic top that will be the wall of the pot. This way later when they need to be joined together it will be easier to close the panel with the excess clay as it is slightly larger than the base.
- In this step, you will use the rolling pin, with which you will gradually stretch the clay to shape the slab. This should be done on both sides of the clay so that it is of equal thickness, flat, and free from imperfections such as bubbles.
- When you feel the thickness of the slab is appropriate, take it in your hand and place it on the edge of the circle (floor) you made at the beginning. This is used to check that the final shape, which should look like a cylinder, is done well.
- Now that you know all the measurements are correct, you can apply a little slip, a mixture of water and clay, around the edge of the base to place the slab on.
- Since the clay slab is not edge to edge but piece on top of the other, you need to gently bring both edges together with your fingertips until the joint disappears.
- Now add legs to your pot. So use a piece of clay to create something resembling a churro (explanation) or a sausage that is thick enough to support the weight of a plant.
- Cut the clay sausage into 3 or 4 pieces to form the legs of the pot.
- To attach them to the bottom you can use the slip again to keep them firmly attached to the pot.
- After that, you should once again gently smear the clay of the legs and base with your fingers so that they blend into one, just as you did with the edges of the slab.
- Once you have finalized the shape of your pot, you should put it in the oven at 800°C to 1,200°C for about 2 to 3 hours.
- If you want to give your planter a unique touch in addition to the legs, you can decorate it with acrylic paints if you like.
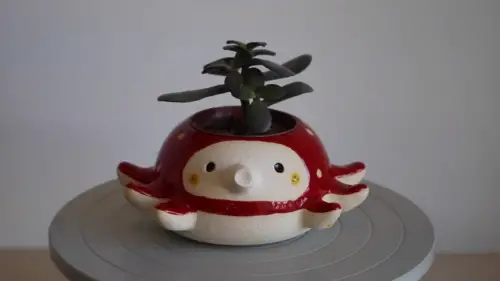
How to make a flower pot with octopus shape
This shape is a bit more complicated than the first but much more creative and eye-catching. The best technique to use in this case is a potter’s wheel. If you don’t have a potter’s wheel, that’s no problem, because other techniques also work.
materials
- Pottery clay
- A wire or nylon cutter
- A potter’s wheel
- A knife
- A sponge to absorb the remaining water from the clay or to apply the necessary water for modeling.
- Barbotine
- Paint
Step by step
- As with the previous pot, the octopus requires you to cut a piece of clay from the clay block using the wire cutters.
- Then you need to knead the clay very well so that you can better handle the material when modeling on the potter’s wheel.
- Now you can place your clay ball on the potter’s wheel and start shaping it little by little and very carefully to achieve the shape of the pot. You can wet your hands with a little bit of water so you can grip the clay better and it slides well through your fingers. You can also use the sponge with a little water to shape the whole shape.
- You should sculpt the general shape of the pot by pushing the clay up as if you were sculpting a cylinder. But at the same time, you should put your hand stretched out in the middle to shape the inner part of the pot, like in the picture below. You have to use both hands. If you apply force on the inside and do not have your other hand on the outside for support, you can cause the workpiece to deform beyond your ability to correct.
- When the pot is in the perfect shape and smooth with no air bubbles or bumps, you can turn off the potter’s wheel. The ceramic piece can now be left to dry in one place.
- When the pot has dried a bit, you should turn it upside down and polish the bottom with a gouging tool. The basic idea here is that the base is not square but a little bit round as you can see in the picture below.
- Now that the shape of the pot is complete, add the tentacles and the nose. This is done in the same way as the legs of the previous pot. You will need to sculpt the 6 tentacles from small but symmetrical pieces of clay that go well with the size of the pot. You also need to make a small tube to shape the nose. To attach the tentacles to the pot you can try placing them one at a time before applying the slip so you know if they are well placed or if they should be higher, lower, or further apart.
- Once you have defined the precise locations for attachment, you can place the tentacles accordingly and connect them to the pot.
- Now place the nose.
- For the eyes, you can use slightly smaller shapes.
- When the whole octopus figure is finished, you can let it dry completely.
- The paint you can use for your octopus is acrylic or oil paint. Don’t worry, they will leave a nice finish. If you want to add even more detail to the octopus, once the paint has dried, you can use the same tool you used for the eyes to scrape off the paint and draw small circles to create the effect of the octopus making dots on its skin has.
- As the last step, put the pot in the oven at a temperature of 800 °C to 1,200 °C for about 6 hours and your beautiful octopus is ready!