Translated by Nick R
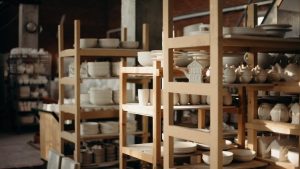
The world of ceramics has had so many great advances that today those who are dedicated or want to start in this occupation can find several tools to facilitate their job.
Did you know there is a tool ideal for flattening clay and creating motifs? Just as you read it, we are talking about the slab roller machine. So stop spending endless minutes kneading and flattening the clay; this tool will be the perfect solution for this problem.
As our main goal is to keep you informed and make your ceramic process more enjoyable, we will tell you about this great tool and everything you should consider if you want one for your workshop.
Table of Contents
What is a slab roller?
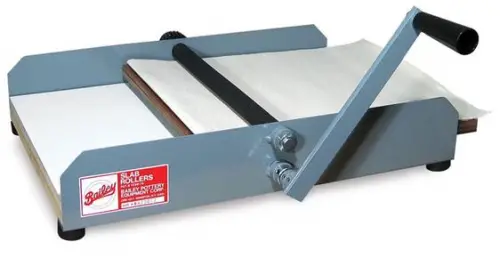
A slab roller, or also called a clay sheeter, is a tool used in pottery to create clay slabs of a certain thickness and size.
The clay sheeter is also utilized to imprint motifs or add textures to clay in the shortest possible time, making the process much more practical. This makes this tool an excellent option for people working in the field who need to efficiently produce their creations.
But, you may be wondering how does this tool work? – It is really simple. You need to put a piece of clay into the roller machine, which should have the roller at the top. Once the clay is ready, spread over it a piece of fabric that usually comes with the sheeter. Finally, with the lever or handle, turn the roller to flatten the clay. And that’s it, super easy, right?
Advantages and disadvantages of the clay slab roller
Like any tool in any industry, the slab roller has pros and cons. Here we explain them to you.
Let’s start with the advantages:
- When using the sheeter, it is possible to create several homogeneous clay slabs, i.e., completely equal slabs.
- This machine allows you to adjust the thickness and size of the slab that will be made very easily.
- Making clay slabs on the roller is a little faster and easier than manually.
- You don’t need to use more force when operating the slab roller.
Now, let’s get to know the disadvantages:
- The maximum size of the slabs is limited by the size of the machine, so you should choose your laminator wisely, keeping in mind your upcoming ceramic works.
- Being a tool that facilitates the potter’s work yet very rare, it can be quite expensive in the market.
Considerations when buying a clay slab roller machine
Now that you have learned a bit more about this tool and your interest in buying one is still alive; here are 6 things to consider if you want to include this tool in your pottery workshop.
Space
The first aspect you should take into account if you want to buy a clay laminator is space.
Usually, you can get clay slab rollers of different sizes in the market. Sheeters can measure from 20 cm to more than 1 meter in length, height, and width.
So, we recommend that before you buy this tool, you make sure there is enough space to install it, and likewise, that there is enough space to be able to manipulate it.
Accuracy
Some sheeters indicate each millimeter pitch so that you know how thick the clay sheet will be.
So, if you need this accuracy in your work, we recommend you verify that the machine displays these measurements before buying your product, and thus you can perform better in your job.
Type of roller
You need to know that, sometimes, sheeters can have one or two rolls, and that is what you need to pay attention to, the type of roll.
Regularly, double rollers are the most accurate, but this does not disqualify machines with only one roll. The roll is one of the main parts, as it is the one that will put pressure on the clay, forming the slab with the expected thickness.
So, what should the roller of your slab roller be like? Simple, it must be completely smooth so that no marks or imperfections are left on your clay, and if possible, it should be made of metal or stainless steel, which are characterized by being very resistant.
Pricing and lifespan
These two aspects are really essential before choosing your machine. First, there is the price; you should know that these types of tools are rather expensive; their price ranges from 28 USD and up.
However, in the market, you will find different options of sizes, brands, and, therefore, prices. There are handmade products of high quality and with prices that go from 5 USD. We advise you to look for the option that best suits your needs and budget.
We remind you that you should always seek well-known brands or those that offer a guarantee for sometimes you cannot rely too much on a product whose price is so affordable, as it may turn out to have bad quality. In addition, you can check for referrals and comments from other customers or acquaintances who have already gone through this purchasing process.
Secondly, there is the shelf life. We know you may be thinking about getting a roller machine that fits your needs and the level of professionalism in which you find yourself.
Besides, you need to make sure that the sheeter you buy will last long regardless of the use you make of it. For this, you can ask for recommendations, suggestions, and references.
Product warranty
The last but not least aspect worth considering before making a purchase, not only of this but any tool, is the warranty.
We recommend purchasing a clay laminator with at least 3 to 5 years of warranty. This is vital because if your product has any damage or defect, you will not have to pay for its repair or buy a new one, but you can take back your slab roller under warranty to the store where you bought it and they will take care of everything.
Where to buy a clay slab roller?
Clay rollers can be found in physical stores specializing in this type of machine or ceramic tools. Buying your rolling machine in a physical store has an advantage: you can observe your product in detail and thus, choose your machine easily.
The second option for buying clay slab rollers is e-commerce sites like Amazon, Mercado Libre, and eBay, among others.
You may find several options on the internet, from new rolling machines to second-hand ones, in other words, they have already been used, yet they are in perfect condition.
How to build your own clay slab roller?
As you can see in our suggestions, some people make their own laminators, and surely, if you have a creative and artistic soul, you would like to make your own rolling machine for clay.
However, maybe you don’t know how to do it, well, you don’t have to worry anymore! You are about to learn how to build your own clay rolling machine.
The materials you need
- A large rectangular wooden board (the size you want your laminator to be)
- 2 thin wooden boards the same length as the board.
- 2 thin wooden boards 20 cm longer than the top and bottom sides of the large rectangular board.
- 2 thinner boards than the previous ones, exactly the same length as the large rectangular board.
- Wood glue
- Wood nails or screws
- Drill
- Electric screwdriver
- Pencil
- Wooden or metal table
- Hammer
- Pliers
- 2 eyebolts with wing nut
- One 75 mm diameter PVC-U pipe
- One 50 mm diameter PVC-U pipe
- Hacksaw
- Object serving as a lever (of your choice)
- 3 SUPERBOARD sheets cut to the same size as the rectangular wooden base board.
- 4 electrical connectors
- Galvanized wire 1/18
- 4 canvas sheets for clay laminator (you can get them in physical stores so you can be sure of their thickness and quality)
Step by Step
Once you have got all your materials ready, it’s time to start building your own ceramic clay slab roller.
Here is the step-by-step video so you can start building your machine.
Step 1: on top of a wooden or metal table, place your large rectangular wooden board; this will be the base of your laminator.
Step 2: on the sides of this board, place the 2 thin boards of the same length. Keep in mind that these boards should stand on one side, as shown below.
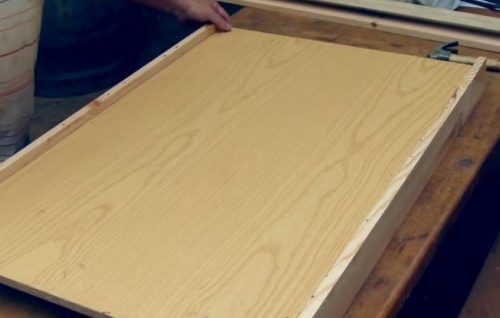
Step 3: place the center of the 2 boards that are longer than the rectangular base and glue the other 2 thin boards together with wood glue. Make sure these boards stick to the bottom of the large boards. That way, they will be centered but aligned with the bottom side of the board.
Step 4: to secure the boards tightly, attach each with 4 wood nails.
Step 5: place these 2 boards on what you built, one on the top and the other on the bottom of the base board. Make sure this large board is on top of the little boards you attached to the other pieces of wood in the previous steps.
Step 6: to secure them, fasten them with a screw in each corner. Help yourself with an electric screwdriver.
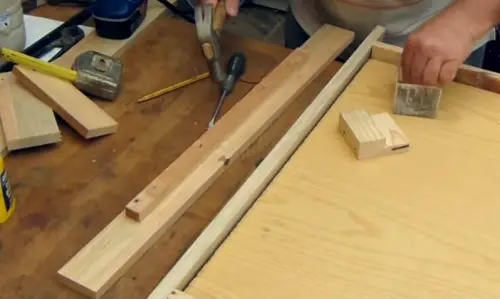
Step 7: with the drill, open a hole in the upper right and left corners of the board protruding.
Step 8: insert an eyebolt into the hole and secure it with the wing nut. Tighten it to make it firm.
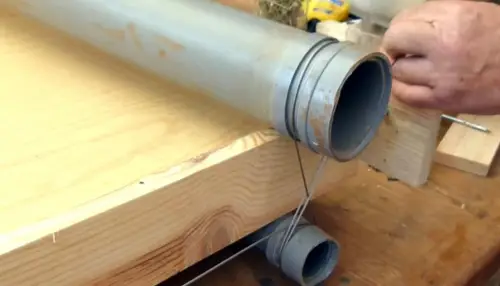
Step 9: cut the 75 mm diameter PVC-U pipe with the saw and calculate the measure so that it overhangs both sides of what you have built for the moment; it should be horizontal. We advise you that at least 10 cm of pipe should be left over on each side when you place it. Take a look at the image below in step 15.
Step 10: repeat the previous step with the 50 mm diameter PVC-U pipe. It should be slightly longer horizontally, at least 10 cm longer than the previous one.
Step 11: out of a leftover piece of pipe, cut 4 circles 3 or 4 cm wide.
Step 12: use a hammer to enlarge a bit the circles you cut in the previous step. This is done for the large tubes you cut to fit inside them.
Step 13: insert these circles through all the remaining ends of the tubes and then glue them 20 cm away from their right edges. You can do it with liquid silicone.
Step 14: place the 75 mm diameter PVC-U tube on top of your sheeter, i.e. the side where you drilled the eyebolt on the board.
Step 15: repeat the previous step with the 50 mm diameter PVC-U pipe. This has to be below the sheeter slightly further out horizontally, at least 10 cm more than the previous one, in the same position.
Up to this step, the tubes should look like the following image.
Step 16: at the bottom tube, on the right overhang side, open a hole from side to side; you can make the hole with the drill, making sure it is big enough for you to insert the object you have chosen as a lever.
Step 17: insert the lever object into this hole. Remember that it must be made of metal, steel, or a similar material equally resistant since you will use it to handle your clay laminator.
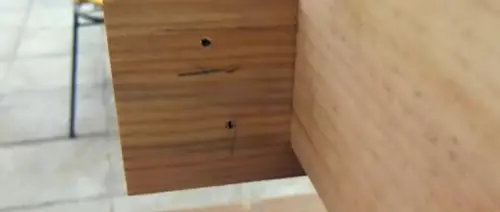
Step 18: with the pencil, mark two vertical points, 4 or 5 cm apart, on the right side of the boards at the bottom of the sheeter.
Step 19: draw these same dots on the boards on the top right side of the machine, just below the eyebolts you placed in step 8.
Step 20: open these holes with a drill. Keep in mind that the holes should be wide enough for the wire to pass through.
Step 21: pass the galvanized wire through the holes. Start by joining the two lower boards, take the wire, always hardened and wrap it around the bottom tube on the left side, and then pass it through the top tube. This step is done in the shape of an eight (8).
Do that twice, and then pass the wire through the top holes and across the eyebolt. Finish by tying it off and tightening it with the electrical connector. Cut off the excess wire.
Step 22: repeat the previous step on the other side of the slab roller.
If you still have doubts about how to route the cable, watch the video above from minute 7:44.
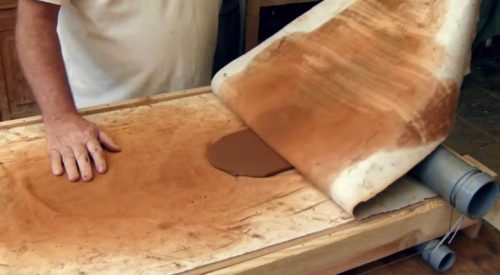
Step 23: by this point, your slab roller is almost read and now it is time to use it. For that, you only have to put 1, 2, or even 3 SUPERBOARD sheets on top of the wooden baseboard that you placed at the beginning to determine how thick you want your clay slab to be.
Note that, to determine the thickness of the slab, you need to look at the height of the edges of the sideboards because what is left over will indicate the slab’s thickness.
Step 24: finally, something you can never forget is putting a piece of cloth over the SUPERBOARD sheets, then the clay, and finally another piece of clothing. All of this is so the clay does not stick to either the sheets or the tubes.
And that’s it: you’ve got your own ceramic clay slab roller. Spectacular!
Before you leave and if you are interested in learning about other tools that will help you in your job as a potter or ceramist, we recommend you to read our blog about 4 machines that will make pottery manufacturing easier.
Also, if you enjoyed making your own clay slab roller machine and want to continue building your own tools, in our blog, you can find out how to make your own potter’s wheel and your own kiln for ceramics.