
Translated by Nick R
If someone in your home smokes, having an ashtray would be really useful, wouldn’t it? So why not has one pretty ceramic ashtray made by yourself? You could even decorate your bedroom or coffee table.
We will show you how to make 3 different types of ashtrays for your home. With our tutorials, you will get an idea of what they look like whether you want to make an identical one or for inspiration.
From a cat-shaped ashtray, with an incense holder, to a heart-shaped ashtray and a circular rainbow ashtray if you like colorful things.
And as we know you’re as eager to get started as we are, let’s stop stalling and start modeling!
Table of Contents
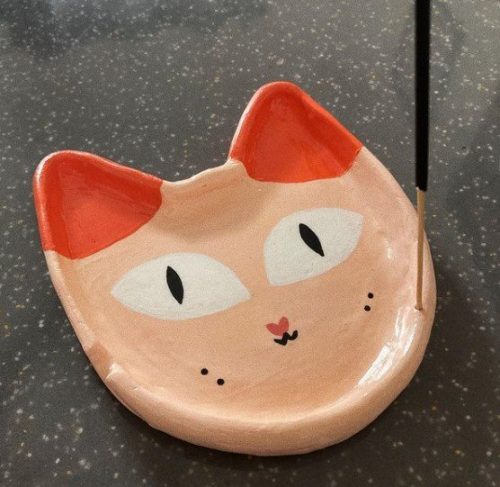
Tutorial #1: Cat Ashtray with Incense Holder
If you love animals and you are crazy about cats, this ashtray is perfect for you. It is literally the head of a cat, and you can decorate it as if it were your cat.
Materials
- Polymer clay
- Roller
- Lance tip scalpel
- Barbotine
- Marker or something round (optional)
- Wooden stick
- Acrylic or oil paint
- Resin for clay
Step by step
Step 1: first, take a piece of polymer clay from the clay block you have at home and knead it very well to make it much easier to model your cat ashtray.
Always remember that the softer the clay is, the easier it is for you to handle it.
In case you want to literally make the whole piece yourself, including the clay, remember that you can make your own polymer clay at home. Just follow a few simple steps that we teach you in our blog on how to make homemade polymer clay.
Step 2: now that the clay is well kneaded, place it on your work table and flatten it with a roller until it reaches the ideal thickness for the ashtray base. We recommend half a centimeter or even one. But if you make it 1 cm thick, it will be much heavier.
The clay plate has to be uniform so that one side is not thicker than the other.
Step 3: now you make the cat’s face figure, and for that, you will use the lance tip scalpel. Now, your clay slab is entirely smooth, right? Here, all you have to do is cut out the outline of a cat’s face as if you were drawing it.
In case you’re afraid of getting it wrong, with a toothpick or something pointy, you can superficially make the silhouette and then cut over these lines with a scalpel. Otherwise, you have another option which is to make a mold on a sheet and lay it on top of the plate to cut directly to the edge.
Step 4: at this point, you should have the ashtray base with the face silhouette, right? Now, with the clay that is left over around the outline, you will make the walls of the ashtray, so knead that clay again a bit so you can use it.
Step 5: now, with that clay, make a long and slightly thick strip as if you were performing the coiling technique. Then, have the barbotine at hand, which is a mixture of water and clay that will help you glue the strip to the base.
Step 6: before gluing the strop or coil to the base, make short cuts on the base border and on the part of the coil that you will place on the cat’s silhouette.
This is a great trick used by potters and lovers of this art so that the clay will adhere much better and will never come off.
Step 7: now apply some barbotine on both parts: on the coil and on the base rim, and glue them together. So they don’t look like two totally different parts, but like one piece, wet your fingers a little bit and drag the clay from the coil downwards, that is, towards the base.
That will always be the key to joining different chunks of clay into one piece: drag the clay from side to side until you can’t see any joins.
Step 8: for the gaps where the cigarettes will go, you will use a round marker, or you can use your fingers to keep it simple. You just have to place it on the edge of the wall and start pushing it down hard until there is a hollow where a cigarette will fit perfectly.
You can measure with a cigarette before making the depression because the idea is not to make it much bigger than a cigarette, but to fit it perfectly.
Step 9: the incense holder is very helpful if you or an acquaintance doesn’t want your home to be full of that smell; make it with the tip of a toothpick. Just make a little but deep hole.
It is best if you have an incense stick at hand, you could make the hole right with it so that the measure is perfect.
Step 10: it’s time to paint! You can use acrylic paints or oil paints in the colors of your choice. And, as we said at the beginning, you can paint it like your cat, with its colors, spots, and distinctive features to make it look much cuter.
Remember that you must let the clay dry completely to start painting because the paint will not adhere to the piece if wet.
Step 11: as the last step and for your cat ashtray to look even prettier, you will apply some clay-resin to make it shiny, coated, and much easier to clean with a cloth when it is dirty.
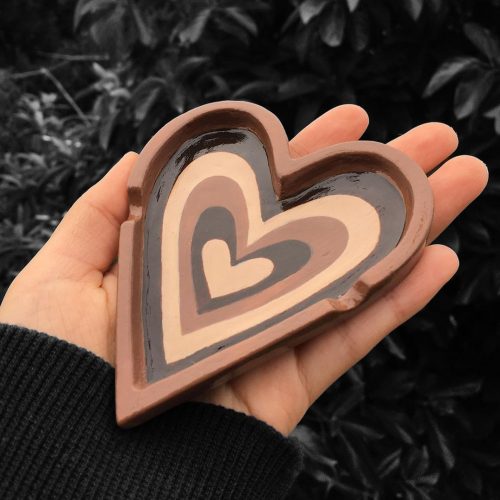
Tutorial #2: Heart-shaped ashtray
In case you have more of an elegant style and enjoy decorating your home with objects in dark colors, this is the ideal one for your home. Just imagine how nice a heart-shaped ashtray would look on your coffee table in the living room, beautiful. Isn’t it?
Materials
- Polymer clay
- Roller
- Lance tip scalpel
- Barbotine
- Marker or something round (optional)
- Acrylic or oil paint
- Resin for clay
Step by step
Step 1: first, you have to cut a lump of clay from your clay block and knead it very well over your work table and with force. Depending on how big you want the ashtray to be, you will need a certain amount of clay, so take that into account.
Although there is no problem if you have leftover clay later, you can put it back in your block, sprinkle it with some water and seal the bag tightly to preserve the clay well.
Step 2: in this case, you will also roll over it to create a slab of clay, which is the easiest way to make this kind of non-tall ashtray.
Make sure that the whole plate has the same height, and try to make it symmetrical.
Step 3: now you cut out the heart shape in the clay plate. As we recommended with the cat ashtray: if you are not confident that the form fits well, use a mold or do it freehand but use a toothpick first so that the line remains superficially and then you can cut flush.
As you see so far, this piece is so easy that anyone can do it, from a child to a senior citizen.
Step 4: the next step is making the walls of the ashtray. Their function is to prevent the ashes from spilling out and making a mess in your house, which is what you want to avoid when making the ashtray. So, make a long, thick strip for the edge of the heart base.
The best way to make this strip or coil is by moving the clay up-and-down and center-to-outside with the palms of your hands.
Step 5: as you can see in the image for reference, the edge or walls of the ashtray are not round but square, so before gluing the strip to the base, make it square.
You can do this by placing something flat, as long as the coil, on top of it and applying a little force on it. Then you will have to turn the strip around to make it square on the other side, which will be less flat. And that’s it, the side that is less flat is the one to be glued to the base.
Step 6: once the square strip is ready, with the scalpel or a toothpick, you will make cuts in both the strip and the base, but only on the side of the strip that will be glued to the base.
Step 7: then you have to apply slip on the strip and on the base where you made the cuts and stick both parts together. To join both, you need to drag the clay from the strip downwards very carefully to avoid damaging the figure. You can moisten your fingers to make it easier.
Step 8: you have two options for making the hole for the cigarette; use your fingers or something round like a marker. You must choose where the sinks will go and press hard with the object until you create the sink.
Once you have finished the whole ashtray shape, you must let it dry completely to continue with the next step.
Step 9: it’s time to decorate your ashtray; you can do so with different shades of brown acrylic paint as in the above reference image. Making various sizes of hearts is a great idea that looks very stylish too, so don’t hesitate to follow this design.
Step 10: apply resin clay to your piece to make it look prettier. This will give it a shiny look, and the ashes will be very easy to clean.
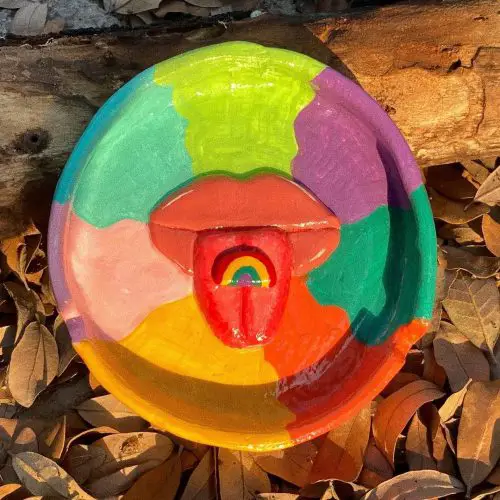
Tutorial #3: Rainbow Ashtray
If you like colorful things and you also happen to be very #Pride, we are sure that you will find this ashtray perfect. It’s beautiful, unique and has an important meaning. So, deciding to model this ashtray will be a great choice.
Materials
- Polymer clay
- Roller
- Lance tip scalpel
- Barbotine
- Marker or something round (optional)
- Acrylic or oil paint
- Resin for clay
Step by step
Step 1: take a portion of clay and knead it well with your hands on your work table; it will be easier to work with it when modeling your piece.
Step 2: once you have kneaded your clay, leave it on the table and take the roller to flatten it until you get a slab no thicker than half or one centimeter as this will be the base of your ashtray.
Step 3: this is the moment to make the base form, and since it is round, you can use any round object in your house as a mold. We know that making a freehand circle, and making it perfect, is a bit complex.
Place the object on top of the clay slab and cut it flush with the lance tip scalpel.
Step 4: you can use the leftover clay from when you cut the base to make the walls of the ashtray and the decorations of the mouth, tongue, and rainbow. The first thing you will make are the walls, which you can do with a clay coil as we showed you before.
You must lengthen the coil with your palms, making movements up and down and from inside to outside. It should be long enough to wrap around the full circle of the base rim. Although if it is too short, you can place another piece or cut the remaining if it is too long.
Step 5: before starting any process of gluing the coil to the base, you need to have all the decorations first, ready? Now you will make the lips. You can make them as a single piece and divide the lips with a toothpick or scalpel.
Don’t make them too thick because there will be two more pieces on top, and the idea is that they should not be higher than the walls.
Step 6: the size of the tongue must match the mouth, so you can measure it with the lips and compare measures before making it.
Step 7: the rainbow, which is technically half of a circle, does need to be much smaller than the tongue, so we recommend you compare sizes here as well.
Remember that you don’t have to paint anything yet; that will be done a few steps later when the whole figure is assembled.
Step 8: the step of gluing all the extra pieces to the base is coming closer, and for this, you must first make tiny cuts in all the parts to be glued: under the mouth, the tongue, the rainbow, and the coil.
You must also make cuts where you will place the parts, so if you want to place the tongue, first you have to set it on top of the mouth to roughly know where it belongs and so you can make the cuts on top of the mouth.
Step 9: apply barbotine to all the sections where you made cuts and start gluing. Make a little pressure whenever you glue the pieces to better join them.
Step 10: the only joint where you will have to pull the clay down so that it becomes only one piece is on the walls and the coil. The mouth, the tongue, and the rainbow should be left as separate pieces.
When you are done gluing all the additional pieces, let it dry thoroughly so you can start coloring your rainbow ashtray.
Step 11: let’s paint! If you want to do the exact same design in the picture, you must be very careful not to mix the colors on the base. Remember to use different brush sizes to facilitate painting only the part you want to paint without smudging other parts.
Step 12: to make your pride ashtray totally perfect and shiny, apply some clay resin, and that’s it, you have finished your colorful and wonderful ashtray!
We have come to the end of this blog where we hope we helped you decorate your home while teaching you 3 different styles of making an ashtray, modeling techniques, and some tips for making ceramics easily. If you want a different design, we hope we have inspired you to create an amazing one.

