Table of Contents
Make cups with a potter’s wheel
We will start with the first method, in which many potters and ceramists are experts. This technique is the most difficult because it requires a very good command of the potter’s wheel.
If you are not already an expert in this field, do not worry, we have two ideal techniques for you later.
Materials you will need
Here is a complete list of the materials you will need to make your mugs on the potter’s wheel.
- Clay
- Potter’s wheel
- Tools for lathing
- Water
- Ceramic kiln
- Liquid barbotine
- Kneading table
- Ceramic glazes or engobes
- Paintbrush
- Sponge
- Laina or spatula
- Wire cutter
Step by step
Now that you have the materials ready, you can learn step by step how to make your mugs using the potter’s wheel.
- To start you need to prepare your clay. To do this, you should moisten it well and knead it until it is ready for use.
- Dampen the sponge and wring it over the potter’s wheel. This will clean the disc.
- Put the kneaded piece of clay on the turntable and start turning the disk.
- Now you can start shaping the dough.
To do this, wrap your hands around the dough to shape it, using your whole hand to give it the circular shape and size you want for your cup. Once the shape is in place, you can open the hole at the top to open the cup. Use your thumbs to do this. - You can shape your cup, just make sure the dough isn’t too thick.
- To make sure your piece doesn’t have any cracks or bumps, you can use a spatula or putty knife. This frees the piece of tonal residue and at the same time makes it smooth.
- Once the cup has reached the desired shape, you can turn off the lathe. Use the cutting wire to cut the bottom of the cup, i.e. separate your workpiece from the lathe.
- Carefully lift the figure without applying too much pressure. Allow the piece to dry, which may take several days. Once the dough is in a leathery state, i.e. almost dry but still slightly damp and no longer able to leave fingerprints, move on to the next step.
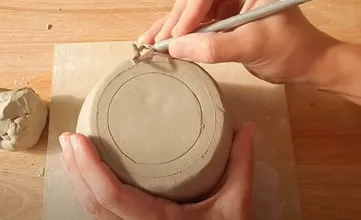
- Place the leather piece back on the lathe, but this time base up. Using a hollowing tool, machine the piece. The classic hollowing is done at the base. This step should be done with a triangular hollowing tool.
As a guide, you can make a circle at the bottom of your cup 1 cm from the rim. If you don’t know what we’re talking about, look at the bottom of one of your cups. - Next you need to shape the handle with another piece of clay. You can shape and cut it out with your own hands or use a cutter to decorate it. Remember that the handle is where you hold the mug.
- Allow your handle to dry, then measure it to the perfect size for your mug and mark where to glue it.
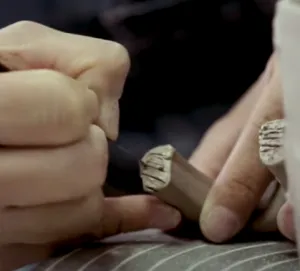
- At both ends of the handle, where you marked the lines before gluing the handle on, make short vertical and horizontal strokes as well, as if drawing a grid, with the lines very close together, so that the slip can adhere better. These strokes can be made with a pointed lathe chisel.
- Glue the handle to the piece and fit the pieces together well so that you can’t see the dividing line. You can help yourself with this with wooden sticks and then dampen the sponge to remove the bumps.
- Let the piece dry very well and bake it at the desired temperature. The ideal temperature depends on the material used. For porcelain, stoneware or refractory clay, the ideal temperature is between 1250ºC and 1300ºC.
- Decorate your piece with glazes or slips as you like and leave to dry.
- If necessary, bake your piece again, but this time for a shorter time, e.g. B. for 8 hours.
- Take your slice out of the oven, your mug is ready to use.
Make your mugs using the slab technique
The next way to make your mugs is the slab technique. This technique is the simplest of the three techniques that we are going to explain in this article today.
The technique of smoothing consists in flattening pieces of clay, cutting them out and gradually shaping them using only your hands.
Materials you will need
- Clay
- Water
- Liquid barbotine
- Kneading table
- Ceramic kiln
- Sponges
- Ceramic glazes or engobes
- Paintbrush
- Tools for turning
- Wooden or stainless steel roller
- Scale
- Spatula
Step by step
- The first step is to knead the clay until it is ready to use, i.e. no longer hard or stiff.
- Then you need to stretch this out into a rectangle, which you can do with a rolling pin. This rectangle should be the thickness you intend for your piece, i.e. as thin as the cups you typically see on the market.
- Then, using the ruler and a cutting tool, draw a straight line and cut. Make sure all sides are symmetrical. We suggest that the top and bottom two sides are 30cm each, which is the usual ruler measurement, and the other two sides are 12cm each.
- Apply some water to the clay with a sponge and set it aside. Repeat step 1 with another piece of clay.
- Form a circle of more than 27 cm in diameter with the kneaded clay. This circle doesn’t have to be perfect, so don’t worry if it’s not done very well.
- A little water should also be applied to the circle with a sponge and then set aside.
- Take the rectangle created in step 3 and gently bend it until you can join the two shorter sides together as if you were forming a cylinder. This step should be done slowly and gradually without breaking the tone.
- You will find that you could now put both sides together. However, before you glue these together, it’s a good idea to let the bent piece sit for at least an hour to allow the material to take that shape.
- You then need to score the edges of both sides as if it were a small lattice and then apply liquid slip to one of the two sides and then join them together.
- When assembling, you should work from top to bottom or vice versa, never from the middle, so that no air bubbles remain. Remember that the cylinder must always stand upright because if you lay it down it can be flattened and completely lose its shape.
- Repeat the previous step but this time on the inside of the cylinder right at the joint.
- Wet the sponge, wring it out and roll it over the cylinder.
- Now place the cylinder on the formed circle. The cylinder should be centered and very well-formed.
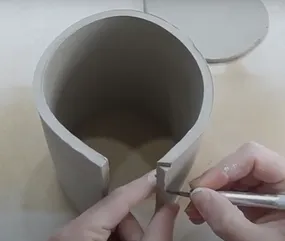
- You will see that the circle sticks out. So start with your cutting tool to cut off the excess piece.
- When the circle is cut out, use the scalpel to make strokes along the edge of one side of the cylinder and around the perimeter of the circle. Where the two parts are to be joined.
- Apply liquid slip to the rim of the cylinder you scored earlier and glue on the circle. This will be the bottom of your cup.
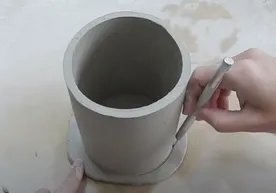
- Use the tool to remove any excess clay and perfect your cylinder so there are no lumps. If necessary, you can apply some water with the sponge.
- Use another piece of clay to form a thin but long piece that will fill the circumference of the cylinder on the inside. This piece serves to additionally connect the cylinder to the ground.
- Push this piece of clay into the cylinder until it touches the bottom and assembles.
- Turn your top hat over so the bottom is facing up.
- Make another sausage. The same thing we did on the inside, we will now repeat on the bottom of the cup.
- Place the long piece on the bottom of the cup an inch from the rim and position it in a circle. Mark the spot and remove the piece again.
- Score the contact points again before applying the slip.
- Coat the sausage with liquid slip and glue it to the underside of your workpiece.
- Start uniting the two parts with a wooden stick and your fingers.
- Now use another piece of clay to form the handle for the cup. You can make this in any thickness and size you want.
- Mark the places where you want to join the cup with the handle.
- Apply a little slip to the edges of the handle and glue it on. Then add a small sausage around the edge of each stem end and smooth down.
- Once done, dampen the sponge, wring it out, and wipe over the entire surface of your mug. This will help you remove imperfections.
- Let dry very well.
- The piece is now in the kiln. Then you can apply glazes or engobes. Keep in mind that the temperature and firing time will depend on the type of clay you are using.
- Then let the cup dry very well. And that was it.
Make cups using the pinching technique
You will need the following materials
- Clay
- water
- Liquid barbotine
- putty
- Ceramic kiln
- spatula
- Ceramic glazes or engobes
- paint brush
Step by step
- Knead the clay very well. Continue until the dough has a smooth consistency, i.e. it can be easily worked and shaped.
- After kneading, shape the clay into an even ball. To make this ball, twist it with one hand and smash it into a round shape with the other hand.
- Once the ball is ready, poke a hole in the center of the ball with your thumb. The hole should be made gradually with little pressure while continuing to move the clay in your hand. This will prevent the ball from losing its shape.
- Once the hole is big enough, use your fingers and palm to form the cup.
- If you find the walls of your cup are too thick, place your palm on the outside of the wall and your index and middle fingers on the inside. Start pressing the material from the bottom up with a little pressure.
- Place a piece of paper under your cup and continue the motion outlined in the previous two steps while rotating the piece.
- Cracks may appear on the outside walls of the figure during the process. If this happens, swipe your thumb over it, remove it, and then continue working.
- It is important that any cracks that appear are evened out. Otherwise, the piece could tear before completion.
- When the piece is the size you want but the walls are still too thick, using a round gouge (rotary tool), begin removing the dough from the inside of the piece, working from the bottom up.
- After removing any material from the inside of the cup, use your fingers to smooth everything out again.
- Now you should use a ruler or suitable tool to level the inside of the walls so that they are horizontal and smooth.
- Now mark the upper edge of the cup and cut off the excess piece.
- Perfect the outside of your piece with an appropriate tool. You can also turn the piece over to do this.
- On the outside of the cup, mark the bottom with two circles. The cup will stand on this area later.
- Using a tool, remove the part outside the marked circle.
- Using a hollowing tool, remove the clay from the inside of the second circle. Be very careful not to puncture the bottom.
- Shape the handle of the cup.
- Wet the sponge with water, wring it out and wipe it over the handle.
- Try if the handle fits and mark the spots.
- Perforate the two ends of the handle.
- Perforate the cup at the marked points where the handle is to be attached.
- Apply slip to the ends of the handle.
- Now glue the handle to the cup.
- Smooth out the areas with your fingers or a tool.
- Dampen your sponge and wipe your workpiece with it.
- Let this dry for about 8 hours and then put it in the oven. Baking time is 8 to 12 hours, the temperature depends on the type of clay you are using.
- After firing, you can decorate the cup.
- Let your piece dry for at least 3 days or bake the piece again.
- Your mug is now ready to use.