
Translated by Nick R
Making clay crafts is very fun, even more, if you know they are easy and will be helpful to your child for school or to decorate, isn’t it? If you want to learn how to make easy clay figures with your children, stay with us.
We will teach you how to make 5 easy clay and cold porcelain crafts that you can use as decorations or gifts. Also, we will tell you what physical and mental benefits you can get from making all these pieces.
But first, if you don’t know these materials very well, we recommend you to read our blogs about:
Table of Contents
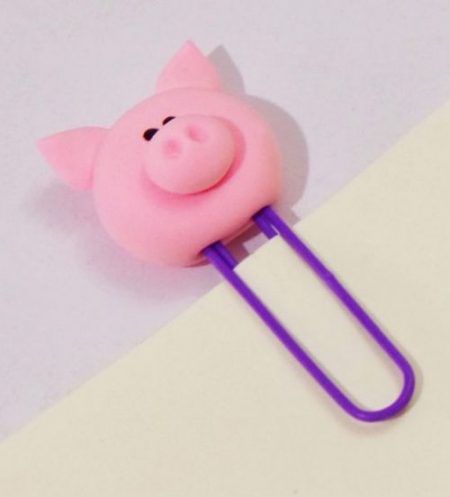
#1 Pig clip
This item is perfect to use as a divider for your school books or notebooks, or as a great gift for parents to use at work or in their books.
Materials
- Pink and black cold porcelain
- Colored paper clips
Step by step
Step 1: first you make two pink porcelain balls, a big one for the face and a smaller one for the nose. Then you will press them against the table, not too hard, to flatten them a bit.
For the nostrils, you will make two tiny holes with the tip of a colored pencil that will not stain the porcelain.
Step 2: for the ears, roll two slightly smaller balls than the nose and flatten them on the table to form a triangle.
Step 3: only one more thing to finish the pig. Do you know what it is? Yes, the eyes! You will make two little balls of black porcelain; you can leave them like that, circular.
Step 4: to finish with the pig, you need to glue all the parts you did before: the ears, the nose, and the eyes.
Step 5: as the last step, place the pig on the clip; we will explain a simple way. You have to make a ball in the same color of porcelain as the pig and totally flatten it.
Then you place the pig face down on a table and the clip on top of it. To join them together, place the flat circle over the clip and press the outer edges firmly to keep it from coming off. Let it dry in the air, and that’s it! Now you have a beautiful paper clip to use in your school books and notebooks.
If you want to make any other figure or animal on your paper clips, let your creativity and imagination fly, that’s what this kind of activity is for.
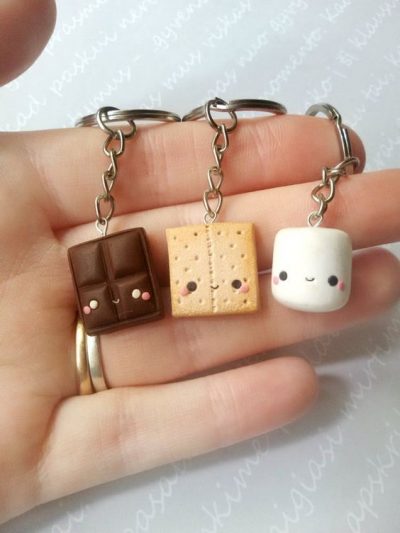
#2 Key chains
Keychains are really nice gifts for family or teachers or if you want, you can simply remove the ring and the chain to keep them as decorative figures that you can collect.
Materials
- Cold dark brown, light brown, and white porcelain
- Keychain ring and chain
- Toothpick
- Black, white and pink acrylic paint
Step by step
Are you familiar with marshmallows and chocolate sandwiches? Because that delicious combination is what we will do.
Step 1: you first will make the chocolate, and for it, you need the cold dark brown porcelain. It is pretty easy, just make a square and its divisions by pressing with a toothpick laid horizontally.
You have to do it on the 4 edges and two across the center to make the 4 chocolate pills.
Step 2: next you will make the cookie using light brown porcelain. Here also make a square and use the toothpick, only this time, you will use the tip to make the cookie dots.
Step 3: finally, you will make the marshmallow with the white porcelain. To do it, first make a ball of dough and then roll it into a cylinder to form the marshmallow shape. Make sure the edges are smooth so it looks like it is very soft.
Step 4: before you start painting and before the cold porcelain dries (it dries in the open air), place the chain with the ring at one of the ends of each piece. It has to be deep enough so it will not come off later.
Step 5: to finish your chocolate, cookie, and marshmallow keychains, you will use paint to decorate them to make their cute faces. You just need two round eyes, a tiny mouth, and colored cheeks. Ready!
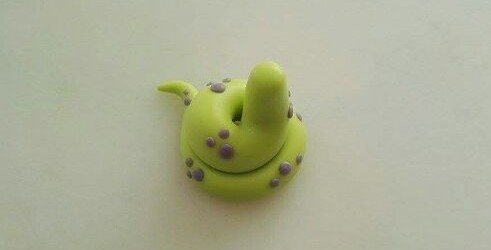
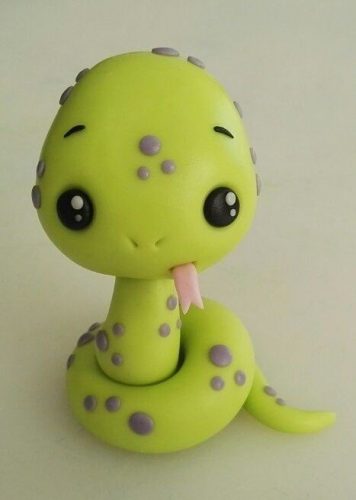
#3 Baby Snake
This piece is perfect for decorating your child’s desk or bedside table. It is a cute and easy way to make a figure that they will be proud to have made.
Put the photo before the materials in each craft.
Materials
- Cold porcelain, green, purple, pink, black and white (If you don’t have all these colors, apply drops of acrylic paint of the desired color to the white porcelain and knead it again)
- Toothpick
Step by step
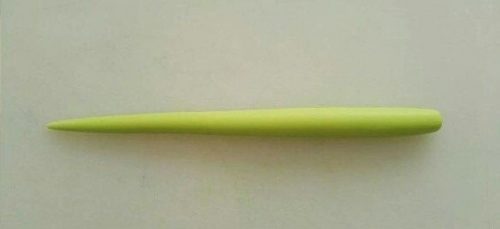
Step 1: take a piece of the green, cold porcelain and make a long strip, one end of which is thicker than the other. To get it right, we suggest you use your palms to move the dough back and forth and stretch it from inside to outside.
Make sure it is thick enough to support the head weight that you will place on it later.
Step 2: now, you will make the snake’s body pose, so take the porcelain strip and put the thinner end on the table, and then form a little circle with the rest of the snake’s body on top of it.
The other part of the body, you will also place it as a spiral over the previous one, but even smaller to get a perfect shape. However, remember that you should not use the whole body in this, leave a little piece of the upper end straight, which will be the place for the head.

Step 3: now that you have finished the spiral shape of the snake’s body, place the little spots across the snake’s body. For this, you make many tiny balls with the purple porcelain, and then you flatten them a little on the table.
Step 4: after you have the little balls for the spots on its skin, glue them on the body, leaving some space between them.
Step 5: bury a toothpick in the middle of the thickest end, which you kept straight, to help support the head’s weight. Be careful not to get pricked by the tip of the toothpick.
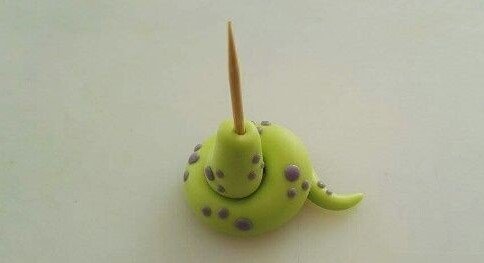
Step 6: for your baby snake’s head, you first make a ball and then flatten it a little so it is not totally round. It needs 3 corners as if it was a triangle, but they will look better if you round them.
After that, flatten one of those three corners, which will be the forehead or the top of its head.
Step 7: before sticking it on the toothpick and attaching it to the body, you will need to decorate it. So, make other small purple balls to decorate it the same way as the body. Also, make two big black balls for the eyes and two little white balls for their lights.
As for the eyebrows, use some cold black porcelain to make two strips, as you did for the body. For the tongue, you will need to cut a small pink porcelain rectangle, flatten it a little bit and make a triangle in one of the short ends.
Step 8: once you have all the parts ready, it’s time to attach them to the head. Make sure they have the same spacing as in the reference image.
Step 9: you may be wondering: What about the tongue? For it, you need another toothpick and make a very thin and deep groove on the face. This way you can put the tongue inside it and make it look like the snake is sticking its tongue out.
You can make the nostrils, two little lines, with the same toothpick. You can help your child in this step to get a polished look.
Step 10: it’s turning out beautifully, right? You’re almost there, don’t worry. There is only one more step left: place the head on the toothpick. Put it in the center, let it air dry for 1 day, and that’s all. The baby snake is ready to decorate your child’s room or become the perfect gift for a friend or family member!
#4 Pencil holder
A pencil holder is a must-have for kids and adults alike, isn’t it? Well, it’s perfect that they make their own customized pencil holder to keep all their pencils, colors, and markers organized.
This is a quite handy and easy-to-make item so let’s get started.
Materials
- Cold porcelain in green, purple, yellow, red, white, and black.
- Another option: Blue, purple, red, white, black, and white cold porcelain
- Toothpick
Step by step
Step 1: first of all, you have to take a big piece of green, cold porcelain and make a very long strip. It can be made in the same way you did the baby snake: with your palms by making movements from the center outwards and back and forth.
In this case, the whole strip has to be the same thickness. One end can be a little thicker for the head, but it is not mandatory.
Step 2: now that you have the strip or the whole snake’s body, let’s assemble your pencil holder. Take the tail end and start making a spiral on the table to make the base of the pencil holder. Once it is wide enough for you, make the walls by placing one strip level on top of the other so it gets higher and higher.
As you reach the other end of the strip, keep a section raised to decorate its head later on.
Step 3: it’s time to decorate it, so make small circles of purple and yellow porcelain and flatten them so you can place them on the snake to resemble stains on its skin.
Step 4: for decorating its head, you have to make two medium-sized balls of white porcelain for the eyes and two smaller ones for the pupils. Then, you can do the same thing you did with the baby snake for the tongue or replace the rectangle with two strips of cold porcelain and then cut the tip to divide it.
As for the snake’s smile, use a toothpick and draw it on the porcelain.
Step 5: now attach all the parts on the head of the snake while holding it so it doesn’t break, and let it dry for about 24 hours in the open air. And just like that, you have a cute and fun pencil holder for your colors and markers.
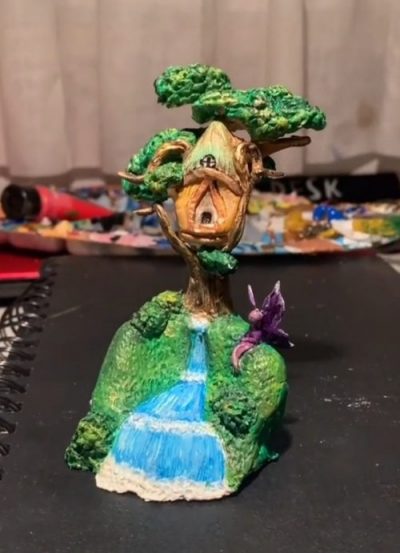
#5 Fairy House
This is a gorgeous decoration for a nightstand or to place it in the living room so everyone can see how talented your little boy or girl is. It takes a little more work, and you need a little more practice, but if you are dedicated and willing to do it, it will surely turn out beautifully.
Materials
- Clay
- Green, blue, white, brown, yellow, and purple acrylic paints
- Wooden stick
- Barbotine (a liquid mixture of water and clay)
Step by step
Step 1: first of all, take a piece of clay and knead it very well on the table so it becomes easier to handle it in your hands.
Step 2: with a well-kneaded clay, start making the base of your fairy house, which is a mountain with a waterfall (that you will make later). So first, make a mountain of clay, leaving the top a little thinner than the base.
Step 3: decorate the mountain with small bushes. Then mold distorted balls of clay, to which you will run a toothpick, making lines and lifting the clay a little to make it look like grass.
Use some barbotine to glue the bushes to the mountain. Remember, barbotine is a mixture of clay and water that you can make for your son or daughter while he or she is making the rest of the house.
Step 4: now, you need to make a tree as the support for the house; it must have many branches and a thick trunk. Also, leave the branches in the center apart because that’s where the fairy’s house will stay, inside the tree.
For the tree, you have to make a very wide clay strip and, with scissors, cut lengthwise one of its ends several times. This will help you make the branches very easily. Next, you can shape them and model the trunk to make it briefly twisted.
Making the house is very easy: you only have to make a cube and a triangle and join them with barbotine. You can use a toothpick to make the house details: the door, window, and the edges of the house.
Step 5: only the fairy is missing now to finish with all the parts of the piece. To make it, you need a tiny body with a round head and wings that match the size of the body.
Step 6: you can use the same toothpick for the waterfall and for the final texture touches on the whole piece. Some circles in a row like swirls in the water and straight lines to make it look like the water is falling will work.
Step 7: it’s time to paint your fairy house, so keep all the acrylic paints we talked about nearby. Use green to paint the mountain and yellow if you want some little spots to create a nice touch to the mountain and the trees.
The water paint it blue and where you made the swirls use white. You can mix white and green to make the house roof lighter. The rest of the house can be painted yellow, we are sure it will look really nice. Finally, the fairy can be painted purple to make it stand out as the center of the whole piece.
Step 8: let the paint dry and verify how all the colors turned out. If you feel that any part could use more paint, go ahead and put it on, it’s your work of art.
Step 9: as you are using clay, you have to place your work in a ceramic kiln or your home oven if it can reach the temperature required to fire the clay you chose. If you only have a home oven, we recommend terracotta clay, which requires a low temperature, so you can fire it at home without any problem.
It has to be baked for 2 to 3 hours between 800°C and 1200°C. You must do it yourself to prevent your child from getting burned as the piece will be very hot.
After those hours your fairy house will be ready and very shiny to decorate any part of your home.
Why is handling clay good for children?
In case you didn’t know, for children handling clay is not only recreational and distracting: it has certain mental and physical benefits for them, as well as for adults.
The main benefit of children modeling clay or cold porcelain is that it helps their fine motor skills to improve in every session devoted to this activity.
This is given when they make little balls or strips with the clay, when they worry about assembling their piece and making it look good, or if they are more experienced when they sit at a potter’s wheel and model as the clay moves between their fingers.
For children, creating pieces with clay or cold porcelain is a recreational and fun experience that, apart from improving their motor skills, helps improve their concentration and relaxation putting aside the stress of kindergarten or school.
If you want your child to have fun and concentrate on an activity through which he or she can relax and rest from the rest of the world, clay modeling is a great option we recommend you to consider.
In addition, you can accompany them in making their ceramic pieces. It will be a perfect moment to share as a family and, at the same time, for you to enjoy the benefits that ceramics has in our lives.
___________________________________________________________________
We have reached the end of this blog. We hope you have learned a lot by making these 5 pieces in clay and cold porcelain while, without realizing it, you receive all the benefits of handling these materials.

