
There’s nothing quite like making something with your own hands and saving money in the process, right? If you are planning to make a figurine or piece out of clay, I have good news for you. There is an easy, quick and inexpensive way to make clay yourself.
Table of Contents
What can we use homemade clay for?
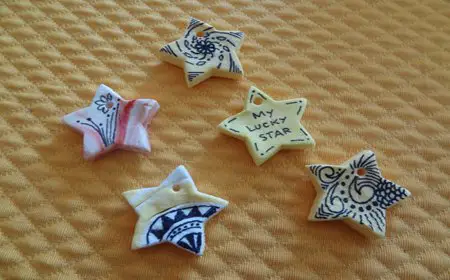
As with cold-paste porcelain and polymer clay, the objects you can make from this material tend to be small. Examples are table decorations, wall hangings, Christmas decorations, paperweights and small plates.
If you want to make very large objects, we do not recommend these clays. While tough, they are a bit more fragile than the pieces made by professional potters, who mostly use red clay, or potter’s clay as it is commonly called.
How is homemade clay made?
Making clay yourself is not that difficult. The materials are easy to obtain and the steps are easy to follow. So to speak, everyone should be able to produce their own clay.
Materials
Not only are the materials easy to obtain, they are also very cheap and you might not even have to go to a store to buy them:
- 2 cups baking powder
- 1 cup flour or cornstarch
- 1 cup of water
- Liquid food coloring (recommended if you want to color your play dough).
- 1 non-stick pan /pot
- 1 wooden or plastic spoon
- 1 glass or plastic container
Step by step
Now that you have all the materials ready, let’s begin the steps to properly make your homemade play-dough.
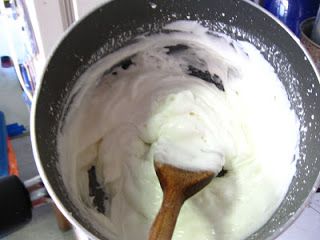
- First, take your non-stick saucepan, place it on a table, and add the three main ingredients we told you about earlier: baking soda, cornstarch, and water. It is very important that the non-stick coating of the pan is almost intact so that the malleable dough does not stick to it but can be easily removed and the pan is not damaged.
- Now start mixing the ingredients well with a wooden spoon for a minute or two.
- Once the mixture is ready, you can place the pot on the stove and cook over low heat for about 8 to 10 minutes. The mass will turn from a liquid mixture into a kind of mashed potatoes. To prevent the putty from becoming lumpy, it is advisable to stir the mixture constantly for the 8 to 10 minutes.
- When the mass looks like mashed potatoes, you need to transfer it from the stove and from the nonstick pan into a glass or plastic container. You should then cover the jar with a lid or a damp cloth so that the play dough does not dry out.
- After a few minutes, check whether the clay has cooled almost or completely.
- If the dough is already ready, keep kneading it until it has a smooth, manageable and homogeneous structure.
- If you want to color your dough, this is the right time to add a few drops of coloring to the dough and continue kneading until the entire dough is your chosen color. To avoid stains on your hands, you can wear gloves. And since you should take good care of your workspace, you can put a piece of plastic wrap on it beforehand to protect your table.
- Have fun tinkering with the clay!
- After creating the artwork, the mold can be left to air dry. You don’t need a kiln or a machine to make this type of clay.
Storage and preservation of homemade clay
If you made a lot of clay or didn’t use it all, you can save it and use it again next time. However, to keep it in good condition until the next time you use it, there are a few tips you need to follow to achieve this.
Some tips for storing clay
There are a few tips for storing clay, but they are very effective, so please follow them carefully.
- You can put the dough in an airtight bag. If you have the different colored dough, you should put them in different bags so that they don’t mix.
- A glass jar with a lid is also a good storage option.
- Do not leave your clay in the sun or in a hot place. It is better to keep it in a cool place to keep it for a long time.
- You can also store the dough in the fridge.
5 tips for making and handling homemade clay
We have already explained the whole process of making this malleable dough. However, we have put together a few special tips below.
- Turn your piece over so it dries on all sides.
- If the clay shrinks a little and cracks as it dries, you can repair it with some clay and water. This is because the mass turns back into a paste on contact with water and you can shape the part.
- To protect your artwork, you can apply two coats of clear varnish after drying. It will also make your artworks look even more beautiful.
- When you are finished making your piece, pack up the leftover clay immediately, and don’t leave it lying around.
- If you have stored your play dough in the fridge or somewhere else for a long time and it is already dry, you can still try to knead it until it regains its soft consistency. If that doesn’t work, you can add some water or olive oil to give the dough some moisture back and knead well again so the oil blends in or don’t discolor the dough.

