
Translated by Nick R
If you are looking for ideas to decorate your home for Halloween, you are in the right place. We will help you make 3 pieces in a simple way; they will be fantastic to the point of stealing all the looks of your visitors.
We understand that it is sometimes difficult to decide what pieces to do for specific dates, particularly if we intend to sell them and make some extra money. That’s why we want to inspire you through these three pieces.
We will teach you step by step how to make a beautiful pumpkin, a spectacular witch hat-shaped candy box, and a terrifying ghost lantern. Let’s not beat around the bush and get started!
Table of Contents
Pumpkin Tutorial
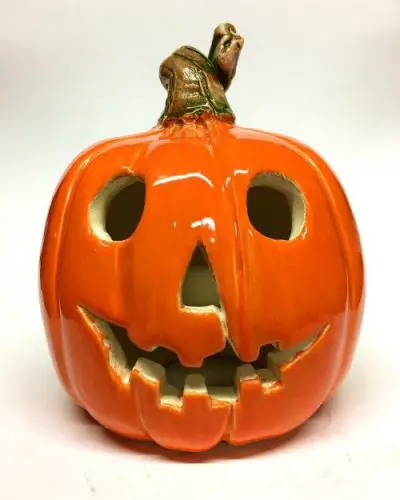
Pumpkins are the most common and famous decorations during Halloween, aren’t they? So it never hurts to have a pumpkin as a decoration in our homes. Best of all, by making it with your hands, you can design any face you want: smiling like the one we are doing here, or with really scary gestures.
Its design is up to you; it can have a long or short stem, big round eyes, or the shape of a drop or a bean. Either a tiny or a big triangle-shaped nose, or a large smiling and serious mouth. You will be able to bring out all your creativity by making a pumpkin, we assure you.
Materials
- Clay
- Cutter
- Potter’s wheel
- Sponge
- Wooden sticks
- Lance-tipped scalpel
- Orange and brown ceramic glazes, or any other desired colors
Step by step
Step 1: the first thing you will need to do is cut a large lump of your clay block with a cutter and then knead it very well on your work table.
An essential tip for you is to never forget to knead the clay well before you start modeling. Otherwise, any air pockets in the clay will make your piece burst in the kiln during firing.
Step 2: now, put your clay on the potter’s wheel, and slightly wet your hands and sponge to help you model. Make a clay cylinder as the potter’s wheel is turning; bring it up and flatten it over and over until you get a cylinder, which will be the final base from which you create your pumpkin.
Step 3: after making the cylinder, locate its center and place your fingers firmly to create a deep hole about the width of your hand. It will look like a bowl by now, won’t it?
Step 4: next, you need to put one hand on the inside of the cylinder walls and the other on the outside and press upwards as if you were making a tall vase.
The height of the cylinder will be the final height of the pumpkin.
Step 5: with your hand back, turn your piece from straight to round like a pumpkin. For so, put it into the cylinder and gently push it outwards.
Step 6: as soon as it becomes circular, take out your hand, and with both thumb and index fingers, close the neck of the circular part while you pull up the clay; this will be the stem of the pumpkin.
Step 7: after that, close the tip and bend it a little bit so it looks like the image below. Although it is up to you whether the stem is long or short, knotted or unknotted.
Step 8: now, we will make the stem and the shell lines, for which you will need a wooden stick. Try to allow some spacing between the divisions; it will look much better.
Step 9: let the pumpkin dry for a few minutes, and with the lance tip scalpel, start cutting out the eyes, nose, and mouth. As we said, you can shape the face as you like or use the one in the photo as a guide.
Step 10: put your piece in the kiln for 2 to 3 hours at 800°C to 1,200°C, and apply ceramic glazes to make it look even nicer. Remember that if you paint your pieces with glazes, you have to take them back to the kiln for a second firing.
After a second firing, let your pumpkin cool a bit and place it in your home for a stylish decoration worthy of stealing all the attention.
Witch’s hat candy box tutorial
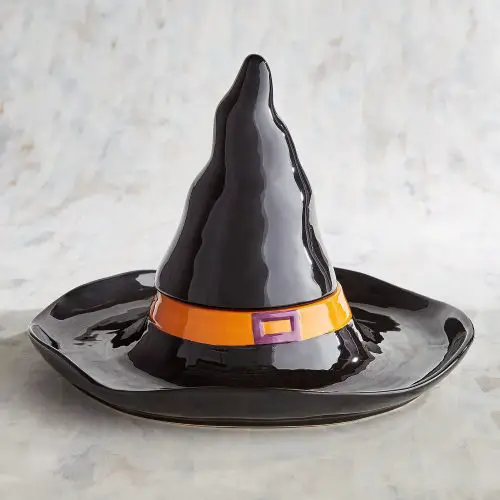
If you are the type of person who gives out candy on Halloween, you will love this idea. This is not the typical round candy bowl that you just pick up from your kitchen and set by the door for kids to take out the candy: this one is very different.
You can put all the candy you want in this candy bowl, and the kids will find it much easier to pick their favorite one because they will be able to see it at a glance. The candies will go in the base of the hat.
Materials
- Clay
- Cutter
- Sponge
- Wooden stick
- Black, orange and purple glazes, or colors of your choice
Step by step
We will show you how to make it with a simple modeling technique: the coiling technique.
Step 1: with a cutter, take a piece of clay from the block you have at home and knead it very well on your work table.
Step 2: now, take some of that clay and start making the coils you will form the hat with. This technique gets its name from the fact that the whole piece is made of small, thin cylinders of clay.
The best way to shape them is by rolling the clay back and forth with the palm of your hands while pulling from the center outward to stretch the coil.
You can make very long coils for the base and smaller ones for the tip.
Step 3: before you start placing one coil on top of the other for the top, you will have to do the base, which can be built from a large circled clay slab. There is no need to make it with coils.
Step 4: over the slab, take some of the long coils and place them along the rim to make the jagged edges that will hold the candies in place so they don’t fall off.
The best way to join the coils with the base or between them is to wet your fingers or a sponge and drag the clay until the joints become unnoticeable and you get a whole piece.
Step 5: having finished the base, let’s start with the cup. Place a long coil in the center forming a circle, and then begin laying one on top of the other. If the ends do not meet but overlap instead, you can cut off the excess with a scalpel.
As the top of the hat gets thinner as you reach the tip, you have to lay each new tier of coils on the inner edge of the previous layer. It doesn’t need to be perfectly even; as you see in the picture, it looks nice with unevenness.
Step 6: bind all the choils as we taught you; by pulling the clay with your damp fingers and rubbing the sponge all over the hat to get a flawless surface.
Step 7: with the wooden sticks, make the belt sections. An easy way is to draw it.
Step 8: put the hat in the kiln for its first firing at approximately 800°C and 1,200°C for 2 to 3 hours, depending on the kind of clay you chose. Now let it cool for a few hours, apply the color glazes, and then take it for a second firing.
And that’s it. You have your unique and lovely candy box to share with the kids!
Phantom-shaped Lantern tutorial
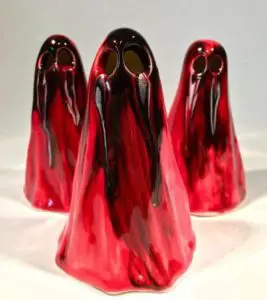
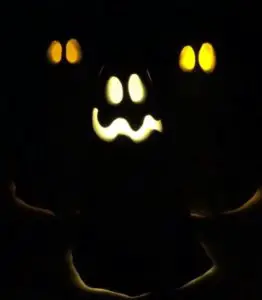
These lanterns are the perfect decoration for any corner of your home on Halloween night. Place them in your garden, on your balcony, or on your front door. They will look great unlit or lit, whichever you prefer.
The best part is that they are not only for Halloween: you can use them the whole year as a small light in your room or on your desk. It will look spectacular.
Materials
This is a really simple piece to make so you will need very few materials.
- Clay
- Cutter
- Perforator
- Lance tip scalpel (optional)
- Glazes
Step by step
Step 1: using the cutter, take a not-too-big lump of clay and knead it thoroughly to avoid air bubbles, as I told you before.
Step 2: as you will be making your ghost with the pinching technique, you first have to make a clay ball with your hands.
Step 3: once you have made the ball, hold it in one hand and make a hole in the center with your other hand’s thumb, as if you were making a donut but without crossing over to the other side. In other words, the hole should be shallow.
Step 4: now, with your thumb, start pressing the walls of the ball against the hand that is holding it, or pinch upwards with your thumb, index, and middle fingers to thin the walls and make them higher. The head of the ghost will be the end you are holding in your palm, and the body will be the end you are pinching upward.
Step 5: pinch and stretch the clay until the ghost reaches the height and width you want it to be; remember that it should be larger than the candle. This is the perfect moment for patching up mistakes. Once the basic shape is ready, start forming the ghost’s waves all along the figure.
You can also do it with little pinches or pressing hard on the clay and moving your fingers down until the base.
Step 6: to verify that the base is straight and that the ghost will stand upright, place it on a table. If it looks wrong, you can carefully run the cutter.
Step 7: let the clay dry for a few minutes.
Step 8: take a drill with a small tip in your hands and drill the ghost eyes. If you don’t want them totally round but elongated like the ones in the example, you can use the scalpel or make two circles, one on top of the other.
Alternatively, you can make your ghost’s mouth with the lance tip scalpel. Giving it a mouth will make it look tender, so if you want it to be more terrifying, leave the eyes alone.
Step 9: you can put your ghost in the kiln for 2 or 3 hours between 800°C and 1,200°C and keep its natural color; however, to make it look more beautiful, we suggest using ceramic glazes. They will waterproof your pieces and give them a beautiful shine.
Don’t think twice, glaze your ghosts and put them on your door to scare children!
We have come to the end of this blog, in which we hope you have enjoyed reading, learning, and making awesome Halloween pieces. We hope you have also learned many new things and that you will be able to make a thousand pieces by applying the modeling techniques we taught you.

