
Translated by Nick R
What better way of celebrating diversity and love than making ceramic art pieces to reflect all that the celebration of pride day means, right? If you wish to express yourself through art, we will help you by teaching you 3 different ceramic pieces in a very simple way.
The colors on these beautiful and unique pieces will take center stage in your home, and best of all, you can use them at any time of the year (not just in June) to show your pride every second.
Along with the blog, you will learn how to make a picture frame, a jewelry box, and a mug while you get deeper into the ceramics world.
Table of Contents
How to make a portrait frame with Pride design
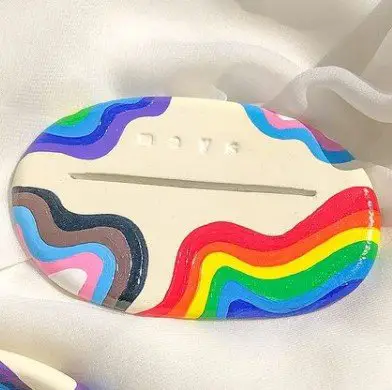
This portrait frame, besides its beautiful adornments with some LGBTQI+ flags, has a truly different design from the usual portrait frames, which is what makes it so striking.
You will be able to place your photos with your friends, family, or partner, and they will be held by the slot it has in the middle. We assure you it will be a beautiful decoration for your bedroom or living room at home.
If you like the idea a lot, you found it easy to make, and you have enough photos, do not hesitate to make several picture frames by switching the flags or placing them all over the piece with which you feel more identified.
Materials
- Polymer clay
- Roller
- Lance tip scalpel
- Ribbon with flat tip
- Acrylic or oil paints
- Resin for clay
Step by step
Step 1: the first thing to do to create your beautiful picture frame is to cut a piece of clay from your clay block and knead it very well with your hands. This will facilitate molding it.
Step 2: now place the clay on your work table, which should be covered in plastic wrap so it doesn’t get dirty, and start flattening the clay with the roller. By doing so, you will be creating a clay slab, which is the easiest way to make this type of piece.
Keep in mind that the plate should be a little thick so that when you remove the clay from the backing part, the slot gets deep enough to hold the photo well but not so deep as to be completely hollow. Some clay should be left at the base.
Step 3: once the plate has a proper thickness, you can cut out the shape of the picture frame with the scalpel, which is like an oval.
Step 4: we know that your oval’s edges are straight, but they look curved or rounded in the reference image, don’t they? To fix that, you need to moisten your fingers and run them along the edges until they become round.
However, there is another easier way, which is to stand the lower edge of the picture frame on the table and with the inner curved part of your hand, the one between your thumb and index finger, pressing the edge so that both the low and up edges curve with a single movement.
Step 5: once the external shape is finished, you will make the groove or support. It’s very simple, don’t worry. You must take a ribbon tool with a flat tip to make it square.
You have to place the ribbon tool in the place where you marked the beginning of the support, press down but diagonally being careful not to reach the table, and move your hand straight as if you were cutting with a ruler over the table. This way, you will quickly remove all the clay from the spot where your photographs will go.
The length of the support depends on the size of the photo to be placed.
Step 6: once the whole form has been completely finished, you must let it dry and start painting and coloring your picture frame. First, you must paint it white, let it dry and begin with the Pride decoration using some community flags.
Step 7: only one step is left: apply clay-resin to your piece to make it shiny and more resistant. And that’s it! You can now place your photos with your partner, your friends, at a Pride march, or with your family.
How to make a Pride jewelry box
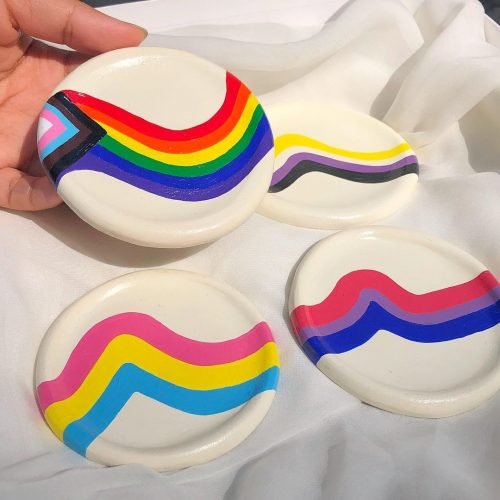
A jewelry box with LGBTQI+ flags to keep your rings, chains, and bracelets (essential for people who belong to the community) organized is perfect, isn’t it?
Jewelry is so meaningful for some people, and if you are among them, we recommend you make one of these jewelry boxes. This time we will make a new flag that embraces the whole community.
Although you can obviously decorate it with the one you most identify with: trans, lesbian, bisexual, pansexual, non-binary gender, asexual or intersex, for example.
Materials
- Polymer clay
- Roller
- Lance tip scalpel
- Barbotine
- Acrylic or oil paints
- Resin for clay
Step by step
Step 1: before making your jewelry box, take a piece of clay and knead it manually very well on your work table, which we recommend covering with plastic wrap, so you don’t damage it.
Step 2: once the clay is well-kneaded, lay it on the table and start rolling it with a roller. The point of this is to create the plate, the base of your jewelry box, from the clay plate you are making.
The plate can be about half a centimeter thick so that it will not be too heavy.
Step 3: now, take the lance tip scalpel and make a circle in the clay. We know it is difficult to make a perfect freehand circle, so we suggest using a mold such as a plate and cutting out flush with it.
Step 4: there are two easy ways to make the rim of your jewelry box, but one more than the other. You may either use the coiling technique, which involves making a strip of clay and sticking it to the edge of the base or fold the base edge up a bit.
If you choose the coiling technique, we recommend using your palms and rolling them back and forth from top to bottom and from the center to the outside for making the coil. This way, you can get the same thickness for the whole strip.
Otherwise, if you choose the easiest way, which is to raise or bend the edge of the base slightly, we recommend you make the base wider than you planned because by adjusting the edge, you will make the plate smaller.
Step 5: in case you have chosen the coiling technique, in order to glue it onto the base, you first have to make tiny cuts on the base edge and on the coil side that will be glued to the jewelry box. This is for it to adhere much better.
Then you have to apply barbotine to both pieces and join them together. For the union to not be noticed and for it to look like a single piece, you have to draw the clay from both the coil and the base until you don’t see they are two different parts.
Once the joining of the pieces and the jewelry box itself are finished, let it dry completely so you can continue with the next step.
Step 6: it’s time to paint! As with the picture frame, first you have to paint the whole piece white, let it dry and then decorate it with the flag that most identifies you.
Step 7: in order to make your jewelry box shiny, more resistant, and much easier to clean, apply clay resin.
And now, you have finished your jewelry box with Pride design to keep all your rings, chains, and bracelets organized.
How to make a mug with Pride design
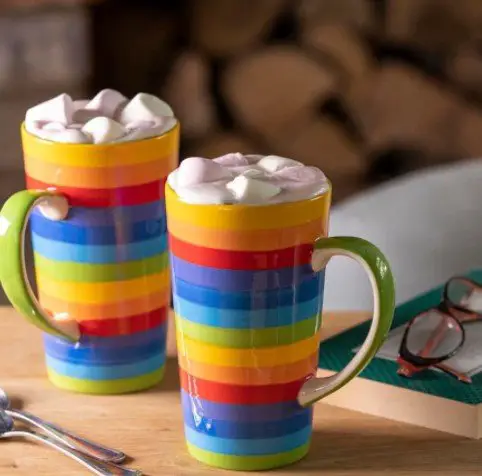
Picture yourself at a gathering with your friends or family and showing with every sip how proud you are to be who you are and to love the way you love. These beautiful mugs decorated with the LGBTQI+ flag are perfect for that.
If you like the stuff you use so often to be Pride designed, this would be a perfect choice.
Materials
- Clay
- Cutter
- Roller
- Barbotine
- Lance tip scalpel
- Ceramic kiln
- Ceramic glazes
Step by step
Since on this occasion, you will be using non-air-drying clay, which needs to be fired in a kiln, it will take a little more work, but don’t worry, the process is still pretty simple.
Step 1: first, slice a piece of clay from your home block with the cutter and then knead it very well. When this material is left with air bubbles and fired, the bubbles will burst in the kiln due to the heat, breaking your piece and therefore damaging all the pieces you have inside as well.
Step 2: as you will model your mug with the slab technique, you will have to follow the same process as for the previous pieces. Flatten the clay with a roller to create a plate or slab, as some may call it.
Step 3: with the scalpel, cut out a circle for the base of the cup and a rectangle for the walls. Depending on the circle diameter, adjust the size of the rectangle so it fits altogether when you place it on top of the base.
Step 4: Now that the walls and the base of the cup are ready, there is only one part missing: the ear or handle. To make it you have to cut a thick strip of clay and cut it in length to what you think is fair compared to the cup size. It has to look symmetrical.
Step 5: it’s time to join all the elements together, and to do so, first make tiny cuts on all the pieces that will be joining to each other, such as the edge of the circle, the base of the plate, both plates ends that will be joined together to form a cylinder, and the strip tips.
Step 6: as nothing joins by itself, you have to put barbotine in all the areas where you made the cuts. Note: barbotine is a water and clay mixture. Technically it is liquid clay and the ” glue ” to join pieces made of this material.
Step 7: for the joints to become unnoticeable, you need to do the same thing you do with the coiling technique, which involves pulling the clay from one side to the other to blend it until it looks like a single piece.
Step 8: as this is a liquid storing piece, you have to apply ceramic glazes to make it waterproof and more resistant. But for this, first, you have to send it to the kiln for a first firing. It needs two firings.
So, take your piece to the kiln for 2 to 3 hours between 800°C and 1,200°C depending on the type of clay you have chosen; some types resist low temperature and others high temperature.
Step 9: let it cool inside the kiln, then take it out and start applying the glazes in all the colors of the flag. Flood your cup with colors and express all the community’s diversity through it.
Step 10: send your piece for a second firing at the same temperature and time as the first round. After these hours, your LGBTQI+ mug will be ready to accompany you in every sip you take.
________________________________________________________________________
We are reaching the end of this blog full of colors and unique pieces in which we hope you have learned a lot about the world of ceramics, including modeling techniques, creation processes, and tools.
We close this blog by telling you that there is nothing nicer than diversity. If you can show this and symbolize the struggle, the love for love, and freedom through a simple ceramic piece like the ones we teach you how to make today, don’t think about it, do it! Express your love and your desire to live and love in freedom through the art of ceramics.

