
Translated by Nick R
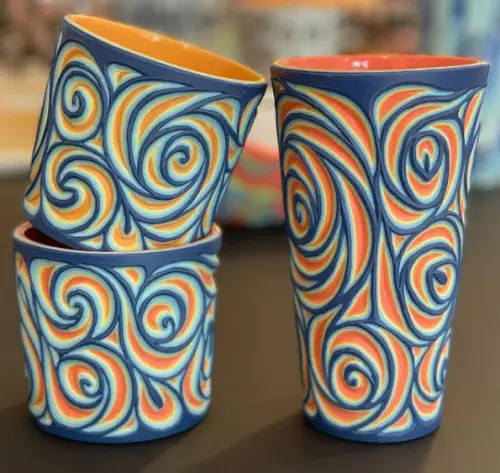
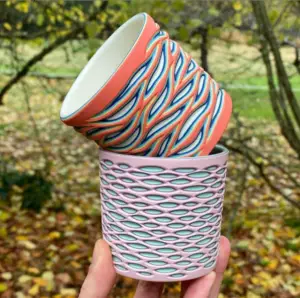
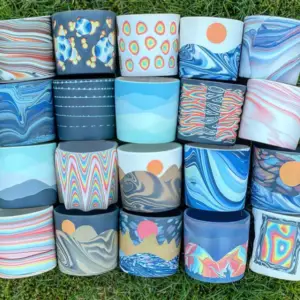
Have you ever seen online videos or photos of ceramic pieces like the ones in the image? No doubt you have thought: “That’s amazing! How do they do it?”. Well, we will show you the step by step for achieving these pretty hand-carved multicolor pieces.
The process is long and involves a lot of work, but, with patience, lots of dedication, and our help, you will surely be able to make them without any problem.
Table of Contents
Why these pieces?
One day, I found myself on Instagram looking at ceramic works, and I ran into a video that blew me away. It was so satisfying as they showed how each cut was made and gradually get to see different layers of colors.
Such awesome colors, the hand movements, and the designs created are the most striking thing about these pieces. And I am sure that, if you make them in your workshop for sale or as a gift in your home, you will steal people’s glances and receive lots of compliments.
If these pieces caught your attention as much as they did mine, let’s start learning how to make them!
What technique is used?
In the world of ceramics, there are 5 modeling techniques amongst which you can choose which one best fits your fine motor skills, your tools, and the type of piece to make. They are:
- Pinching technique
- Coil technique
- Slab technique
- Potter’s wheel modeling
- Casting modeling
In this case, none of the first 4 options work because we will make a layered piece, and only the casting technique works for that. Casting is really simple, but the thing is that you need a plaster or clay mold to use it.
Also, the mold must have the shape of the piece you will be making, i.e. a vase, a cup, a flower vase, etc., because the only thing you will have to do is pour clay or liquid porcelain and let it dry. You will not have to model anything with your own hands like in the other techniques; the mold will do all the modeling work instead.
Aspects you must consider for making these pieces
1. Have at hand all the tools and materials you will use to make your piece so as to make the process much easier and faster.
2. Thoroughly mix the liquid porcelain with the pigments or dyes for coloring the porcelain. For a homogeneous mixture, use a mixer or electric mixer; it is the most practical way to do so.
3. As you are obliged to use molds for the casting technique, use plaster molds, as they have a porous texture that aids the drying of the porcelain by absorbing the residual mixture. In addition, this avoids defects in the piece like bubbles.
4. When pouring a layer of porcelain of one color over the other, allow sufficient time for them to dry before the next one. When the porcelain layer is no longer liquid but a little compact, it will be time to pour another layer. This is done so that the colors do not mix.
5. As the idea is to carve fantastic designs on the porcelain with a ribbon tool, you must have a steady hand and make sharp movements to get neat designs.
6. Because ceramic glazes have the ability to make the porcelain pieces more resistant and waterproof, it would be perfect to apply them to your layered wares. If you plan to do so, use a glossy transparent glaze to protect it and make it shine.
However, if you want to change the internal or external color of your piece, it is fine to apply some other type of glaze that not only protects and brightens but also adds color.
How to make a hand-carved color layered porcelain mug.

Materials
You will be making a 5 layers mug, each of different colors, so the materials will be tailored to the piece. Among them, some will help you to create the porcelain mix so that it has the 5 colors and the others will be of great help during the whole process.
- Liquid porcelain
- Powdered pigments for liquid porcelain of 5 colors
- Dyes or coloring oxides in ceramic powder (optional)
- Electric mixer or stirrer
- 5 large buckets
- Plaster mold for cup
- Scrapers
- Ribbons
- Ceramic kiln
- Glossy transparent glaze
Step by step
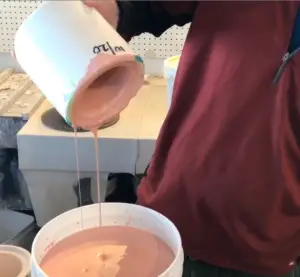
Step 1: The first thing you need to do is mix the liquid porcelain with the pigments and colorants in order to get unique colors for your piece. Then, pour the porcelain and some powdered pigments of the colors you wish into a large bucket.
You can apply pigments only. But, if you want to get other shades of that color, you need colorants.
It would help if you had an individual bucket for each color. Only add several colors in a single bucket if you are combining to have a determined shade or if you want to experiment and have odd colors.
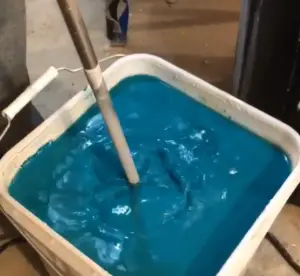
Step 2: Next, take the electric mixer or stirrer, put it inside the bucket, and turn it on to mix the ingredients uniformly.
If you do not have an electric mixer or stirrer, you may use a kitchen mixer. Although if you choose this option, use the mixer only for this purpose at your ceramic workshop and not for cooking.
Remember that it must be very well blended to make it completely liquid, without powder lumps, so keep the electric mixer moving. Move it up and down, along the edges of the bucket, and move it around hard so that everything gets perfect.
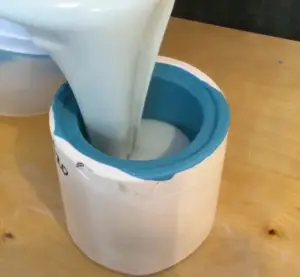
Step 3: Once your colored porcelains are ready, it’s time to start pouring. Place your plaster mold on a table and keep the 5 buckets of colored porcelains nearby.
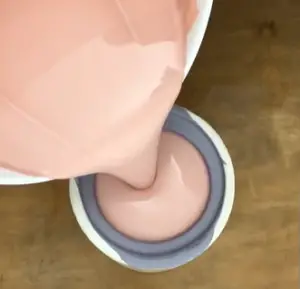
Step 4: Then take the mix of the first, which is the one you will see on the outside of the bowl, and pour it all the way into the mold. Don’t do it too fast or too slow to allow the porcelain to go into each pore of the plaster mold.
Step 5: Let the porcelain sit in the mold for 1 minute so that the mixture is well absorbed by the plaster pores.
Make sure that each layer is around 2 mm thick because if you make them thicker, as there are 5 layers, the piece will get too heavy.
Step 6: Now, you have to pour back the remaining liquid porcelain into the same bucket where the mix was first taken from.
Do it at an average speed so that the necessary mixture remains stuck to the mold and the cup is well-formed.
Step 7: Put the mold back on the table and wait a few minutes until the porcelain gets a little compact and the next layer of color can be applied.
Do this process every time you apply a new color. This decoration technique aims to make color layers instead of color combinations, which would happen if you add the layers without letting them dry a little bit.
Step 8: After this time, pour a new color and do the same procedure as with the previous layer. Let it stick to the mold for a minute, then pour the remaining porcelain into the bucket and let this layer harden a little.
Repeat this 5 times to obtain the five layers. Remember that the last layer will be visible from the inside of the mug; therefore, pay attention to the order of the colors so you will be happy with the result.
Step 9: Wait a few minutes until the piece is a little hard to remove it from the mold and start decorating.
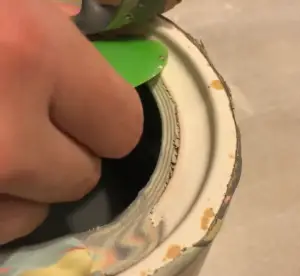
Step 10: Before removing the cup from the mold, clean the porcelain that remains outside the mold; you can do this with a scraper. To achieve a straight opening, you must scrape the rim firmly and deeply.
Step 11: In order to unmold the cup, depending on its shape, you need to put it upside down on your hand and push it up and down a little so that the cup comes out easily in your hand.
If you have a two-piece mold held together with an elastic band, simply remove the band and pull both parts of the mold to free the cup on the table.
Step 12: Now that the mug is in the ideal state to be modified, that is, leather hard (it has lost some of its humidity), you can hold it in your hand or place it on a table with your other hand, hold the ribbon tool used for the design.
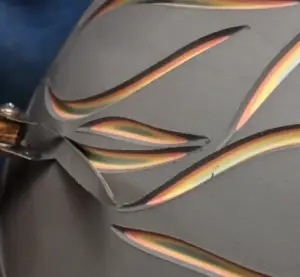
Step 13: For the design in the picture, you need a pointed ribbon. You have to plunge the ribbon tool a little to start with the wave and apply more force little by little, and then you will complete it in the same way you started it, with little force.
As you apply more strength, you will pass to the next layer of the piece which is why you need to pay attention to the layer you are working on so that you never touch the last color. That layer is the one that will resist the beverage drank from the mug.
If you see that the wave is not fluid since you are still learning, you can perfect it with the same ribbon. Don’t worry if it takes you time to make good designs, because, with practice, it will be really simple.
Step 14: Carve that same wave all over the mug. You decide in which position you place each one. For instance, you can arrange them in rows, placing the next one in the middle of two waves of the previous row, placing them in disorder, or forming a flower. Here you can test your creativity.
It is possible that the inner layer turns out to be almost translucent if you have removed many layers and left only the last one. But don’t worry, that doesn’t mean it will break, as it is thick enough not to crack, so liquids won’t drip through it.
This is an example of how you could make an amazing design with a pourer.
Step 15: Now, take your mug to the kiln at a temperature of about 1,400°C (2,500°F) for 3 to 4 hours.
Step 16: Let it cool down, and then apply the glossy transparent glaze using any of the glazing techniques. Remember that it has to be a high-temperature glaze because porcelain is also high-temperature.
Step 17: To finish and have a piece as neat as the one below, take it back to the kiln at the same temperature and for the same time. And that’s it! You now have a unique mug to sell or give as a gift.
Workshops specializing in this technique
The workshop that I found on Instagram, and gave me the motivation to make this blog and share with you this innovative idea of ceramic pieces is Forest Ceramic, which takes inspiration from nature’s patterns and structures.
Forest Ceramic is located on Orcas Island in Washington, USA, and has an Instagram account @forestceramicco with 400,000 followers who love all of the art they make with just a little piece of porcelain.
Forest Ceramic, besides making layered carved porcelain, has other types of pieces that are very striking due to their decoration. They do not paint the ceramics’ designs; everything is made from porcelain, using different techniques.
We have reached the end of this blog, and we hope you have learned a new technique to make your hand-carved multicolored pieces. I know you will steal all the looks and receive lots of compliments from your friends, family, and clients. If you liked this technique, make sure to explore it with different colors and designs. And don’t forget to have fun in the process!

