Did you think that all ceramic pieces are made only on the potter’s wheel?
In addition to the potter’s wheel, there are 4 other modeling techniques, 3 of which are very simple and require only your hands and no other tools.
In this blog, we are going to give you a quick summary of these 4 techniques so you know how each one works.
Table of Contents
Ceramic modeling techniques
The 4 techniques that we are going to explain to you are a lot of fun and the best thing is that everyone can use them to create wonderful pieces in ceramics, from beginners and children to professional potters who make some of their pieces this way produce.
For 3 of them, you only need your hands, clay, and a little water. It’s really great to have a place to relax and unwind while kneading clay and putting all worries aside.
You will learn the following techniques:
- Coiling
- Slab
- Pinching
- Casting
Coiling for pottery work
With this technique, you form cylinders with your hands, resp. Clay sausages and then stack them to get the shape you want.
Also, with the churros technique, you can make many types of items for your kitchen, living room, or any part of your home, such as B. cups, bowls, and vases.
Slab for ceramics
The slabbing technique is known as one of the simplest techniques, as it is based on making squares, rectangles, or circles out of clay, which almost always forms the walls of the objects.
It is mainly used to make plates and cups. Pieces that don’t require much shaping.
Pinching for ceramics
The clay is formed into a shape by the pressure of your hands and fingers. The clay is pressed into the desired shape.
Casting for ceramics
This is the only one of the 4 techniques in which you not only need your hands, but also a mold into which you pour slip, i.e. liquid clay.
The only thing you have to do in this case is pour the slip into the mold. After a bit, you can remove the mold, let the piece dry and process it further.
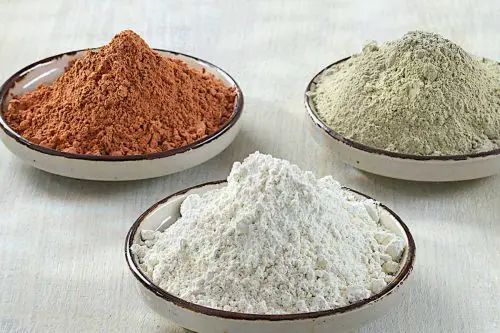
Types of clay you can use
There are many types of clay that can be used to make different pieces based on their components. Here are some options:
- Red Clay
- Cold Porcelain
- Polymer clay
- Homemade Clay
- Earthenware clay
- Stoneware clay
Red Clay
This is the most famous clay in the world of ceramics. Its distinctive red color is due to the high iron content in its compounds.
It is used by both beginners and experts such as professional potters. It is primarily used to make items that are exposed to the elements, such as B. garden pots, tiles, and roof tiles.
Cold Porcelain
This is one of the easiest materials to use. It can even be crafted using very ordinary materials found in the kitchen.
With cold porcelain, you can easily make figures such as keychains, rings, dolls, and flowers. Because the pieces are fragile when the porcelain cools, it is not ideal for making utilitarian items such as crockery.
Polymer clay
This type of clay can be purchased at a craft store or online store like Amazon, just like cold porcelain, but you can also make it at home with simple tools.
To make polymer clay at home, all you need is liquid glue, vinegar or lemon, cornmeal, and mineral oil.
As with cold porcelain, you can make decorative items for your home or as gifts and items such as pots. However, it is most commonly used for smaller, simpler items.
Homemade Clay
As the name suggests, homemade dough can only be made by yourself. You won’t find it in any store because it’s made from very simple and readily available materials like baking soda, cornmeal, and water.
Small and decorative items are the best known from this type of clay, which while a bit more resilient than cold porcelain, is still a little too fragile to make large items.
Stoneware clay
This clay consists of a mixture of sand, minerals, and other muds.
It is a non-porous and opaque clay, meaning it has no holes, making it perfect for use on dishes and other household items such as pots and pans.
Earthenware clay
Earthenware clay is the oldest and most common type of clay in the world. Soft, porous ceramics with bright colors are created from this clay.
It’s one of the cheapest clays on the market, but that doesn’t mean it’s bad. On the contrary, earthenware clay is very good and easy to work with, as it is the most porous and plastic of all clays.
This means it can hold liquids despite not carrying a lot of weight. Because of this, you can use this clay to make many items for your home, such as: B. Decoration and objects for your kitchen.
Earthenware is the cheaper alternative to porcelain, the highest quality and most expensive variety used for the most valuable tableware on the market.
Crafts pieces without using a potter’s wheel
The following will show you how to make different pieces using different techniques.
Picture Frame
One of the most common household items is the picture frame. A handmade picture frame is the perfect gift.
Then we make the picture frame using the ironing technique and cold porcelain.
- The first step is to choose the photo that you want to put in your picture frame. This way you know the exact dimensions. Remember that the perimeter of the inner part of the frame is the size of the photo and the frame can be 2 or 3 cm thick to make it look nice.
- With the determined dimensions, you can now cut out a rectangle or a square from the cold porcelain in the color of your choice, which forms the outer edge of the frame. The depth of the frame can be 1.5cm or 2cm to make it not so heavy. Remember to knead the porcelain very well to make it easier to work with.
- Now cut out the middle in the size of the photo you want to put in your picture frame and the frame is ready.
- The small piece of cold porcelain you removed will be used to make the back of the frame, the part that will hold your photo. Since it has the same thickness as the frame, you can thin the small rectangle, i.e. cut it in half crosswise, so that it is not so thick and fits well into the frame from behind afterward. If this is too complicated for you, you can create a new template for the size of the photo and the thickness you want.
- For the base, cut a strip of porcelain that is 10 cm wide, 5 cm high, and 5 mm thick.
- Then, using the horizontal strip as you cut it and as you see it in the picture, mark with a dot from top to bottom 1.5 cm on both ends of the rectangle, i.e. on the left and right side.
- From the left to the right mark with a dot 4 cm on the horizontal part at the top and 3 cm at the bottom, which will then be the straight side of the strap.
- Now you need to connect the dots as follows: the 1.5 cm on the left with the 4 cm on the top and the 1.5 cm on the right. And the purl 1.5 cm stitch with the 3 cm stitch at the bottom. It should look like the following image. With 3 diagonal lines and 2 straight lines representing the original edges of the strip, i.e. the right side and the bottom.
- Now it’s time to cut out the three marked lines to complete the picture frame.
- To attach the backing to the back of the frame you will need to make a 3cm x 3cm porcelain square and glue one half to the backing and the other half to the frame. The square is folded into a U-shape. You can accurately measure the place where you want to attach the support before attaching it to avoid mistakes such as B. that the support is not properly upright or that the support can be seen when looking at the frame from the front.
- As the last step and to create a unique picture frame, you can make small figures and stick them on the frame.

Soap dish
Every household has soap dishes, a very common and unassuming item.
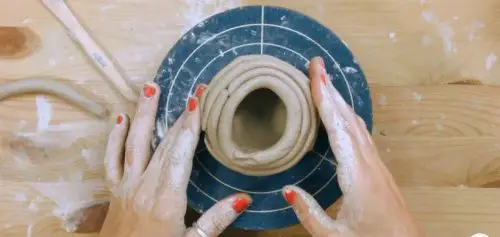
To make the soap dish use the churros technique and earthenware clay.
- The first thing you need to do is make the base in the shape of a square. From this base, you start to shape the whole shape with the coils.
- To shape the coils, you need to take a piece of clay and move it back and forth on a table with the palm of your hand.
It’s a very simple technique, but there are a few things to keep in mind:- Always make the movement with the palm of your hand and not your fingers so that the coil has an even shape.
- The movement should not only be forward and backward but also outward from the center to stretch the clay.
- After making several coils, you can stack them one on top of the other. Because it’s such a small and thin piece, you won’t need as many sausages. Since the walls extend outward diagonally, you should place each layer of churros on top of the outer edge of the previous layer to create the shape you want.
- Every time you put a new churro on top of another, you can use your finger to push them together so that the connection is no longer visible. This should be done bottom-up first, then top-down, as if you were dragging the clay. You need to smooth the walls very well to make it look perfect.
- Make the holes for the water outlet exactly in the middle.
- Place your piece in the oven at 1,200ºC for 2 to 3 hours and then decorate as you wish so it can decorate your bathroom.
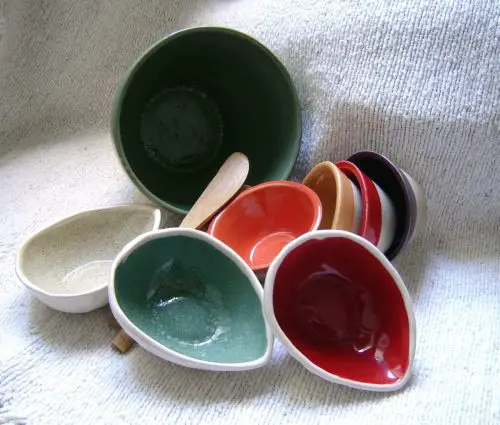
Gravy boat
We will use the pinching technique for the gravy boat, which is one of the simplest techniques. Also, the clay you will be using is earthenware clay, which is perfect for this purpose.
- The first thing you need to do is make a very well-kneaded ball of clay.
- Hold the ball in one hand and press the center with your thumb to form a shallow hole for the gravy boat to form. The hole should be about 1.5 cm deep.
- Push the clay outwards from the center to make the hole bigger and bigger.
- To achieve the shape of the gravy boat you have to turn it on your hand while pushing from the bottom to the mouth so that all the walls get the same height and thickness. The piece should not be completely round but should have a point on one side for pouring out the sauce. So don’t forget to create this lace.
- To make sure both the bottom and the mouth of the gravy boat are straight, you can place the gravy boat on a table, flatten the bottom and check that the mouth (tip) is completely straight.
- Now that your gravy boat is a perfect shape and the walls are smooth you can pop it in the oven at 1000C for 2-3 hours as the piece is small.