
Translated by Nick R
Have you ever had kitchen accessories but in ceramic? Yes, they do exist. Besides the regular ceramic objects such as pots, plates, and cups, there are other great items that, as well as being really useful, turn out to be a great decoration. Do you have any idea what they are?
The articles that, step by step, we will teach you how to make for your kitchen are a grater, an orange juicer, and a strainer.
The ease of clay to break the molds is amusing, isn’t it? Although it is hard to believe, even these pieces can be made of ceramic. Throughout this blog, you will learn how to make them all.
Table of Contents
Replacing plastic with ceramic
There is something fascinating about choosing ceramic over plastic. As you may know, most of these kitchen items are made of one of the most polluting materials: plastic. Therefore, replacing it with an environmentally friendly material such as ceramic could be of great help to the planet.
It can indeed be more expensive because of the material and the value of the craftsmen’s labor, yet if you want to help the planet, you can take small steps like this one. Also, remember that you can make them with your own hands, there is no need to buy them.
All 3 objects can be made with entirely manual modeling techniques, in case you don’t have a potter’s wheel. However, it’s up to you to make them this way if you have a lathe.
For making the grater and the strainer, you will use two of the three manual existing techniques. Meanwhile, you will learn how to make the orange squeezer on the potter’s wheel so that you can explore the modeling techniques of ceramics.
Now that you know this: let’s stop stalling and start creating!
How to make a ceramic grater
The first thing you need to know is that the grater you will make has not the typical triangle shape (exactly a quadrangular pyramid) that you know, but it is a small or large platter, depending on how big you want it. You can grate garlic, pieces of apples, onions, and more similar foods.
Apart from being a handy tool for the kitchen, we assure you that, as for decoration, it will be a magnificent feature on your shelves or countertop because of its beautiful looks.
Materials
As you can see, it’s not a very complex piece, so you won’t need many materials.
- Clay
- Some water
- Sponge
- Small tip drill
Step by step
Before starting, be aware that you will make your grater plate using the pinching technique, one of the 3 easiest techniques to practice manual modeling.
Step 1: first, take a lump of clay from the block in your home or workshop. Then you have to knead it until it gets smooth and easy to handle.
Step 2: then, within your hands or on a table, form a ball of clay. The size of the ball will determine the size of the plate: keep it in mind.
Step 3: with your thumb, make a hole in the center of the clay ball while holding it in your other hand. This is the first step for the plate.
Be cautious. It should not be too deep because a sufficient thickness has to be left at the plate’s base where the teeth of the grater will be placed.
Step 4: now, wet your hands a little and start pinching or pressing the clay outwards from the hole. You will make the plate wider with every pinch you make. You can press it over your hand so it gets easier.
As it is a plate, ensure that the walls are not too high and that the base is large and flat.
Step 5: to verify that the plate is totally flat, place it on a table and check that it is straight. If you notice a light between the table and the plate or that it looks gimpy, gently press it down on the table until the base is flat.
Here you can also check to see if the top of the plate is straight so that you can start making the teeth of the grater.
To perfect the walls and base of the plate, you can use a damp sponge and gently wipe it all over. This way, there will be no bumps or surface imperfections.
Step 6: now, for the teeth, the principal part of this piece, you will take the drill and check on a small chunk of clay whether that is the ideal drill tip size or if you need a bigger or smaller one.
The way to make them is to gently place the drill on the clay to remove a little bit of clay and then lift it to check if it is well done.
If you find that size is fine, that’s perfect; you can start making the plate’s teeth. Remember to keep a narrow space between each perforation to shape the teeth.
Step 7: make a spiral while making each one of the teeth. This will make it much easier to grate the garlic, onion, or whatever you need.
Step 8: once you have perfected your dish with a sponge and made the tooth spiral with the perforator, take the piece to the kiln for 3 to 4 hours between 850°C and 1,200°C. This depends on the type of clay you have used, whether it has a low or high temperature.
Step 9: in case you want to decorate your piece as in the picture above, you will have to apply ceramic glazes and send it back to the kiln for a second firing.
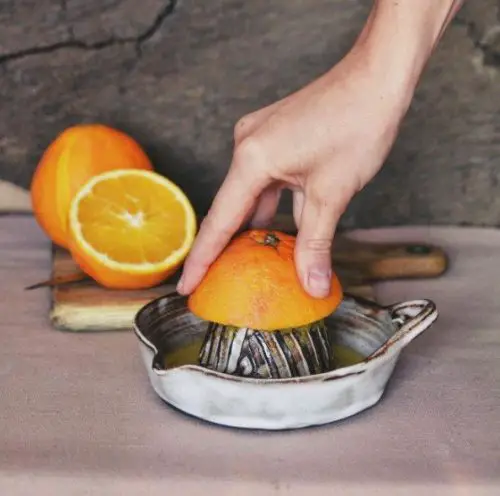
How to make a Ceramic Orange Juicer
This is another example of a handy object in our kitchen that we could replace with a nice piece of ceramic that, besides being pretty, is very easy to use.
Without a doubt, ceramic orange or lemon squeezers are much better than plastic ones. In my own experience, they are easier to clean, use, and last much longer. Besides, it is not a tool you will want to hide; instead, you ought to display its beauty.
We will show you how to make a juicer that does not need an extra piece to collect the juice. But if you want to make one with the container, you can drill tiny holes on the upper piece and make the glass.
Materials
This piece takes a little more work, yet you will need practically the same materials, nothing fancy. They are all things you have in your workshop or at home, so you don’t have to worry that much.
- Clay
- Potter’s wheel
- Sponge
- Scraper
Step by step
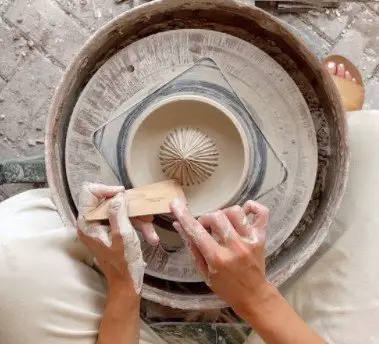
You will make this gorgeous squeezer using a potter’s wheel, so are you ready? Let’s get started!
Step 1: first, take a large lump of clay and knead it well either on the potter’s wheel or on your work table.
Remember to do this no matter what piece you are making because water or air bubbles in the clay will explode in the kiln when firing the piece.
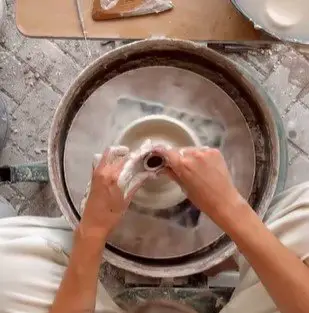
Step 2: now you start the lathe, wet your hands a little, and begin to shape the clay into a cylinder, not very high. From this cylinder, you form the whole squeezer, thus, from there, calculate how big or small it will be.
You should know that most of the time, if not always, you will need to make a cylinder first for any piece you come up with.
Step 3: now lay the wet sponge on the upper edge of the cylinder and start dragging clay inwards; into the center. You must keep a few millimeters of the rim from where you start pulling the clay because that will be the edge of the plate, or for you to better understand, the walls that will hold the orange juice.
By doing this, you will start forming the most important part of the juicer: the triangle. Plus, in the process, you are making the dish deep enough to store the juice without spilling over.
Step 4: as you pull the clay into the center, it should begin to form a cylinder or clay mound again, right? Well, from that pile of clay, you will form the juicer triangle.
The first thing you have to do with this clay mound is slowly widen the cylinder by putting your index and middle fingers in the center of the cylinder and pulling the clay upwards with your thumb.
When reaching the desired height and width of what will be the squeezer, while the lathe turns, press with a little force from the bottom of the cylinder to the tip to close it and form the triangle, as you see in the picture.
As you move up you have to press harder to make it wide at the bottom and thin at the top.
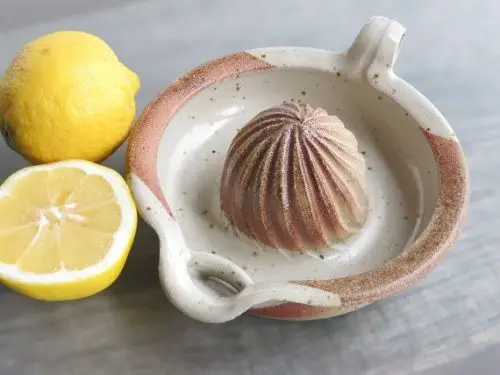
Step 5: now, use a scraper or any pointed object to make the squeezer rows. You can make them straight or slightly curved as in the example above: it’s up to you.
You only need to draw the lines from bottom to top so you are able to remove the released clay easily. Allow a few millimeters between each line so that the squeezer works much better.
It should look like the picture below. That is a great example.
Step 6: make the spout of the juicer with a finger. It will look much more natural if you do it this way.
You place the tip of your finger inside the dish on the rim and gently drop it over the rim wall so the clay falls down and forms the spout. For it to be well-shaped, moisten your finger a little and run it repeatedly over the spot where you placed your finger before.
Step 7: as a last step of the modeling process, depending on whether you like it or not, you will mold the juicer handle. You can make it from a flat strip of clay. Make the strip, apply some barbotine on both ends and press it on the rim and the bottom of the juicer’s plate.
In order to keep the union unnoticeable, with your fingers lightly wet, drag the clay of the strip so that it joins with the plates and, therefore, they look like a single piece.
Step 8: put your juicer in the kiln for 3 to 4 hours between 850°C and 1,200°C. If you want to decorate it with glazes, use one of the glazing techniques and put it back in the kiln for the same time and at the same temperature.
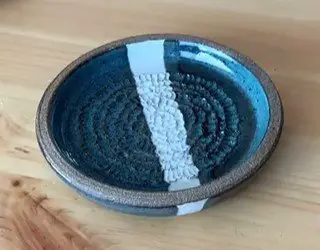
How to make a ceramic strainer
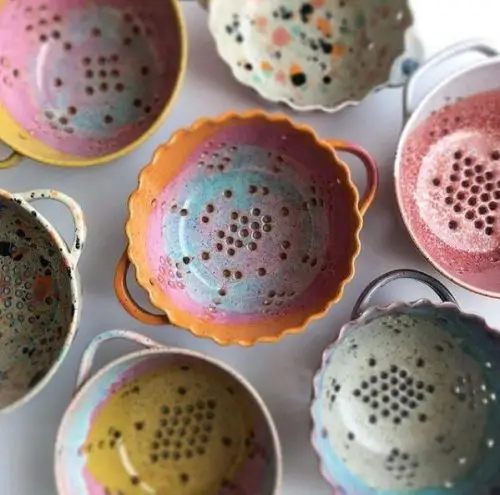
We know you use the strainer a lot when cooking, so we would like to ask you: if your passion is cooking and you use strainers so much, why not have a beautiful strainer in such fantastic material as ceramic?
This is a handy tool that apart from being a strainer, can have many other uses. It can be a bowl for your fruits or as you see below, a decorative article thanks to its colors and shapes.
Materials
You will use exactly the same materials that you used for the grater, perfect, right?
- Clay
- Some water
- Sponge
- Perforator
Step by step
In making your ceramic strainer, you will employ the coiling technique, the other manual modeling technique we mentioned before.
Step 1: as you must be guessing, the first thing to do is knead the clay on your work table with some water.
Step 2: then, you take a chunk of this clay and make a circle that will become the base of the strainer and from where you will lay the coils to form the strainer’s walls.
Step 3: now, to make the coils, place a piece of clay on the table and start pushing it back and forth with your palms, and from the center outwards to stretch the clay.
Then you determine the length of the clay coils. Some may be long, and others a little shorter for the base.
Step 4: to start shaping the colander, place the shorter coils along the base edge you made at the beginning, and place one on top of the other. As for joining them, you need to moisten your fingers and drag the clay up and down, so you won’t notice the joint.
As the colander is not straight but expands more as it rises, you have to place the coils not exactly one on top of the other but on the edge of the previous one. That way, its shape turns outwards.
Step 5: when you have finished making the colander shape, you have to perfect the piece by joining the coils so for the walls to be smooth both inside and outside. You can do this with your fingers alone or a sponge, or a scraper.
Step 6: for making the colander holes (through which the liquids will pass), you must wait until the clay is in leather hardness, which means until it has partially lost its humidity.
So that you know that the clay is leathery, you will have to touch it and feel it is a little bit hard. However, you will be able to tell just by looking at it, as its color will have changed.
Step 7: now, take the perforator, flip the sifter over and start making the holes on the bottom. You can either make them in straight lines or at random all over the piece, that depends on what design you want to make in your creation.
Step 8: place the colander in the ceramic kiln at between 850°C and 1,200°C for 3 to 4 hours for the first firing (and the only one if you do not want to glaze it). If you want it to turn out as beautiful as those in the reference image, do it. Do not hesitate; it is not that difficult!
You can experiment with different colors and kinds of glazes, as long as they all are suitable for high or low temperatures according to the type of clay you use. You better not mix them because you will not get a good outcome.
So we have reached the end of this amazing blog in which we show 3 practical items for your kitchen. We hope you can make your pieces with easiness and use them in the best way.
If you couldn’t decide to make them with your own hands, we hope to have helped with some great options that you can even buy. Yet, all these pieces are not exactly so easy to get because they are not very common. So if you know a business that makes ceramics, don’t hesitate to ask them to make one of these great pieces for you.

